Magento is a powerful eCommerce platform that can be used to create and manage online stores of all sizes. It is written in PHP and is open source, meaning it is free to use and customize.
Installing Magento can be a bit of a challenge, but it is worth it in the end. In this guide, we will provide you with a step-by-step guide on how to install Magento 2 for beginners.
So, what are you waiting for? How to install Magento for free? Let’s get started!
Step 1: Set Up Your Server – How To Install Magento 2
Before doing the Magento installation, you will need to find a web server to host it on. This means signing up for a web hosting plan and purchasing space on a web server.

Once you have a web hosting plan, you can upload the Magento software to your server and begin the installation process.
If you are looking for a web hosting provider that offers automatic Magento installation, we recommend SiteGround.
SiteGround is a great choice for Magento sites because it makes the installation process quick and easy.
You can still install Magento manually if you want, but SiteGround gives you the option to do it with just a few clicks.
Step 2: Install Magento 2
So how to set up Magento 2? Magento installation requires downloading the Magento software to your local computer from the download page, which offers three options: Composer, Git, and Archive.
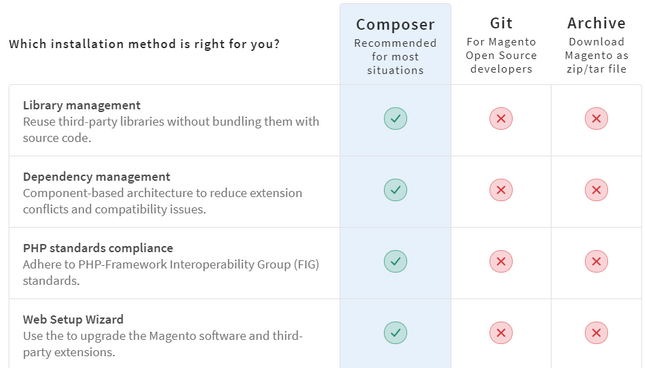
Magento can be installed by downloading the Archive version, which is a compressed file that contains the Magento software. This is the easiest way to install Magento, especially for beginners. We will discuss how to install Magento 2 Composer in the next blog.
You can choose to download the file in either ZIP or TAR format. Once you have the file downloaded, you can run Magento on a local server (your computer) or upload it to a remote server (provided by your hosting provider) later on.
Magento Archive Download with Sample Data
Magento offers sample data that you can include with your archive download. You can use this data for free, and it will help you master Magento quickly.
It provides you with a pre-populated storefront with example products, so you can see what a real Magento store looks like.
Sample data gives you a template storefront with around 250 products in different categories.
This is a great way to see what a Magento store filled with products looks like and to test performance and scalability.
Step 3: Make a New MySQL Database and User for Magento 2 Hosting
Creating a new MySQL database and user for Magento is a necessary step in the Magento 2 install process.
This tutorial will use SiteGround as an example, but the steps are similar for most hosting services.
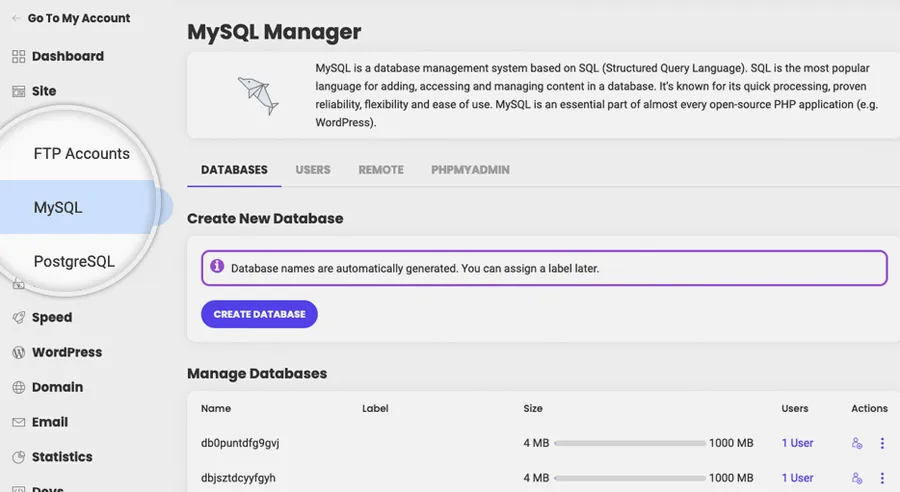
To begin, sign in to the control panel of your SiteGround hosting account and go to Site Tools > Site > MySQL
Click the Create Database button in the Databases tab. SiteGround will automatically generate a database name for you.
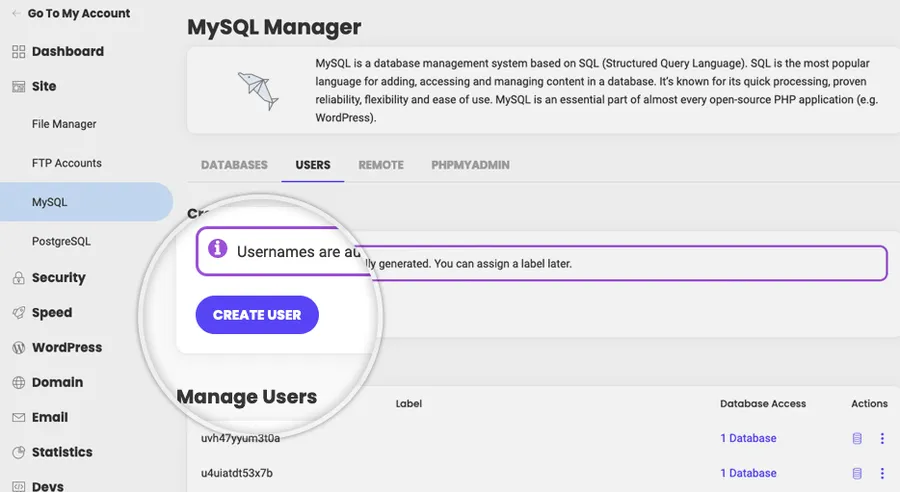
Next, navigate to the Users tab and click the Create User button. SiteGround will also automatically generate a username and password for you.
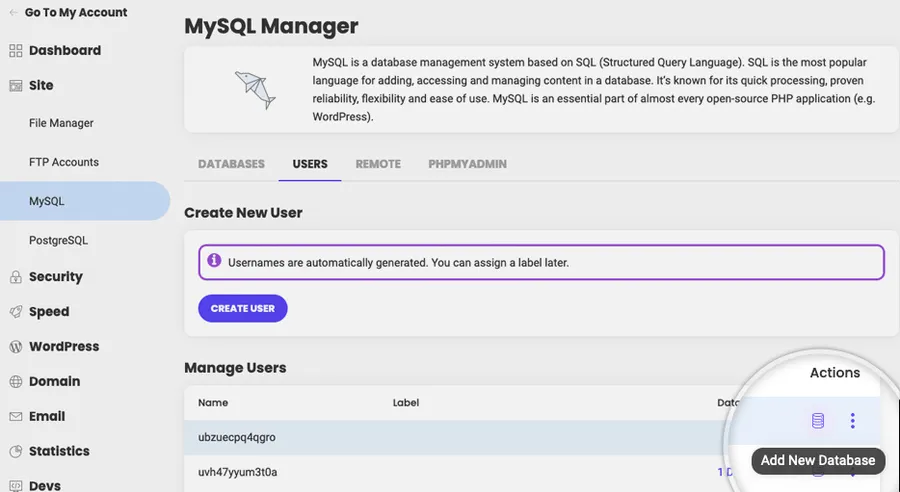
Finally, to allow the user to manage the new database, click the Add New Database button beside the new username and select All Privileges from the drop-down menu. Click Confirm to save your changes.
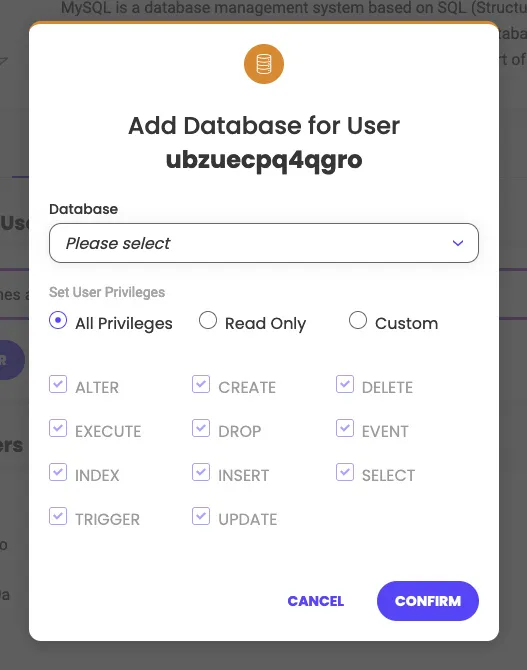
Once you have completed these steps, your new database and user will be ready to use Magento.
Step 4: Upload and Unpack Magento
Upload Magento
You can use either the File Manager section of your control panel or a file transfer protocol (FTP) client to upload Magento to the server connected to your hosting account.
The File Manager option is easier and more time-saving, so we’ll use that in this guide.
In the File Manager section, select the root folder of your website. This is usually the public_html folder that you’ll see on the screen for SiteGround users.
After that, select the Upload button and choose the folder of files you downloaded from Magento in step two.
Unpack Magento
After uploading the Magento folder, you’ll have to pull the files from it into your website’s directory (this is all done in the File Manager).
To do this, just right-click the folder and select Extract.
Step 5: Set Up Magento
It’s time to start installing Magento now because all the files are in place. So how to set up Magento 2?
To begin the Magento installation process, open a web browser and type your domain name in the URL bar. Click Agree and Set Up Magento to get started.
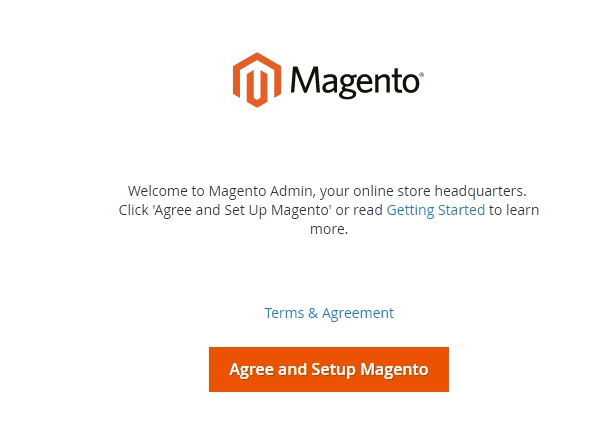
To prepare for installation, the Magento installer will walk you through five steps:
- Readiness check
- Add a database
- Web configuration
- Configuration your Magento store
- Create an admin user in Magento
We’ll provide more detailed instructions for each step below on how to install Magento 2, but the Magento installer app will guide you through the entire process. Just input the required information and click Next.
Readiness Check
This is a step in the Magento installation process that verifies that your server meets the minimum requirements to run Magento. To perform a readiness check, simply click the Start Readiness Check button in the Magento installer.
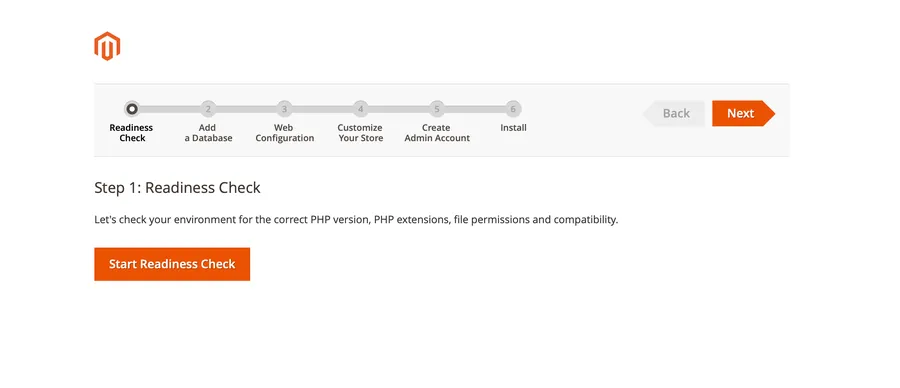
The readiness check will check the following:
- PHP version: Magento requires PHP version 7.4 or higher.
- PHP settings: Magento requires certain PHP settings to be enabled or configured correctly.
- PHP extensions: Magento requires certain PHP extensions to be installed and enabled.
- File permissions: Magento requires certain file permissions to be set correctly.
If the readiness check passes, you will be able to continue with the Magento installation. If the readiness check fails, you will need to resolve any issues before continuing.
Add a Database
In this step of the blog on how to install Magento 2, you will need to connect Magento to the database that you created in step three. To do this, you will need to provide Magento with the following information:
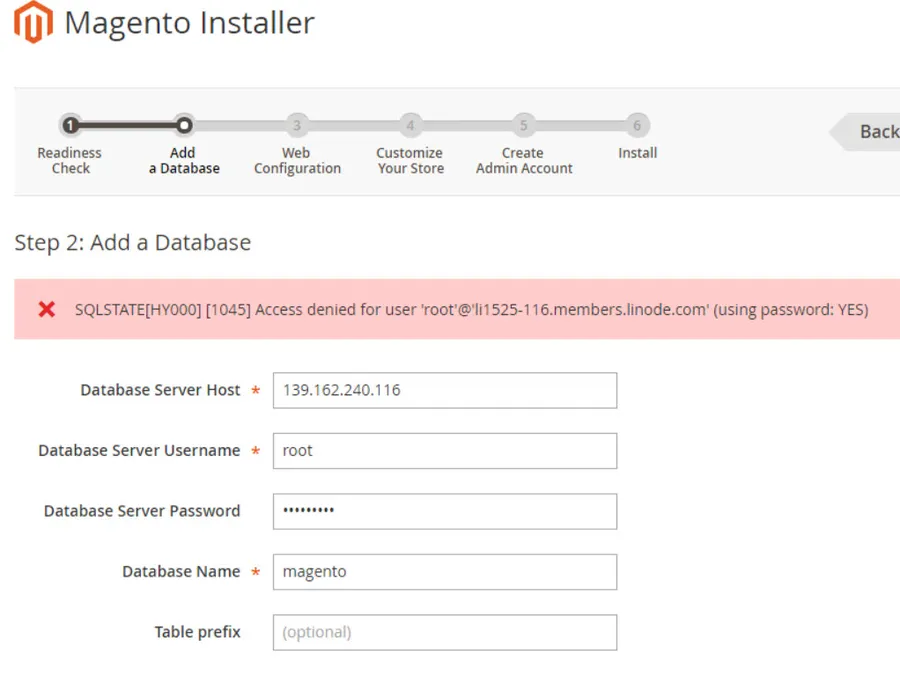
- Database name: The name of the database that you created in step three.
- Database username: The username for the database user that you created in step three.
- Database password: The password for the database user that you created in step three.
Once you have provided this information, Magento will be able to connect to the database and start the installation process.
Web Configuration
When setting up Magento, you will need to configure the webserver to serve the Magento application. This includes editing your store and admin addresses, as well as your encryption key.
To edit your store and admin addresses, go to the Web Configuration section of the Magento Setup Wizard.
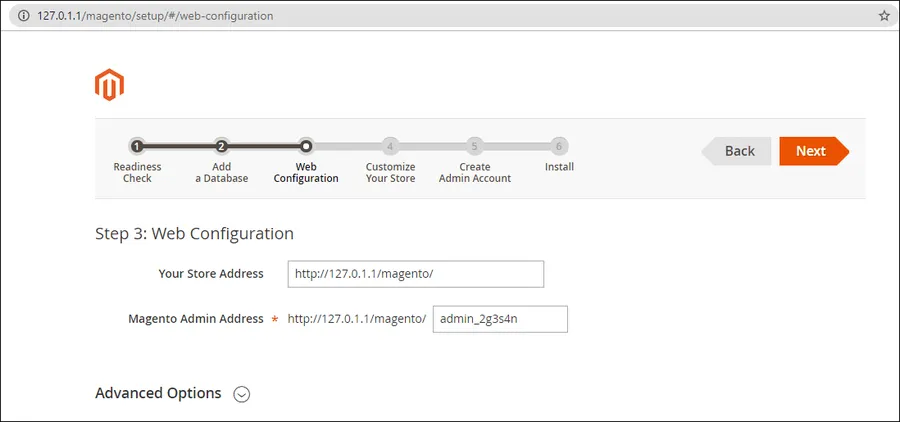
Your store address is the URL that customers will use to access your store, and your admin address is the URL that you will use to log in to the Magento Admin panel.
You can leave the store address as it is or change it to match your domain name.
However, you should change the admin address to something unique and challenging to guess to prevent unauthorized access.
To change your encryption key, click on Advanced Options in the Web Configuration section. You can either use the Magento-generated key or enter your custom key.
The encryption key is used to protect sensitive data in your database, such as credit card information, payment gateway credentials, and CAPTCHA values.
Magento does not encrypt other data, such as usernames, passwords, addresses, and phone numbers. It is important to keep your encryption key safe and secure and to avoid changing it after installation.
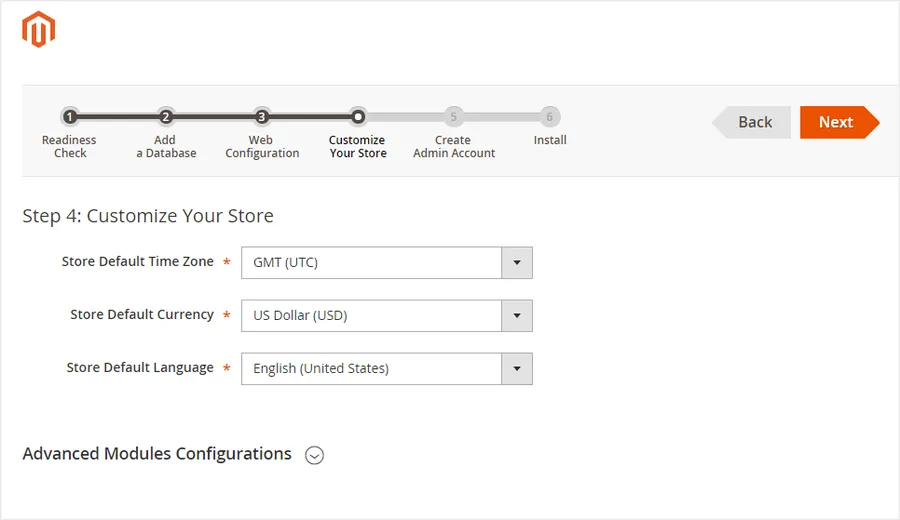
Customize Your Magento Store
This is where you can configure the store’s default timezones, default language, and currency. You can also change these settings later from the Magento admin panel.
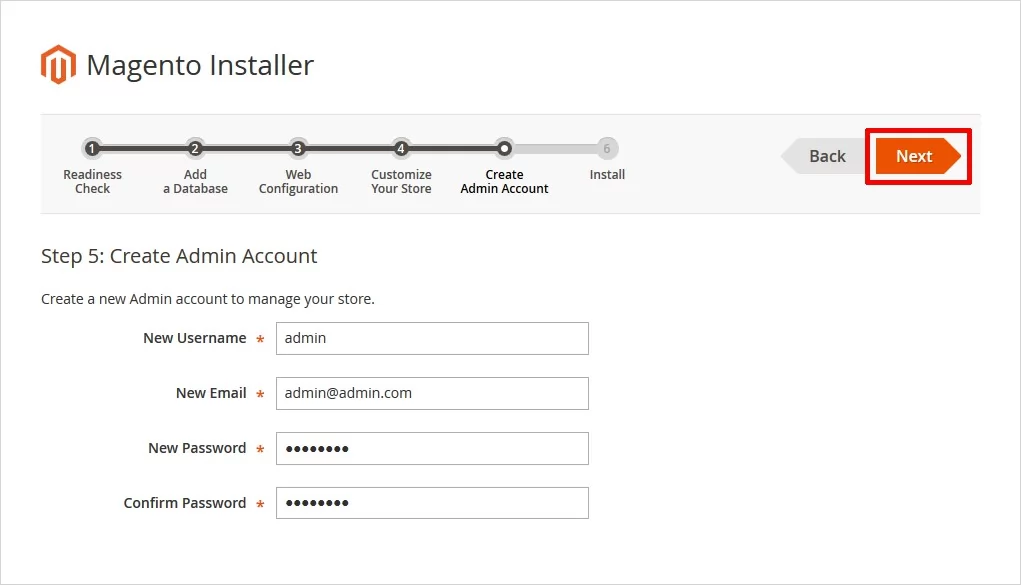
Create Admin Account
It’s the simplest step in the blog on how to install Magento 2. You just need to fill in some admin account information, such as username, email, and password to create an admin account for your Magento store.
Step 6: Install and Finish
Now it’s time to click Install Now and let Magento do its magic. The installation won’t take long.
Once it’s finished, you’ll see a summary page with all the details. At the end of the page, click Launch Magento Admin to start managing your store.

Final Thoughts
Installing Magento manually can be a bit time-consuming, but it is definitely doable. If you are comfortable with the technical aspects of setting up a web server and database, then manual installation is a good option. However, if you are looking for a faster and easier way to install Magento, then SiteGround’s automatic Magento installation is a great choice.
In addition, we will include some helpful articles that you can read to learn more about Magento and how to use it effectively.
- How to Choose the Best Magento Hosting Provider for Your Needs: Top 7 Recommendations
- Magento 1 vs Magento 2: What Are The Key Differences?
- 8+ Must-Have Magento 2 Extensions for Success
Contact US | ThimPress:
Website: https://thimpress.com/
Fanpage: https://www.facebook.com/ThimPress
YouTube: https://www.youtube.com/c/ThimPressDesign
Twitter (X): https://x.com/thimpress_com


