Robots.txt is a simple text file that tells search engine crawlers which pages on your website they are allowed to crawl and index.
It can be a powerful tool for managing how search engines crawl and index your website, but it’s important to use it sparingly and to test it carefully before deploying it.
This blog post is a simple guide for WordPress and Shopify users on how to use robots.txt. We will cover the following topics:
- What is Robots.txt? And how does it work?
- Why use Robots.txt?
- Best practices for using robots.txt
- Robots.txt templates and examples
- How to edit your robots.txt file in WordPress and Shopify
If you are new to robots.txt or if you just want to learn more about how to use it effectively, this blog post is for you.
What is Robots.txt?
Robots.txt is a text file that tells web crawlers, such as Googlebot and Bingbot, which pages on your website they are allowed to crawl and index.
It is a simple text file that is typically located at the root of your website (e.g., https://example.com/robots.txt).
Robots.txt files use a simple syntax to specify which pages and directories crawlers are allowed to access.
The most common directive is Disallow, which tells crawlers not to crawl a specific page or directory.
For example, the following directive would tell all crawlers not to crawl the /admin/ directory:
User-agent: *
Disallow: /admin/
You can also use the Allow directive to tell a crawler to crawl a specific page or directory, even if it is blocked by a preceding Disallow directive.
Robots.txt files are not binding, but most crawlers will respect them. This means that if you block a page in your robots.txt file, it is unlikely to appear in search results.
How Robots.txt Works?
When a crawler visits a website, it first checks for a robots.txt file. If a robots.txt file is present, the crawler will read it to determine which pages it is allowed to crawl.
The crawler will then start crawling the website, starting with the homepage. If the crawler encounters a page that is blocked in the robots.txt file, it will skip that page and move on to the next one.
Once the crawler has finished crawling the website, it will create an index of the pages it has crawled. This index is used to generate the search results that you see when you perform a search on a search engine.
For example, the following rule tells the Googlebot web crawler that it is allowed to crawl the entire website:
User-agent: Googlebot
Allow: /
Why Use Robots.txt?
There are a number of reasons why you might want to use robots.txt, including:
- To prevent sensitive pages from being indexed, such as login pages or admin pages.
- To improve crawling efficiency by preventing crawlers from crawling pages that are not important, such as static pages like your privacy policy or terms of service.
- To prevent duplicate content issues by telling crawlers which version of a page to index.
Best Practices for Using Robots.txt
When using robots.txt, there are a few best practices to keep in mind:
- Use robots.txt sparingly. Robots.txt is a powerful tool, but it can also be dangerous if used incorrectly. It’s important to only use robots.txt to block pages that you really don’t want to be indexed.
- Test your robots.txt file. Once you have created or edited your robots.txt file, it’s important to test it to make sure that it is working as expected. You can use the Google Search Console robots.txt tester to do this.
- Keep your robots.txt file up to date. If you make changes to your website, be sure to review your robots.txt file to make sure that it is still accurate.
Robots.txt Templates vs Robots.txt Examples
Here are some Robots.txt templates and Robots.txt examples for your reference.
You can copy and paste these robots.txt files to your site, or you can use them as a starting point to create your own.
Keep in mind that the robots.txt file can impact your SEO, so be sure to test any changes you make before deploying them.
Certainly! Here are 10 common robots.txt templates and examples for different scenarios:
1. Allow all robots full access to the entire website:
Template:
User-agent: *
Disallow:
Example:
User-agent: *
Disallow:
This template allows all web crawlers full access to all parts of the website.
2. Disallow all robots from accessing the entire website:
Template:
User-agent: *
Disallow: /
Example:
User-agent: *
Disallow: /
This template blocks all web crawlers from accessing any part of the website.
3. Allow a specific robot full access to the entire website:
Template:
User-agent: [specific-robot]
Disallow:
Example:
User-agent: Googlebot
Disallow:
This template allows only the Googlebot crawler full access to the entire website.
4. Disallow a specific directory for all robots:
Template:
User-agent: *
Disallow: /private/
Example:
User-agent: *
Disallow: /private/
This template blocks all web crawlers from accessing any content within the “/private/” directory.
5. Disallow a specific file for all robots:
Template:
User-agent: *
Disallow: /file.html
Example:
User-agent: *
Disallow: /file.html
This template blocks all web crawlers from accessing the “file.html” file.
6. Allow a specific robot to access specific directories:
Template:
User-agent: [specific-robot]
Disallow: /private/
Example:
User-agent: Googlebot
Disallow: /private/
This template allows only the Googlebot crawler to access all parts of the website except the “/private/” directory.
7. Allow all robots access to specific directories:
Template:
User-agent: *
Disallow: /private/
Example:
User-agent: *
Disallow: /private/
This template blocks all web crawlers from accessing the “/private/” directory while allowing access to other parts of the website.
8. Allow a specific robot access to a specific file:
Template:
User-agent: [specific-robot]
Disallow: /file.html
Example:
User-agent: Googlebot
Disallow: /file.html
This template allows only the Googlebot crawler to access all parts of the website except the “file.html” file.
9. Allow all robots access to specific file types:
Template:
User-agent: *
Disallow: /*.pdf$
Example:
User-agent: *
Disallow: /*.pdf$
This template blocks all web crawlers from accessing any PDF files on the website.
10. Crawl-delay for all robots:
Template:
User-agent: *
Crawl-delay: 5
Example:
User-agent: *
Crawl-delay: 5
This template instructs all web crawlers to wait for 5 seconds between successive requests to the website to reduce server load.
Please note that these examples are generic and may need to be customized based on specific requirements and the behavior of the web crawlers being targeted.
Editing Robots.txt in WordPress:
Method 1: Using a WordPress SEO Plugin (Yoast SEO)
1. Install and Activate Yoast SEO:
If you haven’t already, go to your WordPress dashboard, navigate to Plugins > Add New, search for Yoast SEO > Install Now > Activate.
2. Access the File Editor: https://yoast.com/help/how-to-edit-robots-txt-through-yoast-seo/
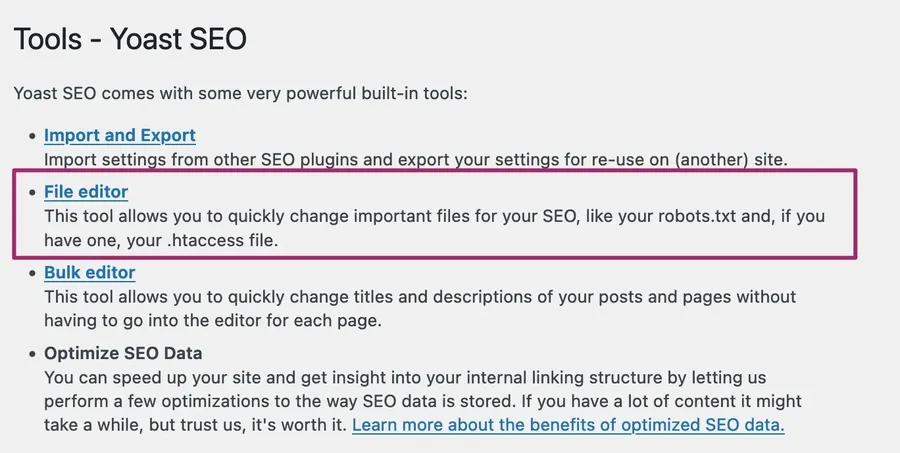
In your WordPress dashboard, go to Yoast SEO > Tools.
3. Edit Robots.txt:
- Click on the File Editor link.
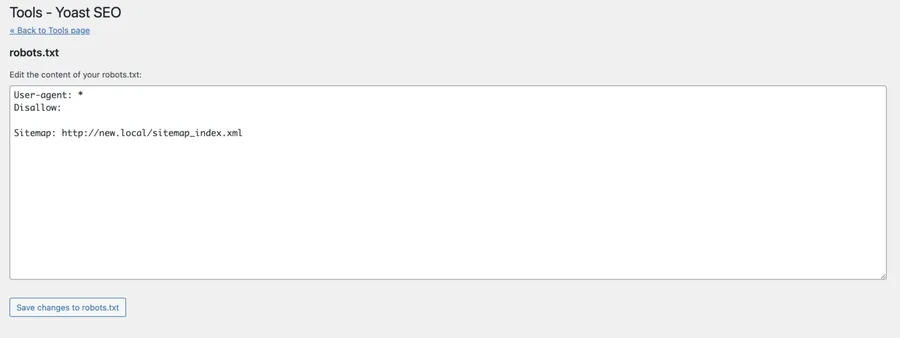
- In the robots.txt section, you can add your custom rules.


4. Save Changes:
After adding or modifying the rules, click on the Save Changes to Robots.txt button.

Method 2: Editing Robots.txt Manually
1. Connect via FTP:
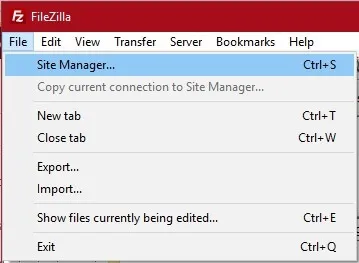
Use an FTP client (like FileZilla) to connect to your WordPress site.

2. Edit or Create Robots.txt:**
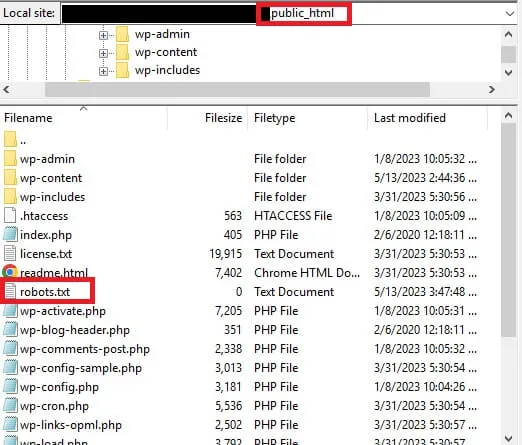
- Navigate to your website’s root directory.
- Look for the robots.txt file. If it doesn’t exist, you can create a new text file and name it robots.txt.
- Edit the file using a text editor and add your custom rules.

Editing Robots.txt in Shopify:
Method 1: Using the Shopify admin panel
- Go to your Shopify admin panel.
- Click Online Store > Themes.
- Click the Actions button next to the theme you want to edit, and then click Edit Code.
- In the Templates section, click Add a new template.
- Select robots.txt > Done.
- Make the changes you want to make to the robots.txt file.
- Click Save.
Method 2: Using a third-party app
There are a number of third-party apps available that allow you to edit your robots.txt file in Shopify. Some popular apps include:
To use a third-party app to edit your robots.txt file, follow the instructions provided by the app developer.
Final Thoughts
Understanding and effectively utilizing the robots.txt file is crucial for managing how search engines crawl and index your website. By following the guidelines outlined in this blog post, WordPress and Shopify users can make informed decisions about what content should be accessible to search engine crawlers.
Read More: The Complete Guide to Optimize WordPress Robots.txt for SEO
Contact US | ThimPress:
Website: https://thimpress.com/
Fanpage: https://www.facebook.com/ThimPress
YouTube: https://www.youtube.com/c/ThimPressDesign
Twitter (X): https://x.com/thimpress_com
