Learn how to Schedule your auto posting pipes using Cron jobs. This guide will walk you through setting up scheduled tasks that seamlessly push your content to various channels (courses, blogs, etc.), saving you time and effort.
Overview On Cron job And Pipes Scheduling
Cron is a program that allows users of Unix-based systems, including WordPress, to schedule commands or scripts to run automatically at specific times or dates. These scheduled tasks are known as cron jobs.
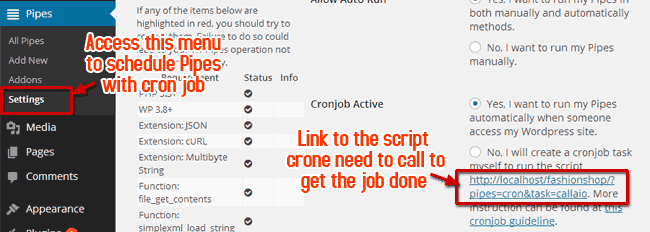
In the WP Pipes system, the scheduling of your pipes is managed by a cron job. This means that Cron will execute the pipes within your WordPress environment by running a designated script, the link to which is available in the WP Pipes settings (Pipes > Settings).

Setting up a Cron job to schedule pipes auto posting
To automate your WP Pipes posting, you have two options:
- Script-Side Scheduling: Let WP Pipes handle the scheduling and execution of the cron job internally.
- Server-Side Scheduling: Set up a cron job on your server to trigger the posting process.
Important Note:
- Verify Functionality: Before automating, ensure all your pipes are functioning correctly. Broken pipes can interrupt the process and trigger warnings.
- System Requirements: Review the WP Pipes System Requirements to ensure your environment is compatible and optimized for smooth operation.
Running your cron job as a Server-Side
To execute your cron job on the server, navigate to the “Settings” section within “Pipes” and disable the script-side cron job. Select the option “No, I want to run my Pipes Manually” and save your changes.

This instruction is for hosting administrated with cPanel. But it’s pretty similar to other server administrators as well.
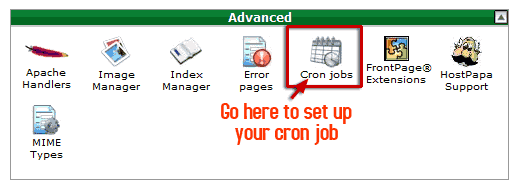
Step 1: Access your cPanel. You will see an icon leading to the page where you can set up your cron jobs.

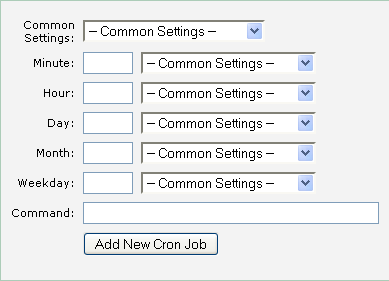
Step 2: Creating a cron job for Pipes scheduling. On the setup page of your cron job, you will see this on your screen.

This is where you set the time interval for the schedule of your pipes. You can set them to run weekly, monthly, daily, or once in a few hours or minutes.
The Command box is where you enter the command to instruct cron to perform your task. There are two commands available:
Option 1:
/bin/wget -O /dev/null “http://yourwordpresssite.com/?pipes=cron&task=callaio”
Replace the placeholder path in this command with the one found in Pipes>>Settings. Paste the modified command into the Command box and click “Add New Cron Job.” Your server will then execute the Pipes script according to the schedule you’ve set, automatically triggering your pipes.
Option 2 (if Option 1 fails):
lynx -dump ‘http://yourwordpresssite.com/?pipes=cron&task=callaio’
Similarly, replace the placeholder link in this command with the one from your Pipes > Settings page.
Running your cron job as a Script-Side
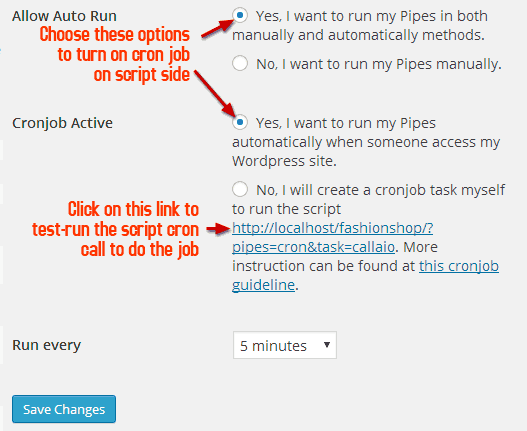
To execute your cron job within the script, simply adjust the Pipes Settings as illustrated in the image provided:

Take control of your content calendar and free up valuable time by using Cron jobs for your auto-posting pipelines. With a bit of initial setup, you’ll enjoy the benefits of automated, consistent posting across your chosen platforms.
Learn More from ThimPress Knowledge Base Articles:
- WP Pipes System Requirements
- How to Use Custom CSS in Your Online Course
- Create a Child Theme in Resca: A Step-by-Step Guide
- One-Click Resca Theme Installation Guide (Video)
- Step-by-Step Video Tutorial: Installing Resca Theme
- Create A Child Theme in Squareroot: Step-by-step Guide
- ADOT Theme Installation: A Step-by-Step Video Tutorial
- Install and Set up the FundPress plugin
- How To Submit A ThimPress Support Ticket
- How To Disable The Demo Slider Images
Contact US | ThimPress:
Website: https://thimpress.com/
Fanpage: https://www.facebook.com/ThimPress
YouTube: https://www.youtube.com/c/ThimPressDesign
Twitter (X): https://twitter.com/thimpress
