LearnPress Live Course Integration is an amazing add-on that assists you in creating and managing live courses and video meetings using Zoom or Google Meet on your LMS website.
For sure, you can increase the engagement and interaction between instructors and students and make online learning more interesting and effective.
In this beginner’s guide, we will explore the concept of LearnPress Live Course Integration, its benefits, and how you can leverage this powerful feature to enhance your online learning platform with live courses.
What is LearnPress Live Course Integration?
LearnPress Live Course Integration is an innovative feature that allows you to seamlessly incorporate live courses into your LearnPress platform.
With this integration, educators can deliver interactive lessons, engage with students in real time, and create a dynamic learning environment.
Students, on the other hand, can participate actively in discussions, ask questions, and receive immediate feedback from instructors.
Benefits of LearnPress Live Course Integration
Integrating live courses into your LearnPress platform offers a plethora of benefits for both educators and students.
Let’s explore some of the key advantages:
- Enhanced Engagement: Live courses foster active participation and engagement among students, creating a collaborative learning experience.
- Real-Time Interaction: Students can interact with instructors and peers, ask questions, and receive instant feedback, improving their understanding of the course material.
- Flexible Learning: Live courses provide the flexibility to join sessions from anywhere, enabling students to learn at their own pace and convenience.
- Improved Retention: The interactive nature of live courses enhances knowledge retention as students can immediately apply what they have learned.
- Personalized Learning: Instructors can tailor their teaching approach based on students’ real-time feedback, ensuring personalized learning styles.
How To Use The LearnPress Live Course Integration
To begin integrating live courses into your LearnPress platform, follow these step-by-step instructions:
Step 1: Download, Install, and Activate the LearnPress Live Course Add-on
After buying the LearnPress Live Course add-on, go to ThimPress, log in to your account, and look for “Download” to get it.

Now Go to your WordPress website:
- Sign in to your Admin dashboard.
- Go to the “Plugins” section.
- Click on “Add New”.
- Click on “Upload Plugin”.
- Choose the plugin file you downloaded (it will be a .zip file).
- Click on “Install Now”.
Wait for a few seconds to click Activate Plugin if it’s installed successfully.

Note: If you have trouble activating LearnPress add-ons, please refer to our tutorial article on Activate LearnPress Add-ons on WordPress.
Step 2: Create API Key & Secret Key
In this LearnPress Live Course Integration guide, you need to create an API key and secret key for Google OAuth credentials and Zoom OAuth credentials.
For Google Oauth Credentials
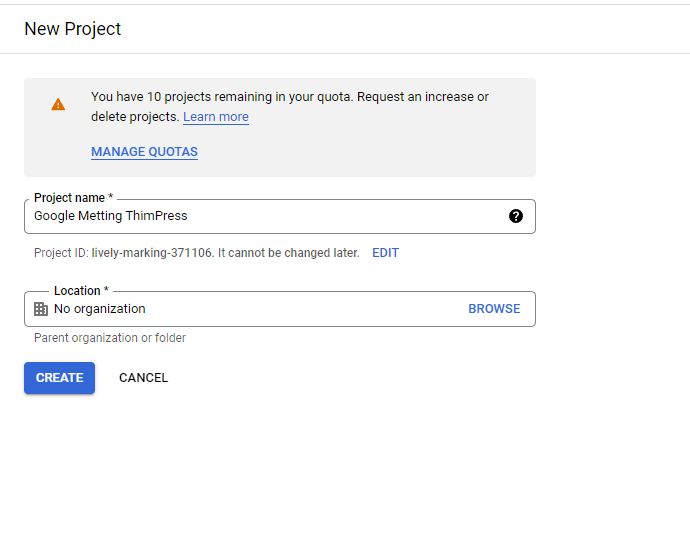
First, you need to Create a Project on Google Cloud.

Enter the Project name and Location and click Create.
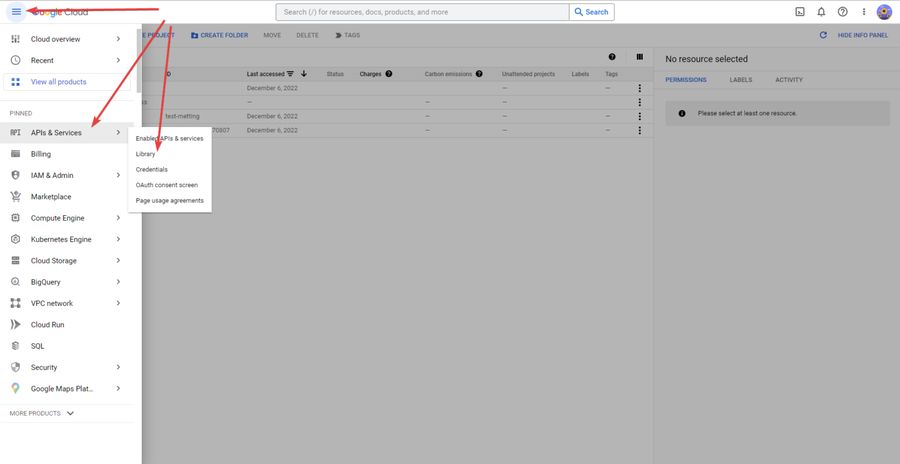
Hover over to APIs & Services and choose Library.
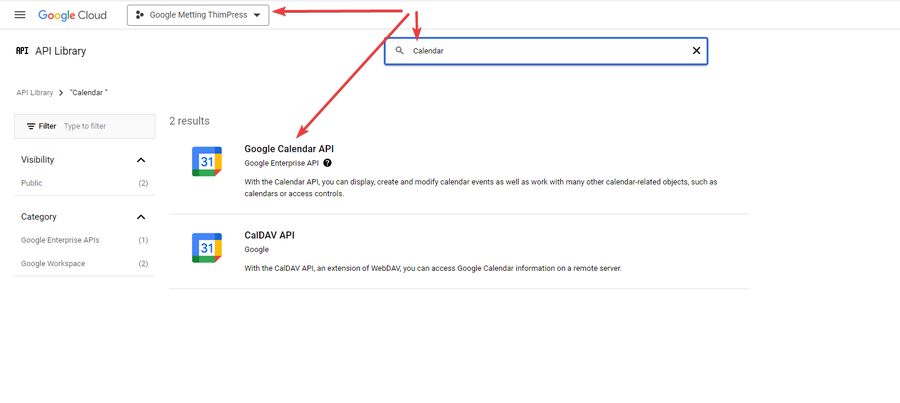
In the API Library, type Calendar in the search box and select Google Calendar API. Then, click on the Enable button and wait for a few seconds to complete the activation.

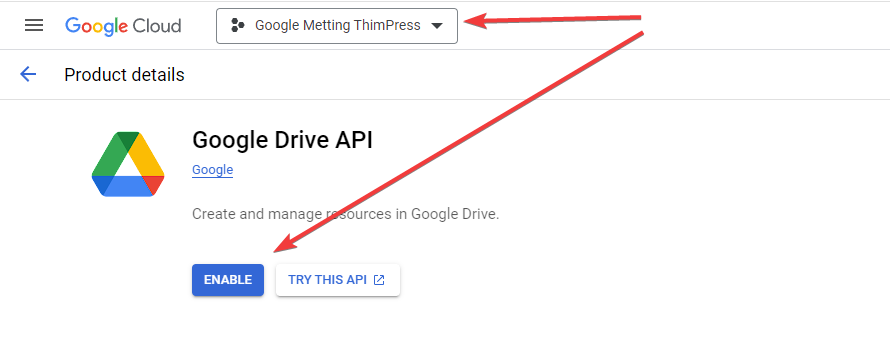
Similarly, go back to the API library, search for the Google Drive API, and Enable it.
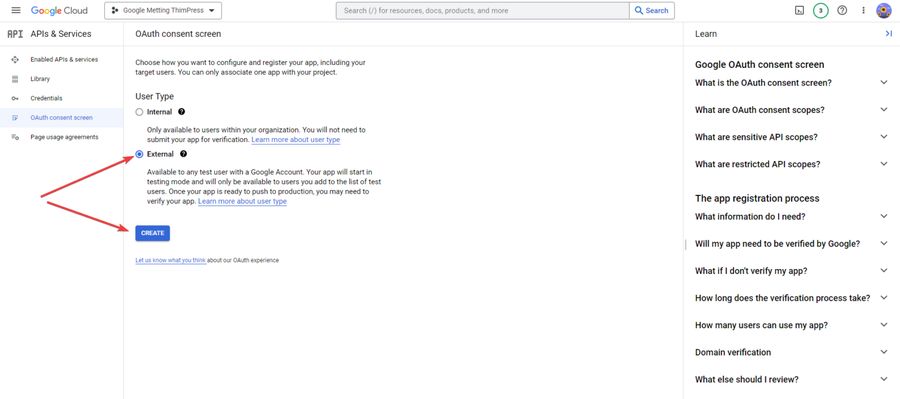
Go to the part that says “APIs & Services”, Find and click on “OAuth consent screen”, Choose “External”, and Click on “Create”.
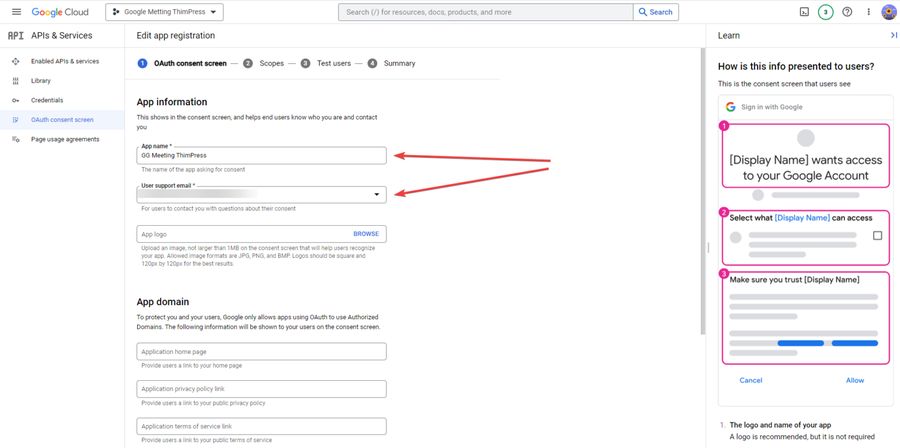
Fill in all required information and click Save And Continue.
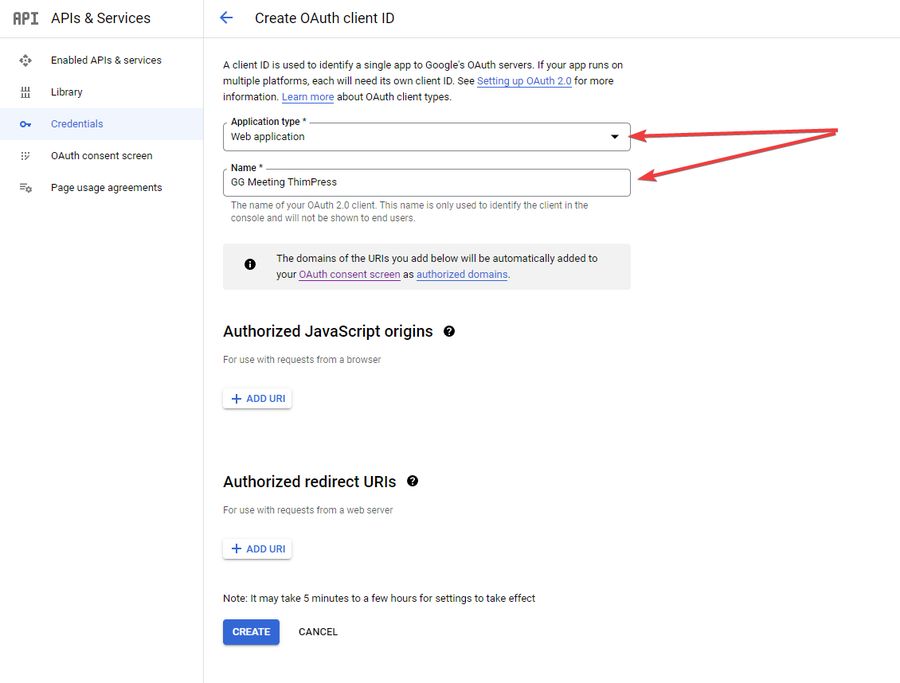
Now, In the APIs & Services section, select the Credentials section, click Create Credentials, and choose OAuth Client ID.

Fill in the Application type, Name, and Add the URI of Authorized Redirect URIs (Add: Your domain+ live-setting/settings/). After that, click Create.
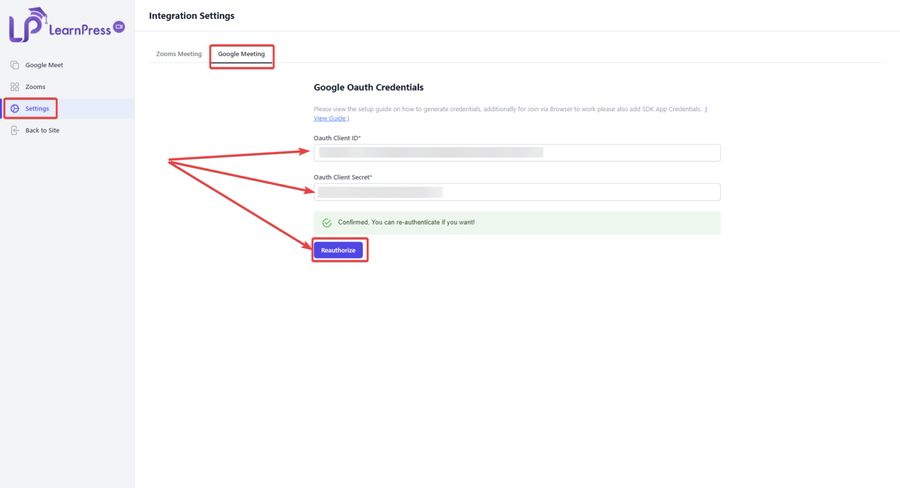
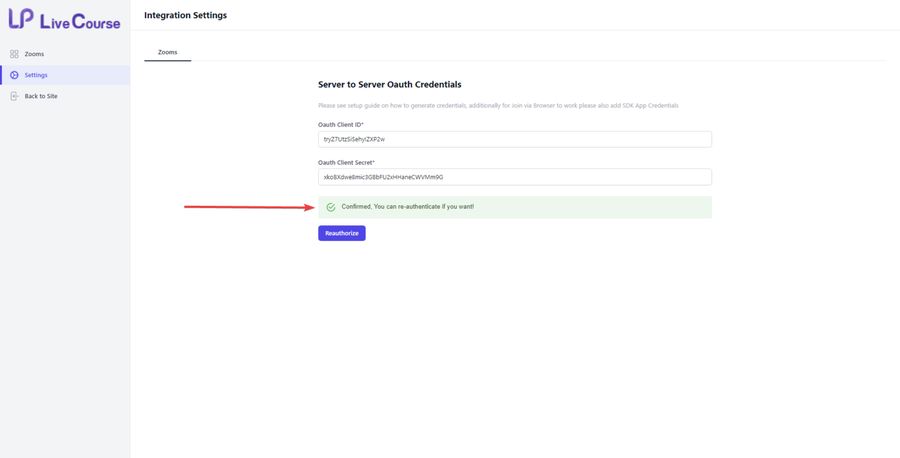
After successfully creating your Client ID and Client Secret, go to your LearnPress Live Settings and click Google Meet. Enter the OAuth Client ID and OAuth Client Secret, then select Reauthorize.
For Zoom OAuth Credentials
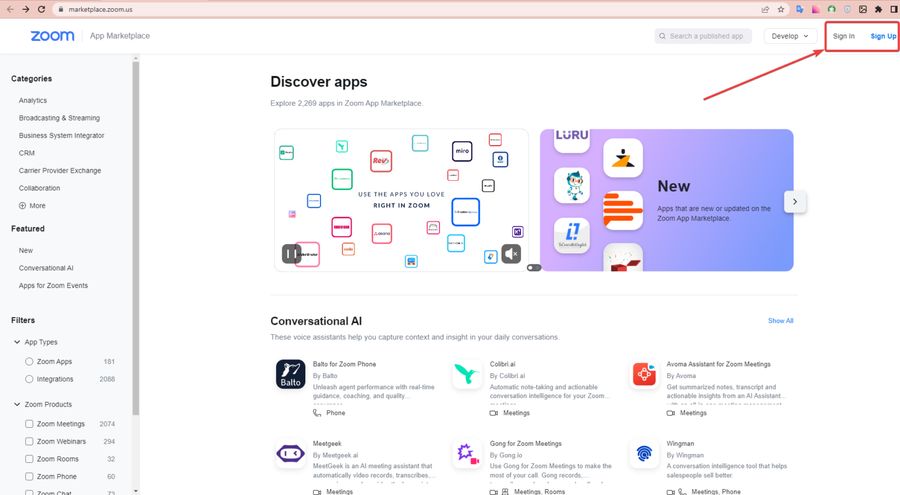
First, you need to create an account to log in to Zoom.
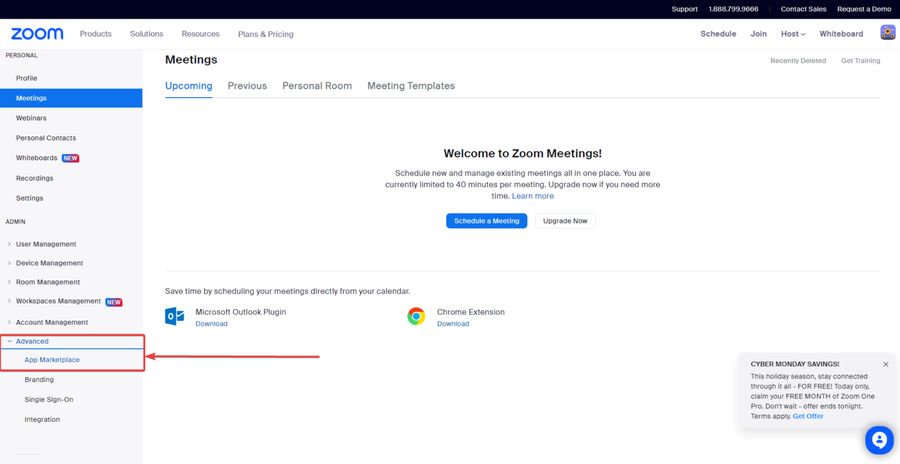
Next, navigate to Advanced, and click App Marketplace.
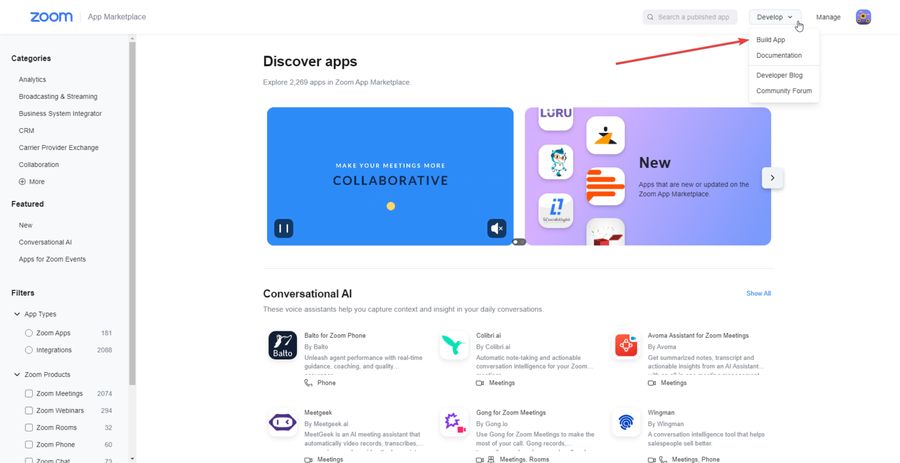
Choose Build App.
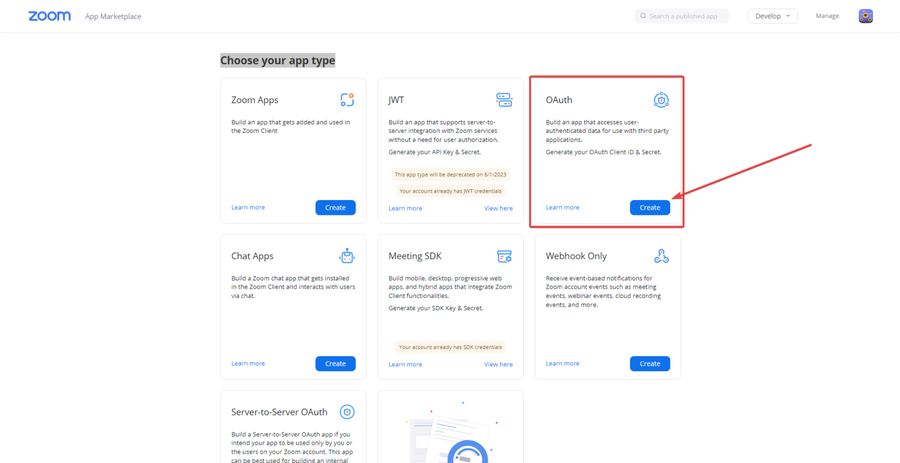
Choose OAuth and click Create.
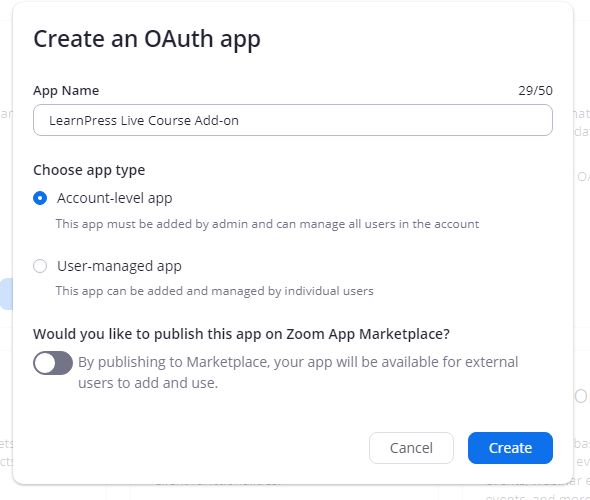
Fill in the App Name, choose Account-level app type, and disable Would you like to publish this app on the Zoom App Marketplace? After that, click Create.
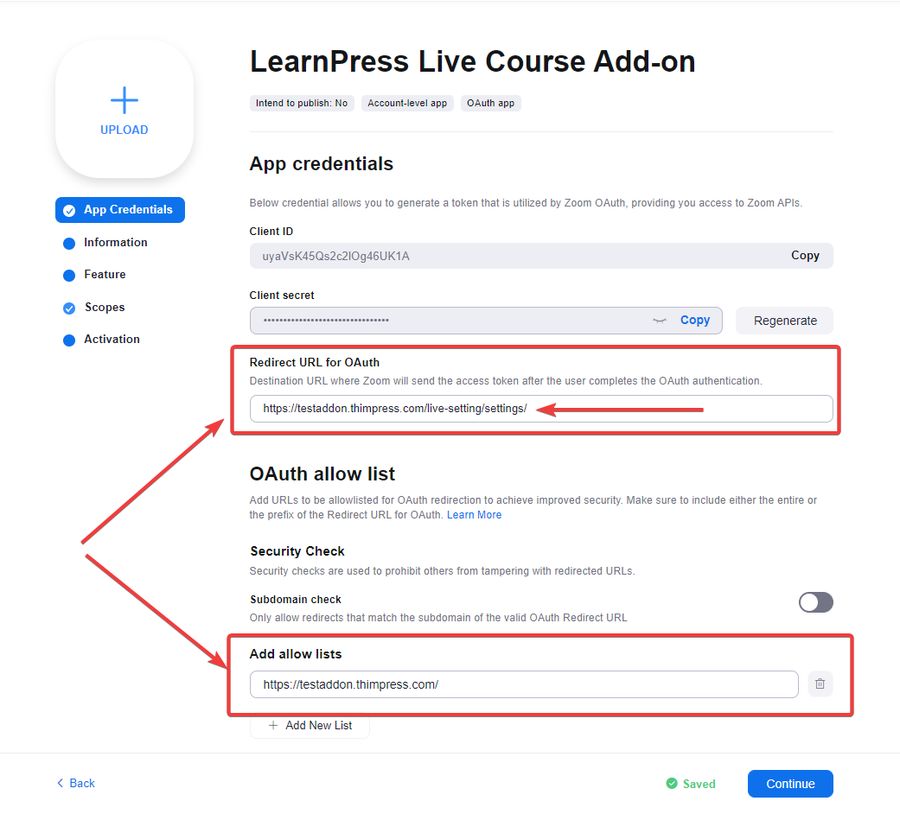
Back to LearnPress Live Settings, choose the Zoom Metting tab, and copy the URL link.

Now paste it into the Redirect URL for OAuth and Add allow lists (but remove: zoom-setting/settings). Then click Continue.
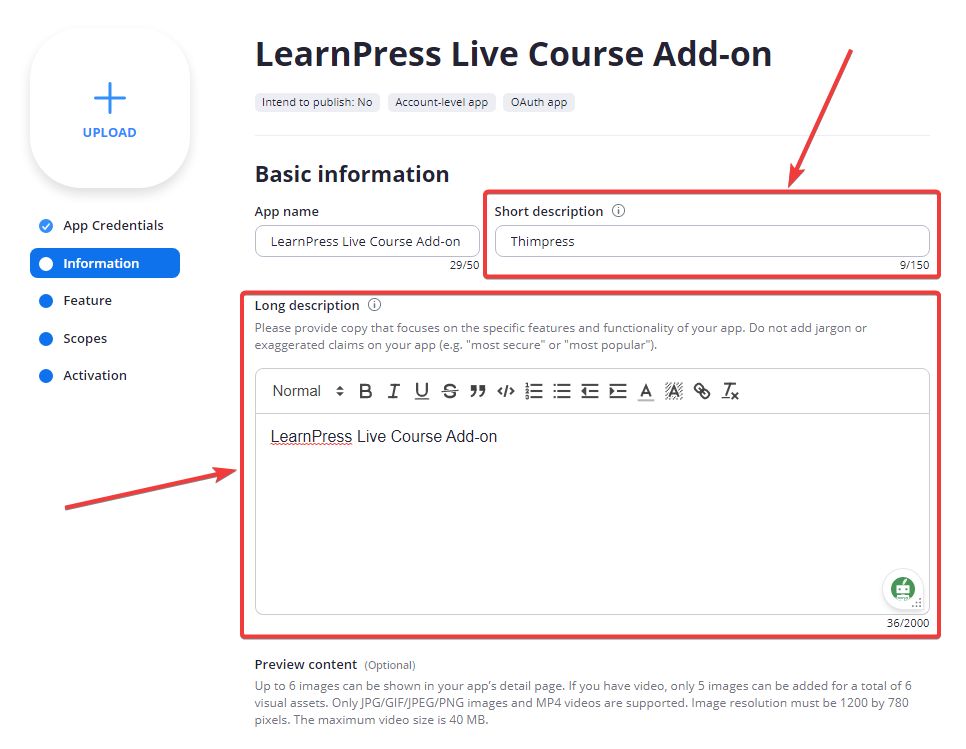
Fill in all the required information.
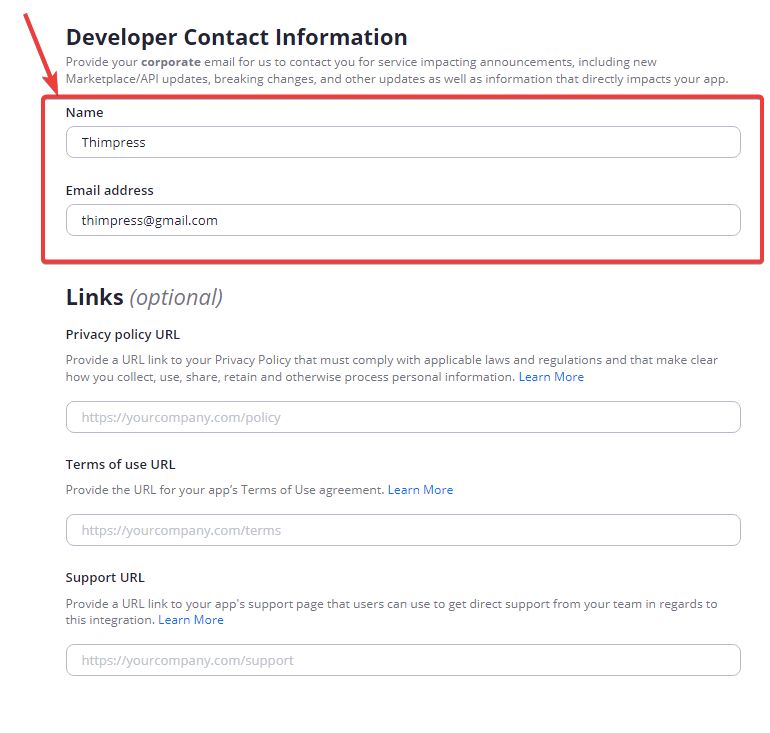
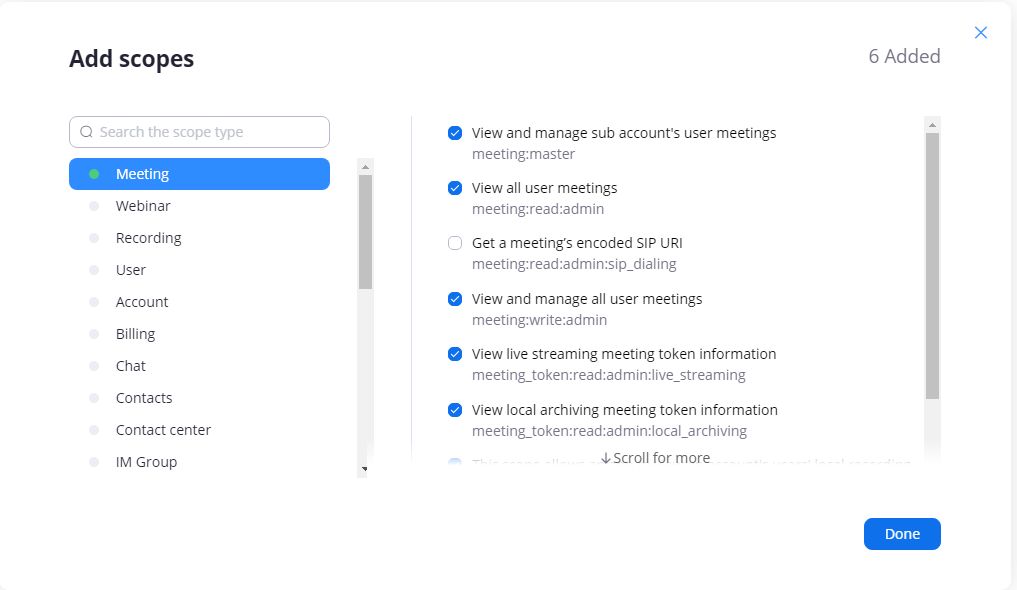
Note: In the Add Scopes section, select all options (except Get a meeting’s encoded SIP URI) and click Done.
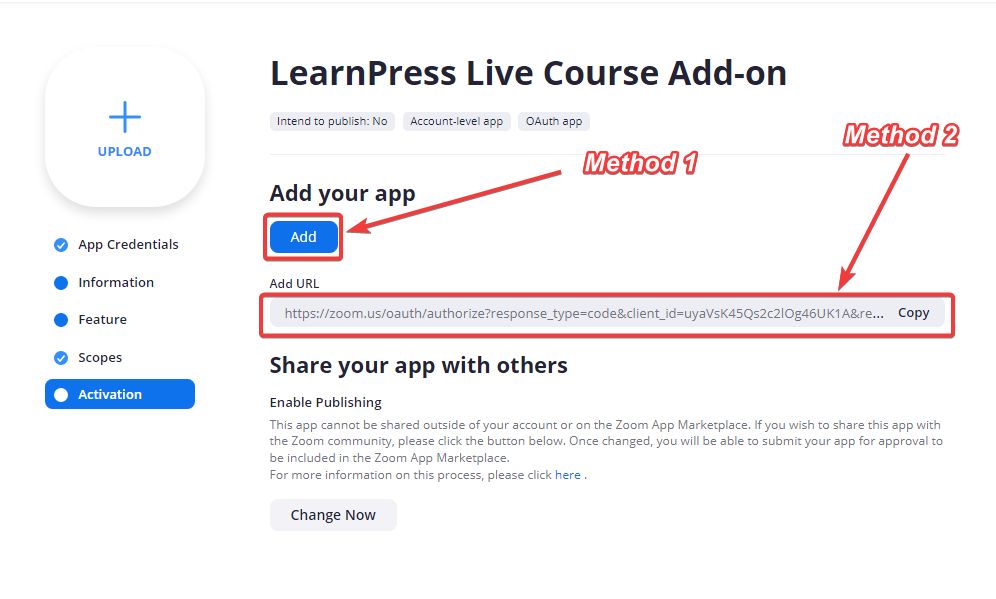
After you finish the setup process, you can connect the LearnPress Live Course Add-on to your site by clicking Add or Add URL.
Next, click Allow.
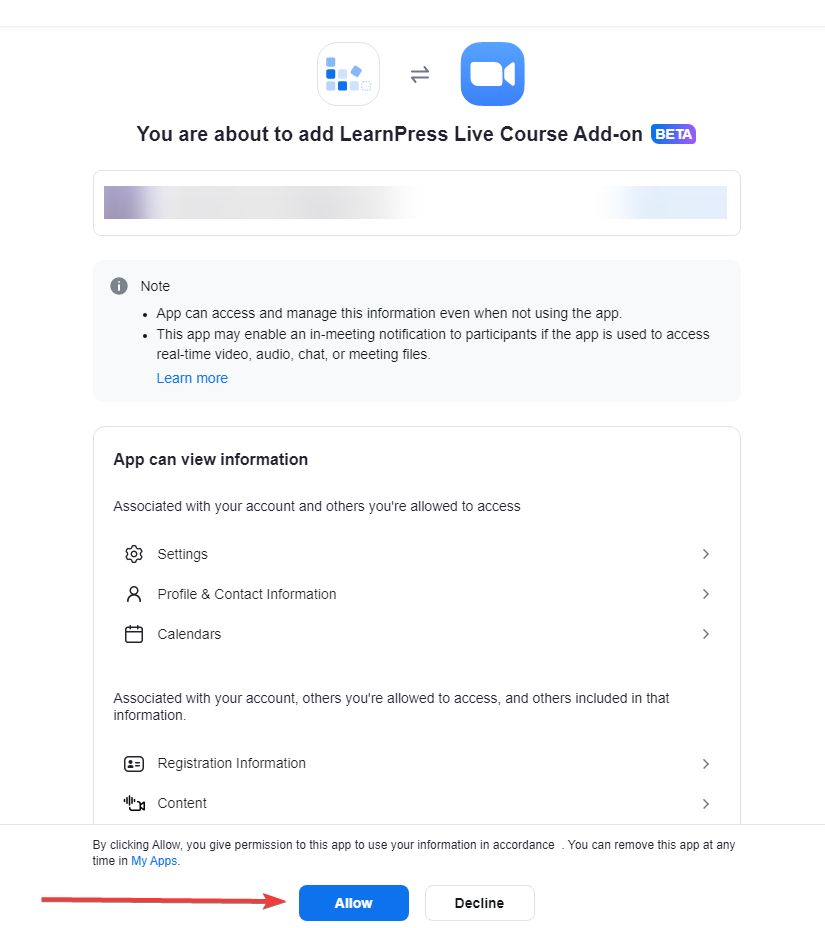
You will go straight to your site, and the LearnPress Live Course Add-on will be linked to your site.
Step 3: Add New Google Meeting and Zoom Meeting
Now, let’s learn how to add a new Google or Zoom meeting using the LearnPress Live Course Integration.
Add New Google Meeting
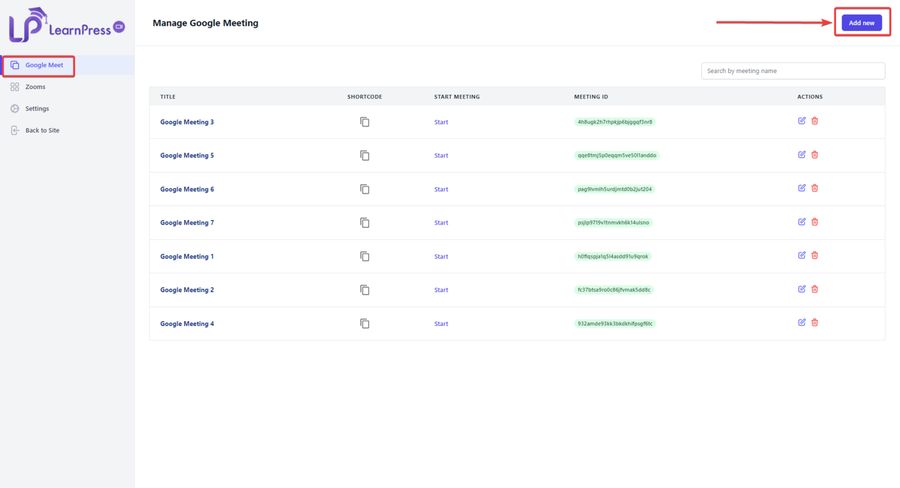
Go to the LearnPress Dashboard, navigate to Google Meet, and click Add New.
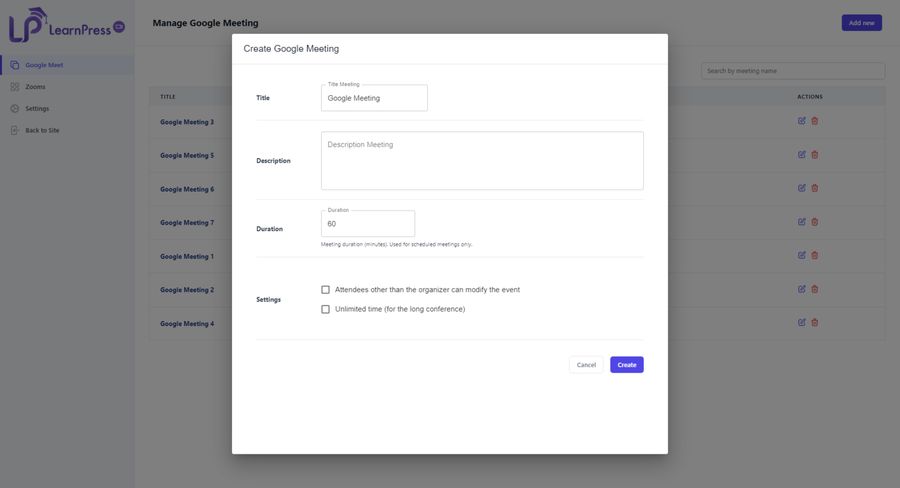
Fill in the required information, such as the meeting title, meeting description, meeting duration, and settings. After that, click Create.
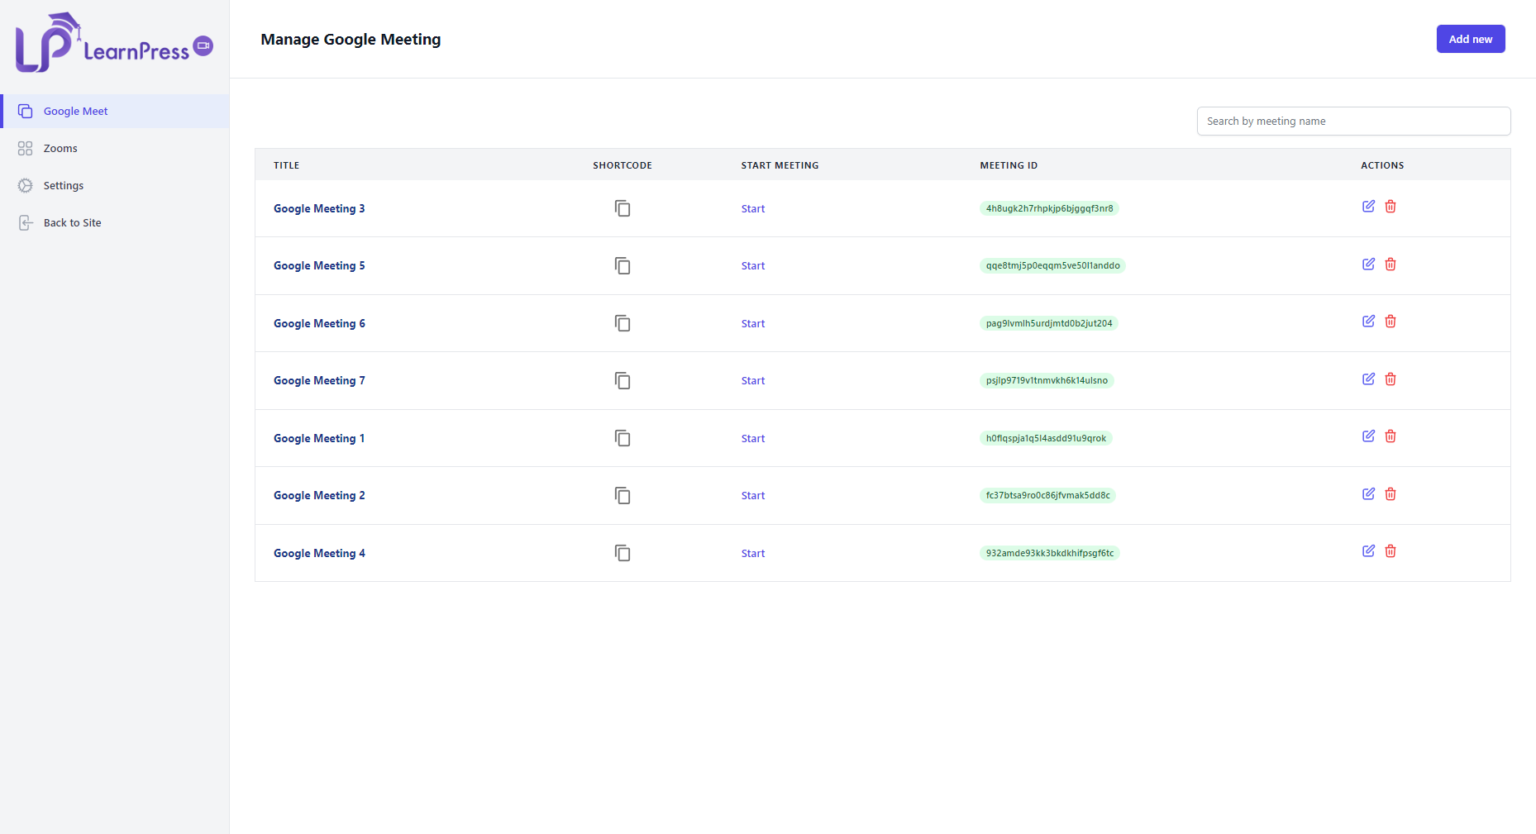
Note: There is a trash icon or edit pen icon for each meeting. So that, you can delete or edit the meeting you want.
Add New Zoom Meeting
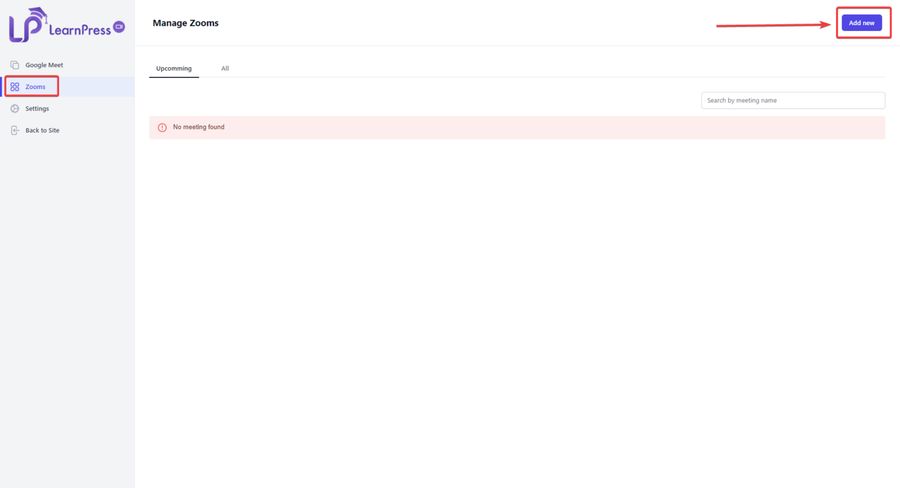
Go to the LearnPress Dashboard, navigate to Zooms, and click Add New. In this step, you’ll see that there is an Upcoming tab and an All tab for the meeting rooms.
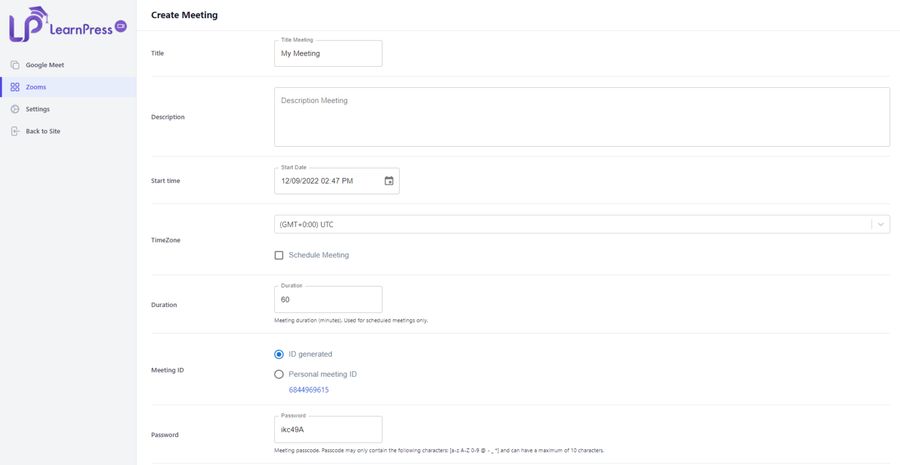
Fill in the required information, such as meeting title, meeting description, meeting start time, meeting timezone, meeting schedule, duration, meeting ID, meeting password, waiting room, video meeting, and settings. After all, click Create to complete the process.
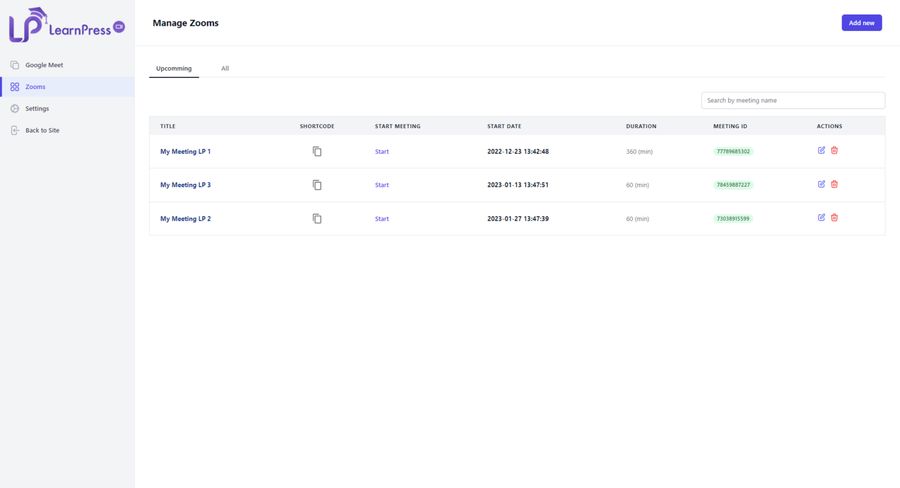
If you want to edit or delete the meeting, you can click on the edit pen icon or trash icon.
Step 4: Set Up Google and Zoom Meeting
Set Up Google Meeting
Here is a step-by-step to set up Google Meeting on LearnPress:
- Open LearnPress.
- Click on “Courses”.
- Make a new course or pick one you already have.
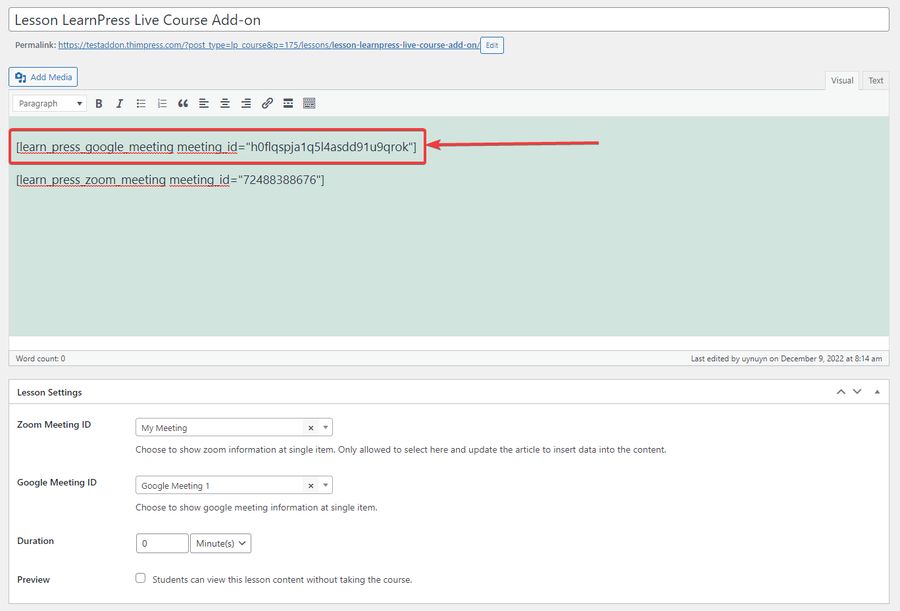
- Scroll down to “Lesson Settings”.
- Choose a Google Meeting from the list.
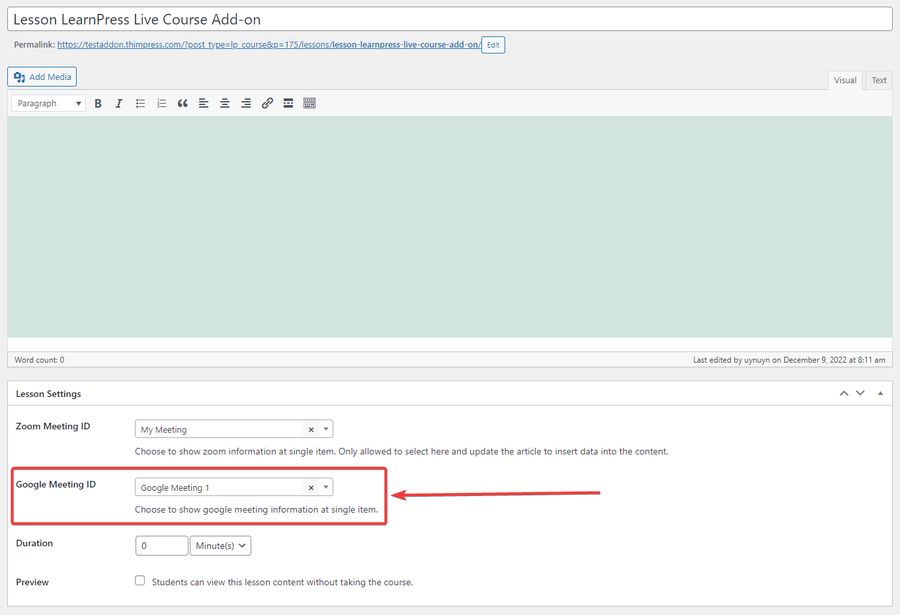
Make sure to update the lessons, and then you will observe in the description the shortcode of the meeting you assigned.
Set Up Zoom Meeting
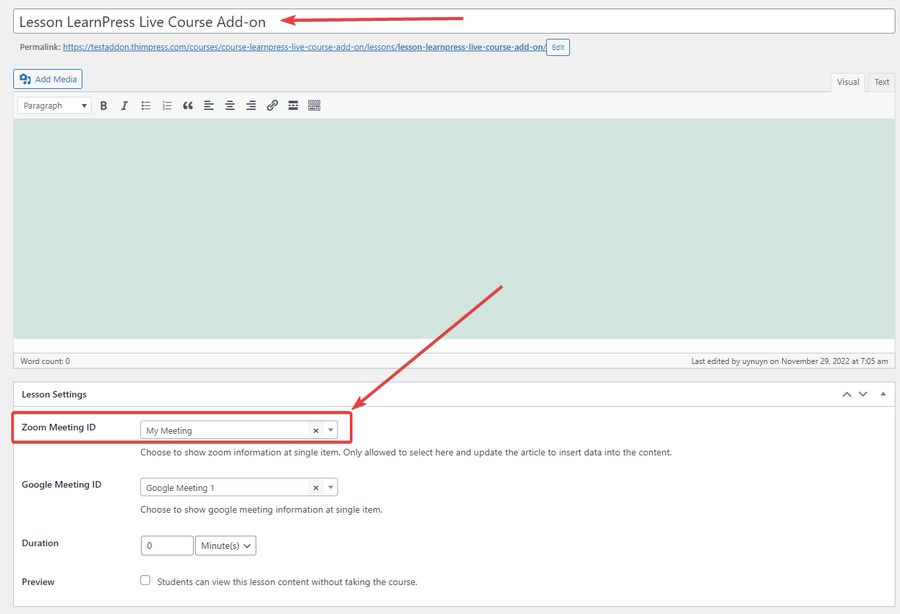
Similar to Google Meeting Setup, you can find the Zoom Meeting ID in the Lesson Settings and select the meeting ID you want.
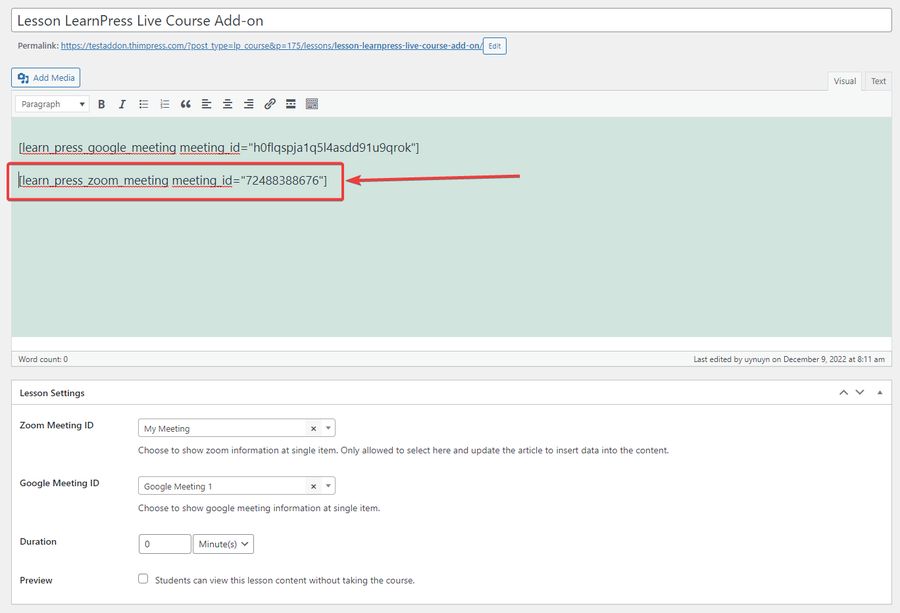
Be sure to update the lessons, and then you will see in the description the shortcode of the meeting you allocated.
Step 5: Fontend Google and Zoom Meeting
Frontend Google Meeting
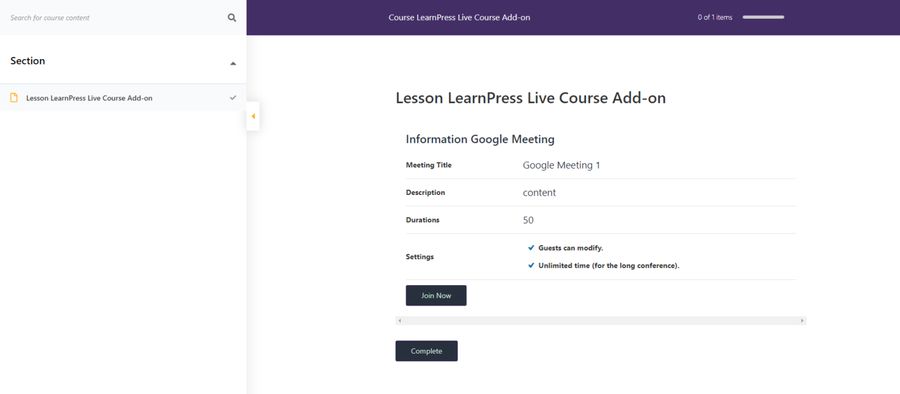
The meeting information that you have configured in the backend will now be shown to you in the front. The user can access the meeting by choosing the Join Now button.
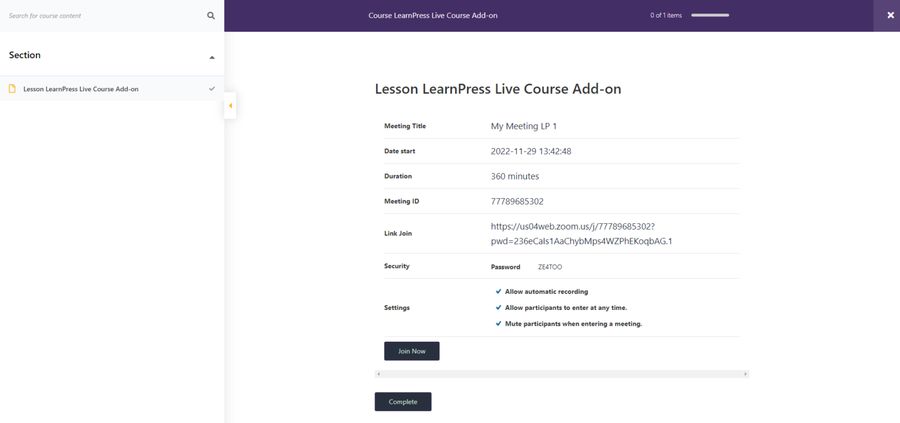
Frontend Zooms Meeting
Below is how the Zoom Meeting. Users can enter the meeting by selecting the Join Now button or using the Join link with a password.
Conclusion
Congratulations! You have now learned all about the LearnPress Live Course Integration. By following the steps outlined in this guide and implementing best practices, you can create an engaging and interactive learning experience for your students.
Read More: LearnPress Student List Integration: A Powerful Add-on for WordPress LMS
Contact US | ThimPress:
Website: https://thimpress.com/
Fanpage: https://www.facebook.com/ThimPress
YouTube: https://www.youtube.com/c/ThimPressDesign
Twitter (X): https://twitter.com/thimpress
