Are you looking for a way to manage Vimeo Privacy Settings and add a team member to your Vimeo account?
Vimeo should be no longer strange to us as one of the most popular video platforms on the Internet – a place for content creators to swim and whirl. Thus, some of you may not know how to set up privacy settings or join forces with other people, especially tutors, and teachers. Therefore, we are here to help you with that!
What is Vimeo?

Vimeo platform is a high-quality video-sharing platform that allows us to upload and watch long/short high-quality videos. Talking about video platforms, you may think about YouTube at first but it’s very great to know its amazing alternative – Vimeo.
The main difference between Vimeo vs YouTube is the audience. Here, it heads to a more professional audience since it was created by a filmmaker team. Also, this platform is ads-free but you will have to pay for any type of storage space or you can call it a “monthly subscription”.
How to Create a Vimeo Account?
As the basic info about this video platform has been showing up, let’s learn how to make a Vimeo account for yourselves. Here are the steps:
- Access Vimeo site
- Click “Join” or “Join for Free” (ảnh)
- Enter your email and type in your unique username + password (don’t publish your password, of course)
- Confirm your email by checking your email inbox
- Update your profile picture
At this point, your account is ready to go. One more thing, you should use your username to name your custom URL so that people can find your channel faster.
How to Buy a Standard Plan or Vimeo?
Before having your way to Vimeo privacy settings, you should have your monthly subscription first. Wonder where to buy it? Here, get one via Vimeo Plans. Of course, Vimeo has a free plan as well but it’s very limited and people usually use it to test before they buy pro plans.
Now, for the sake of us, Vimeo separates into 4 paid plans.

Starter
- 60 videos/seat/year
- $7/seat/month
- Billed annually
The Starter pack is for beginners that just jump into Vimeo. This option provides 2TB (2000GB) bandwidth and a 60-video limit for a year. Also, basic premium features are available. Therefore, it’s called just a tool where you can create & share videos
Standard (Most Popular)
- 120 videos/seat/year
- $20/seat/month
- Billed annually
Including all the features from the Starter pack, the Standard pack is born for professionals and businessmen to sell their videos on Vimeo. You can have all the features in the Starter pack and more features such as selling videos on demand.
Advanced
- 240 videos/seat/year
- $75/seat/month
- Billed annually
Besides all Standard pack features, the Advanced pack also allows you to live stream, make virtual events, and create marketing integrations. Also, you can make live Q&A, polls, chats; real-time stream health, and attendee registration (up to 100 events).
Enterprise
Offering additional security, control, and support, the Enterprise pack is the only one that doesn’t have a certain price on the Plans page – you will have to contact the sale team for more information. Besides all Advanced pack features, you will be provided with custom permissions, SSO & SCIM, advanced marketing integrations, 99.9% guaranteed uptime SLAs, a backup stream, and moderate live Q&A. Moreover, there are many functions that only the Enterprise plan has.
Set up Vimeo Privacy Settings
You can have many methods to control who can access your videos & how they can access yours so. Therefore, we will show you each access option detail so that you can simply configure your videos’ access settings based on your demands.
Vimeo Privacy Settings Detail
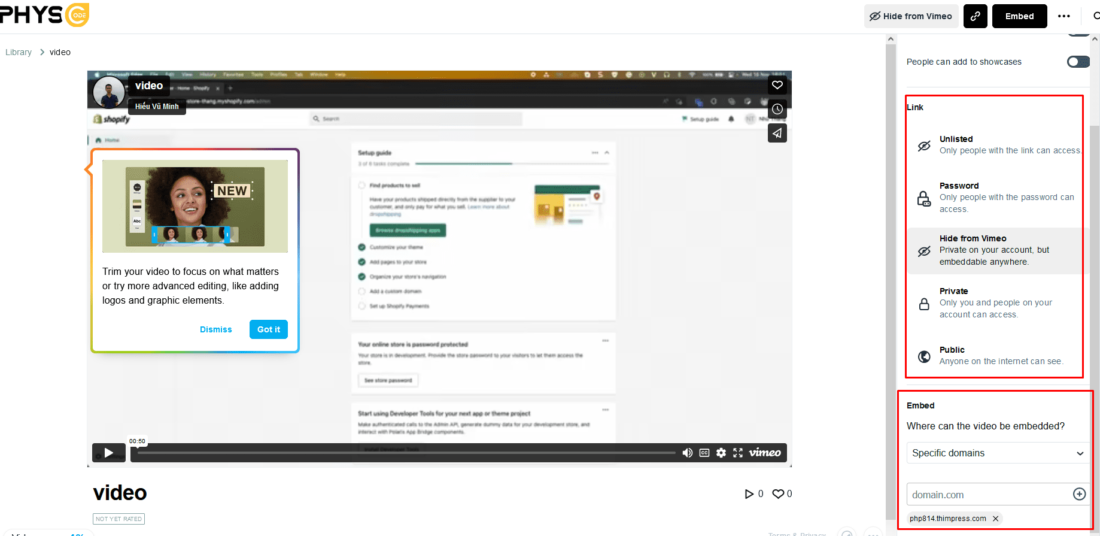
You can view these options for your own goods:
- Public: This option is the only setting available with the Free plan. Everyone can watch your videos and those videos can be indexed by search engines.
- Unlisted: This option is available with the Starter pack and higher. Unlisted videos won’t appear in search engines but they can be accessed and shared by anyone who has a video’s unique URL. Also, you can embed the videos anywhere you want. Moreover, the audience can view these videos without a Vimeo account.
- Password: This option is available with the Starter pack and higher. You can set a password for a video and anyone with a password can watch it.
- Hide from Vimeo: This option is available with the Starter pack and higher. That video can be embedded & watched on other websites but doesn’t have a video page on Vimeo. Also, it won’t appear in groups and channels but you can still add it to the display.
- Private: The video will only be visible to you and your team members – adding team members to your account isn’t available in the Free plan.
Vimeo Privacy Settings Comparison
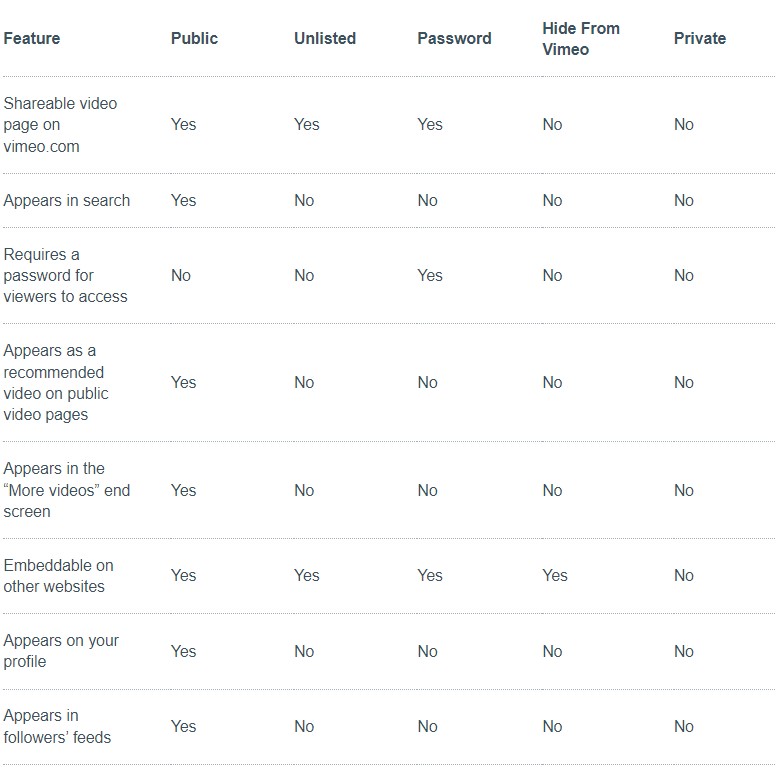
We will provide you with a better view of those privacy settings:
How to Add a Team Member on Vimeo
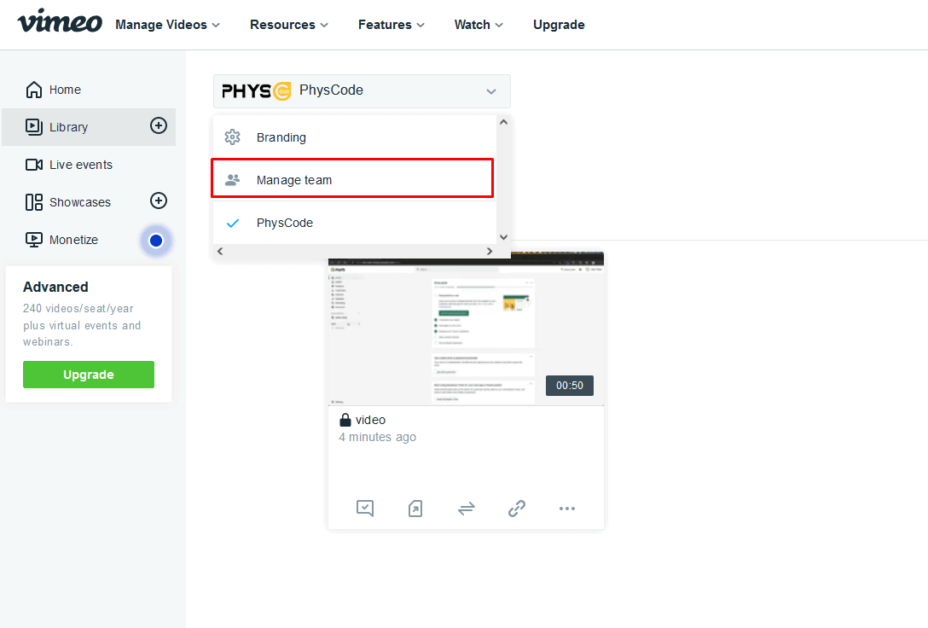
To invite a member, you can navigate to “Team Management” in your account drop-down or user menu and click “Invite”. Moreover, you can invite new team members by entering their email addresses and pointing out their roles. You can change or revoke any team member’s permission settings when visiting the “Team Management” page.
Team Management Permission Types
There are 4 different roles in Vimeo Team Management settings:
- Viewers: Your team members can review, comment, and share the videos. No allowance to upload, edit, publish, or access many settings.
- Contributors: Better than the roll Viewers, you can upload, publish, and edit existing content. However, you can’t delete a folder or change its name of it.
- Admins: Bypassing the Viewers and Contributors rolls, you can have all features you want – except access to account settings and payment settings.
- Owners: You are the god of this account which means you can do anything to this Vimeo account. Also, you can edit the profile page, remove live events, etc.
Note: Owners & Admins can provide Contributors with access to specific folders which proves to be more convenient.
How to Upload a Video to Vimeo & Embed Video to a Lesson
Upload a Video to Vimeo
Here are the steps that you can follow to upload a video to Vimeo:
Step 1: Create a Library
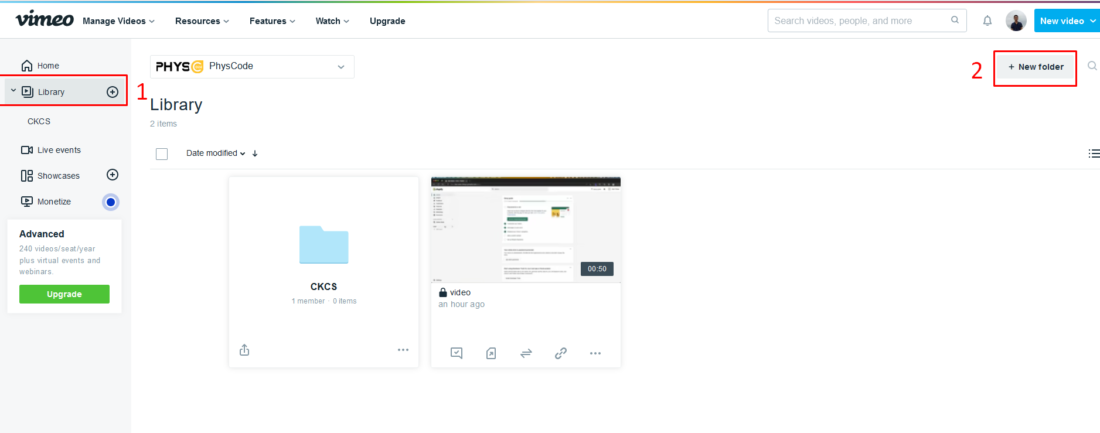
First, you navigate to the “Library” section. Then, click “New folder” to create a new library.
You can change the name as well. Please note that a Library is nearly the same as a Course if you are handling LMS such as LearnPress or Eduma.
Step 2: Upload a Video to the Library
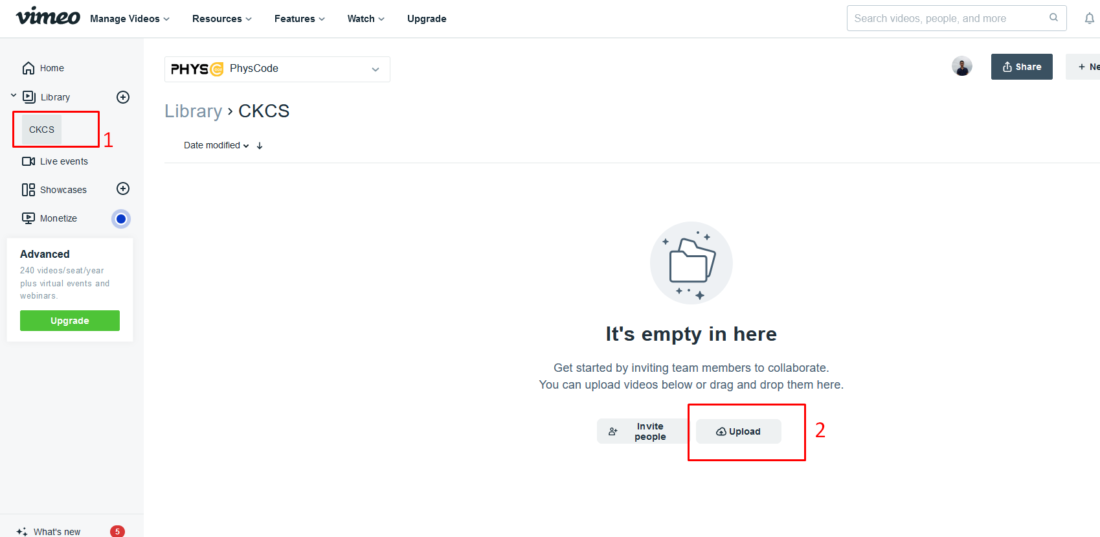
Here, you will choose the wanted Library and click the “Upload” button.
Step 3: Set up Privacy Settings
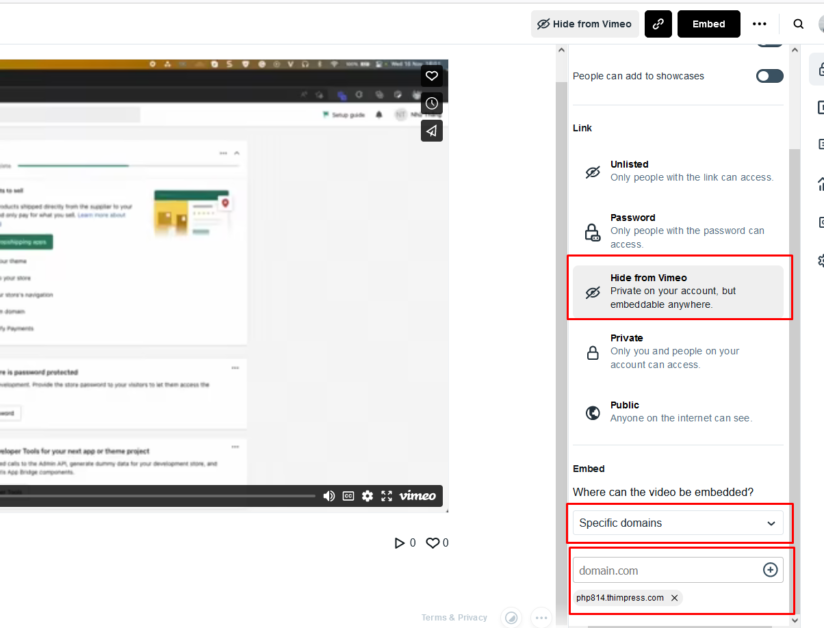
After uploading the video, click the video to access its settings. In the settings section, choose “Privacy” and disable “Allow downloads” & “People can add to showcases”.
In the “Link” section, select “Hide from Vimeo”. Then, choose “Special Domains” in “Embed” and type in your domain, such as thimpress.com. After setting up, your video won’t appear except for selected domains.
Embed Videos to Your Courses/Lessons
Step 1: Get the Embed Link
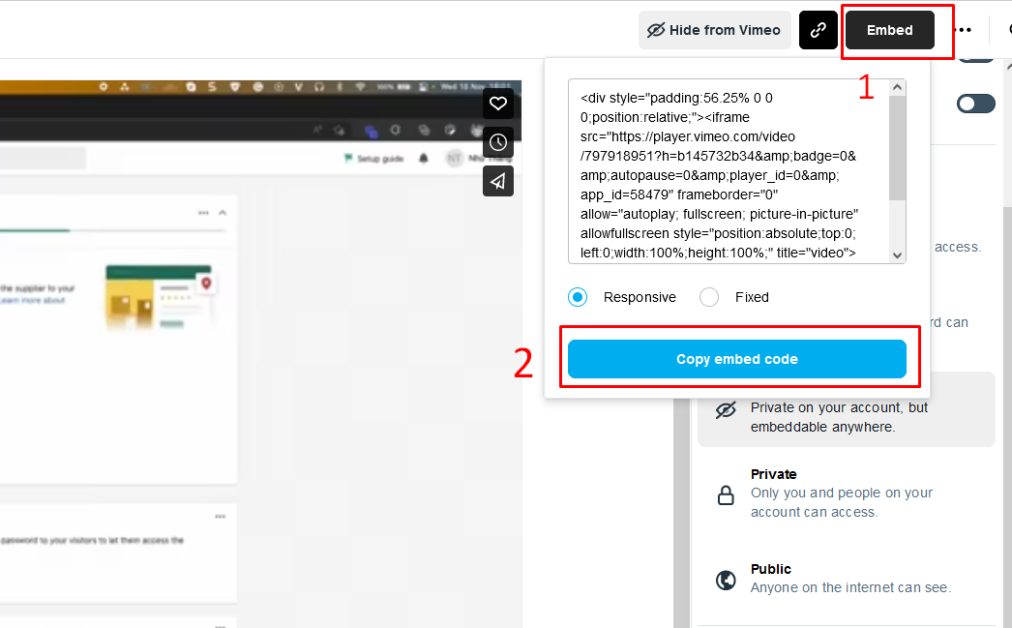
After setting up videos, click “Embed” and choose “Copy embed code”.
Step 2: Embed the Video to a Course/Lesson
In a lesson/course, move to the tab “Text” and paste the video’s iframe.

Wrapping Up
That should be all the guide & tips to manage Vimeo privacy settings and add a team member to your account. We hope you will have a great time using this fantastic video platform.
Read more: How to Fix “cURL Error 28: Connection Timed out” in WordPress
Contact US | ThimPress:
Website: https://thimpress.com/
Fanpage: https://www.facebook.com/ThimPress
YouTube: https://www.youtube.com/c/ThimPressDesign
Twitter (X): https://x.com/thimpress_com

