Have you ever wondered how the web pages you visit every day are created? The answer lies in a language called HTML. What is HTML? It stands for Hypertext Markup Language, and it’s the foundation of every website you encounter.
In this article, we’ll take a closer look at what HTML is, how it works, and why it’s so important in the world of web development. We’ll keep things straightforward, making this your go-to guide for understanding the basics of HTML.
Eduma – Education WordPress Theme
We provide an amazing WordPress theme with fast and responsive designs. Let’s find out!
What is HTML?

HTML is like the skeleton of a webpage. It’s a language that tells your web browser how to organize and display content like text, images, and videos.
It uses tags, which are special codes, to mark up different parts of the page. For example, there are tags for headings, paragraphs, links, and more. HTML is essential for creating websites and web applications.
What Does HTML Mean?
HTML stands for Hypertext Markup Language.
It’s the code that builds websites and tells your web browser how to show them.
- Hypertext: Think of this like links. It’s how you click on words or pictures and jump to another part of a website or even a different website altogether.
- Markup: This is the special code that organizes the stuff on a website. It tells the browser what’s a heading, a paragraph, a picture, or a list. This way, everything looks neat and makes sense.
So, HTML is like the instructions and the glue that puts all the pieces of a website together, making it easy for us to read and explore online.
How HTML Works: A Simple Explanation
HTML, or HyperText Markup Language, is the foundation of every website you see. It’s a language that tells web browsers how to display the content of a webpage. Think of it as the skeleton of a website, providing structure and organization.
HTML’s Role in Displaying Content
HTML uses “tags” to mark up different elements on a webpage.
These tags are enclosed in angle brackets (e.g., <h1>, </p>).
Different tags have different meanings and instruct the browser on how to present the enclosed content.
For example:
- <h1> indicates the main heading of a page
- <p> defines a paragraph of text
- <img> embeds an image
- <a> creates a hyperlink
The Relationship Between HTML, CSS, and JavaScript
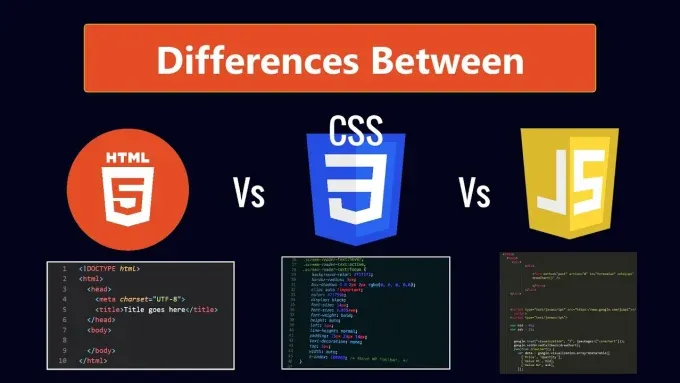
HTML (HyperText Markup Language), CSS (Cascading Style Sheets), and JavaScript are the three core technologies of the web, each playing a distinct role:
- HTML: Provides the basic structure and content of the webpage.
- CSS: Controls the visual appearance of the HTML elements, including layout, colors, fonts, and more. It adds the “skin” to the HTML skeleton.
- JavaScript: Makes the webpage interactive. It allows you to create animations, handle user input, and dynamically update content. It’s the “muscles” that bring the HTML skeleton to life.
Together, these three technologies create the rich and interactive web experiences we enjoy today.
Fundamental HTML Structure
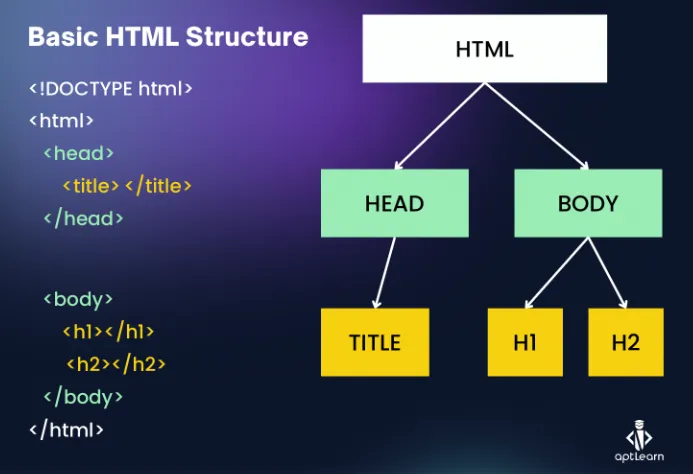
HTML, or HyperText Markup Language, is the foundation of every website. Understanding its basic structure is crucial for building web pages. Let’s break down the essential elements:
- <!DOCTYPE html>: This declaration informs the browser that the document is an HTML5 document, the latest version of HTML.
- <html>: This tag envelops the entire HTML document, signifying the beginning and end of the content.
- <head>: This section contains metadata about the HTML document, such as the document title and character set. It doesn’t display content directly on the webpage.
- <title>: Nestled within the <head> tag, the <title> tag defines the title of the webpage, which appears in the browser’s title bar or tab.
- <body>: This section houses the visible content of the webpage, including text, images, links, and other elements.
Simplified Code Example:
HTML
<!DOCTYPE html>
<html>
<head>
<title>My First Webpage</title>
</head>
<body>
<h1>Hello, World!</h1>
<p>This is my first paragraph.</p>
</body>
</html>
In this example:
- <!DOCTYPE html>: Declares the document as HTML5.
- <html>: Starts and ends the HTML document.
- <head>: Contains the page title.
- <title>: Specifies the title “My First Webpage.”
- <body>: Holds the visible content (a heading and a paragraph).
This basic structure serves as the skeleton for any HTML document, providing a clear organization for web page creation.
Common HTML Tags
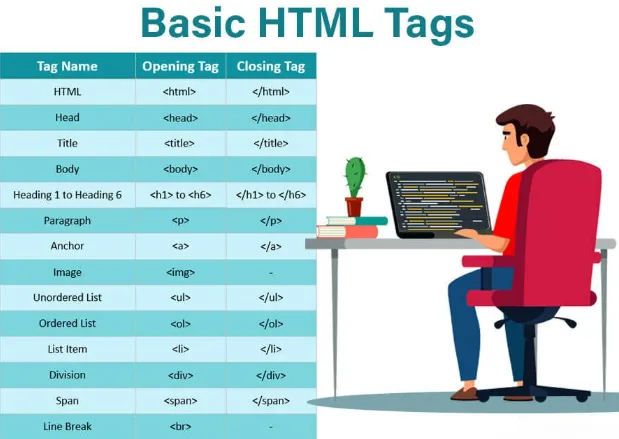
Let’s explore some essential HyperText Markup Language tags you’ll use all the time:
- Headings (h1-h6): Create titles and subtitles.
- <h1>This is the biggest heading</h1>
- Paragraphs (p): Hold blocks of text.
- <p>This is a paragraph.</p>
- Links (a): Make clickable hyperlinks.
- <a href=”https://www.example.com”>Visit Example Website</a>
- Images (img): Insert pictures.
- <img src=”image.jpg” alt=”Description of the image”>
- Lists (ul, ol, li): Build unordered (bullet) or ordered (numbered) lists.
- <ul><li>Item 1</li><li>Item 2</li></ul>
- Divisions (div): Create sections to group content.
- <div>Content goes here</div>
- Spans (span): Apply styles or effects to small pieces of text within a larger element.
- <p>This is a paragraph with a <span style=”color:blue”>highlighted</span> word.</p>
HTML Attributes
Attributes add extra information to tags, like styling or functionality. They are written as name-value pairs inside the opening tag:
- href (for links): Specifies the destination URL.
- src (for images): Specifies the image file path.
- class: Allows you to apply CSS styles to multiple elements.
- id: Gives a unique identifier to an element (for styling or scripting).
- style: Applies inline CSS styles directly to an element.
Getting Started with HTML
Creating a basic HyperText Markup Language file is the first step towards building websites and web applications. Here’s a simplified guide to help you get started:
Step 1. Setting Up Your Workspace
- Text Editor: Choose a text editor designed for coding. Popular options include Visual Studio Code, Sublime Text, Atom, or Notepad++. These tools offer features like syntax highlighting and auto-completion, which make writing HTML easier.
Step 2. Creating Your First HTML File
- New File: Open your text editor and create a new file.
- Save as HTML: Save the file with the .html extension. For example, index.html.
Step 3. Write your HTML Using The Basic HTML Structure
Use the basic structure we covered and add your content.
- DOCTYPE: Start your HTML file with <!DOCTYPE html>. This declaration tells the browser that it’s an HTML5 document.
- HTML Tag: Enclose your content within <html> and </html> tags.
- Head Tag: Inside the <html> tags, add <head> and </head> tags. This section is for metadata, like the title of your page.
- Body Tag: After the </head> tag, add <body> and </body> tags. This is where the visible content of your web page goes.
4. Viewing Your Web Page
- Open in Browser: Locate your saved HTML file and double-click it. It should open in your default web browser.
Best Online Tutorials and Courses HTML Resources
The web is full of great places to learn more:
- W3Schools HTML Tutorial: Comprehensive and beginner-friendly, with interactive examples. https://www.w3schools.com/html/
- MDN Web Docs HTML: In-depth documentation with detailed explanations and references. https://developer.mozilla.org/en-US/docs/Web/HTML
- Codecademy Learn HTML: Interactive course suitable for hands-on learning. https://www.codecademy.com/learn/learn-html
Conclusion
HTML is the foundation of the web, and now you’ve taken your first steps toward understanding it. Remember, practice makes perfect. So, start experimenting, building your own webpages, and unleashing your creativity.
FAQs: What is HTML?
Read More: 10+ Best HTML Footer Templates
Contact US | ThimPress:
Website: https://thimpress.com/
Fanpage: https://www.facebook.com/ThimPress
YouTube: https://www.youtube.com/c/ThimPressDesign
Twitter (X): https://x.com/thimpress_com

