A favicon, or favorite icon, is a small image next to a page title on a browser tab. This site icon plays an essential role in establishing your website identity.
If you own a professional website, consider using favicons if you haven’t already. Here, we’ll discuss the importance of it and the things to consider when preparing it. We’ll also show you three methods on how to add a favicon to your WordPress website.
Why You Should Add a Favicon?
To demonstrate the importance of favicons, take a look at the screenshot below.

As you can see, each tab has different icons that differentiate the web pages you’re visiting. When you have a bunch of tabs on your browser, favicons help you identify these pages. As a result, it creates a better user experience.
A favicon isn’t only useful in browser tabs. When users add a page shortcut (Add a Favicon) to their mobile home screen or desktop, the favicon will be displayed on the screen. On top of that, favicons can work similarly to a logo. When people see it, they’ll instantly recognize your website and brand.
Add a Favicon: Preparing Your Favicon
The quickest and easiest way to create a favicon is to use favicon generators. No need to have any technical knowledge as most of them provide ready-to-use images that you only have to tweak a little.
Consider using your brand’s logo as well, but make sure it can be cropped into a square icon. It also has to look simple enough that you can see it clearly despite its small size. Use image editing programs like Photoshop, DesignWizard, or GIMP to modify and resize your logo.
For the image’s format, it’s recommended to use an ICO file because most browsers support it. However, not all photo-editing software allows you to create ICO files. Therefore, it’s better to use online favicon generators that provide the option. Or, save your image as PNG and use an online ICO converter. Usually, the size has to be 16 x 16 pixels.
If you use WordPress 4.3’s Site Icon feature, you don’t need to worry about converting your picture beforehand. You can now upload any image file as your favicon. Regardless, always make sure that it can be viewed in any browser after uploading it.
3 Ways to Add a Favicon to Your WordPress Site
There are three methods in which you can add a favicon to your website, choose whichever option you prefer.
Add a Favicon: WordPress Customizer
For WordPress 4.3 users, using the Site Icon feature is the most convenient and recommended way to add your favicon.
Prepare a square image that is at least 512 pixels in both height and width. The file should not exceed 128 MB. If you have a rectangular image, they will allow you to crop it as you upload your favicon.
Once your image is ready, follow these steps:
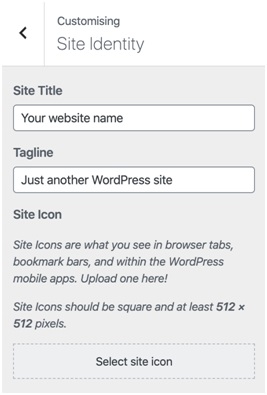
1. Open your WordPress Dashboard, go to Appearance, and select Customise.
2. Look for a tab that contains Site Icon. Most themes would have it in Site Identity, but some rename the tab to Site Title, Brand Name, Site Logo and Header, etc.

3. Select Site Icon and choose an image from your Media Library or upload a new file.
4. You’ll be led to the Crop Image editor. Adjust the position and proportions as you like.

5. Congratulations! You should have a new favicon. If it hasn’t appeared yet, WordPress recommends clearing your cache and restarting your browser.
Add a Favicon: Using Plugins
If you haven’t updated your WordPress, you can use plugins to add a favicon.
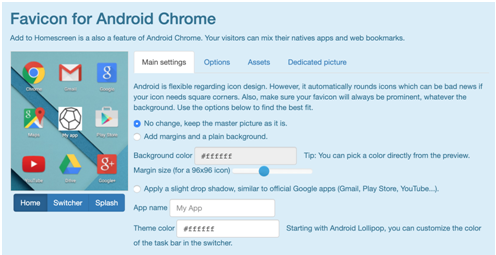
Some plugins provide you with more control over how your favicon looks on non-desktop devices. For instance, Favicon by RealFaviconGenerator gives you the option to customize your icon’s appearance in different operating systems.
To use the plugin, go through these steps:
- Go to Plugins and click Add New on your WordPress dashboard.
- Search for Favicon by RealFaviconGenerator, then Install and Activate the plugin.
- Select Appearance and click Favicon from the dashboard. Upload a square image that is larger than 70 x 70 pixels. Ideally, the picture should be 260 x 260 pixels or more.
- You’ll be redirected to a page where you can set your favicon’s look in iOS, Android Chrome, Windows, and Safari. Then click Generate your Favicons and HTML code.

Other than that plugin, you can use All in One Favicon. The plugin allows you to set different favicons for the back end and front end. This way, you won’t get confused when your website and dashboard are both open.
Add a Favicon: Manual Installation via FTP Client
Another method is to upload your favicon manually to your WordPress website. For this, you need to connect your website to an FTP client like FileZilla. Your icon can be in either ICO or PNG format and should be named favicon.
It’s also highly recommended that you create a child theme to use this method. That way, your code changes won’t get removed when there’s a new theme update.
When your site is connected, go through these steps:
- Upload your favicon file to your current theme folder through your FTP client. If you’re using a child theme, upload it to that folder.
- Add the same file to your root directory. It should be in the same folder as your wp-content and wp-admin. This is to ensure your favicons can be viewed in feed readers.
- On your WordPress Dashboard, go to Appearance and click Theme Editor.
- Now, select the Theme Header file and add this code below inside the tag if you have an ICO file:
<link rel=”shortcut icon” href=”<?php echo get_stylesheet_directory_uri(); ?>/favicon.ico” />
Replace the part after href= until /favicon.ico with the path to your root directory. It would look like this:
<link rel=”shortcut icon” href=”<http://www.yourdomainname.com/favicon.ico” />
If you have a PNG file, simply replace the file format. Then Update File.
5. Refresh your website. If it works, you should have a new favicon by now.
For all the methods, don’t forget to check your favicon’s appearance on mobile devices. Open your website from your mobile browser and add the site to your home screen.
Add a Favicon: Conclusion
Though they are small, favicons can raise brand recognition and create a better user experience. You can use online favicon generators or any image-editing software of your choice to create your own favicon. If you already have one, just add it to your WordPress website using any of the three methods above. Good luck!
Read more: Popular Plugins and Themes for WordPress LMS Websites


