Are you looking for the way to edit header section in Eduma?
The header is the first thing visitors see on your website. It holds your brand’s logo, the main navigation menu, and key contact information. A well-designed header is crucial for user experience and branding. If you are using the Eduma theme, you have powerful and user-friendly tools to create the perfect header for your educational website.
This guide will provide a clear, step-by-step process to help you edit header section in Eduma, from changing the layout to updating your logo.
Eduma – Education WordPress Theme
We provide an amazing WordPress theme with fast and responsive designs. Let’s find out!
Accessing the Eduma Theme Customizer
All visual and design-related settings for the Eduma theme are managed within the WordPress Customizer. This is your central hub for making changes and seeing a live preview of them.
First, log into your WordPress dashboard. From the main menu on the left, navigate to Appearance and then click on Customize.
This will launch the theme customization interface, where you can find all the settings to modify your website’s appearance.
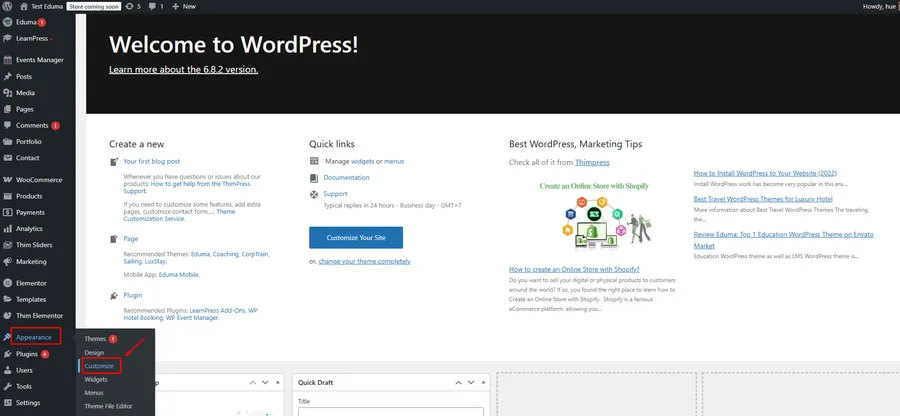
How to Edit Header Section in Eduma
Once you are in the Customizer, you will see a list of sections you can edit. To begin customizing your header, simply click on the Header tab.
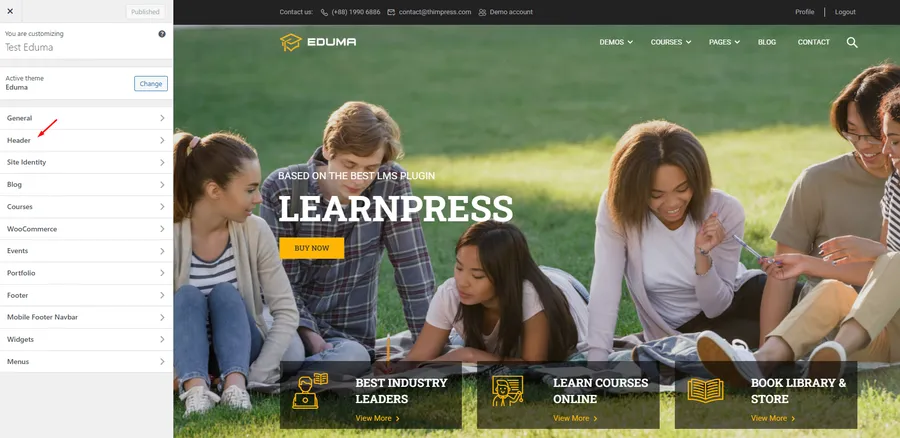
Here, you will find several options to control the look and feel of your header. Let’s explore the most important ones.
Choose a Header Layout
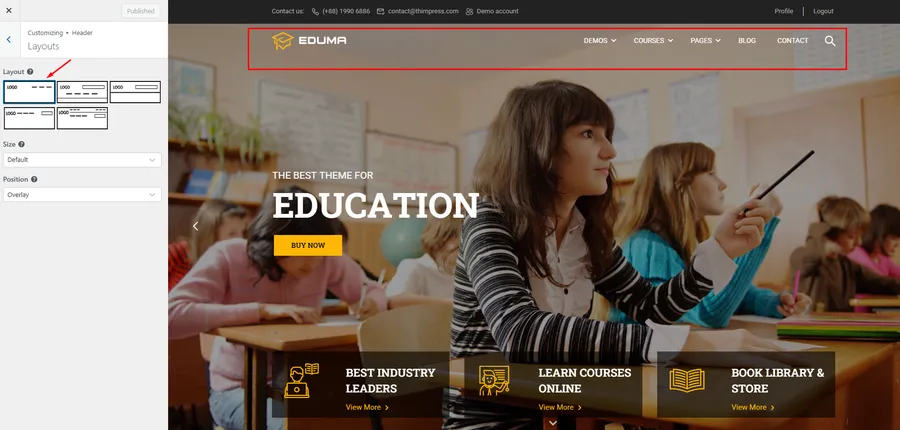
Eduma offers multiple pre-designed header layouts to fit different styles. You can choose a layout that places your logo on the left, in the center, or has a multi-row design.
- Inside the Header options, click on Layouts.
- You will see several layout thumbnails. Click on the one that best suits your website’s design.
- The live preview on the right will instantly update to show you how the new layout looks.
Configure the Sticky Header
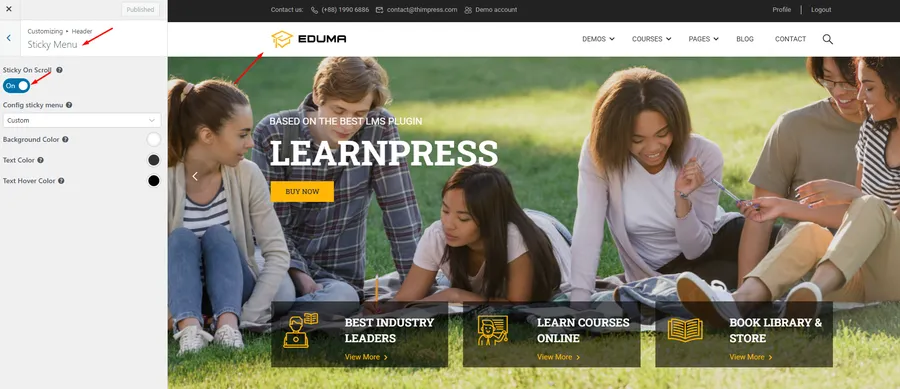
A sticky header (or fixed header) remains visible at the top of the screen even when users scroll down the page. This provides constant access to the navigation menu, improving the user experience.
- In the Header settings, find and click on Sticky Menu.
- To enable this feature, simply turn the Sticky On Scroll toggle to the “On” position.
- You can also customize the background color and text color for the sticky header to make it stand out.
Customize the Main Menu
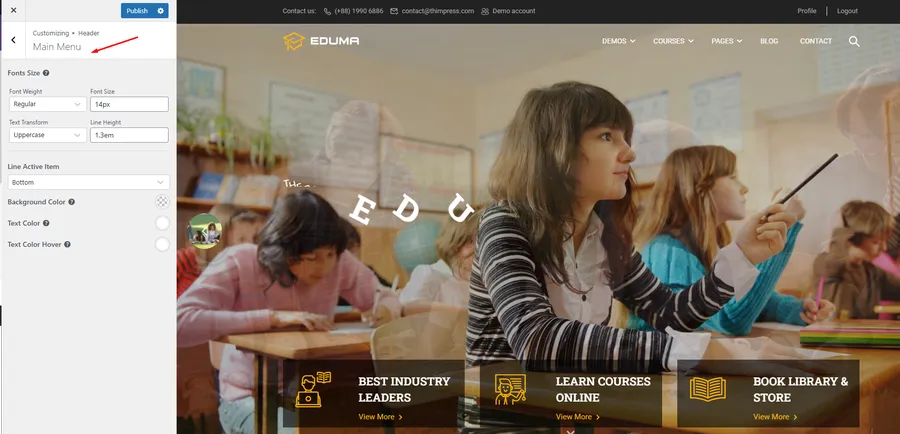
The main menu is your primary navigation. Eduma allows you to easily adjust its typography to match your brand identity.
- From the Header options, select Main Menu.
- Here, you can modify the following:
- Fonts Size: Change the size of the menu text.
- Font Weight: Make the text bolder or lighter.
- Text Transform: Set the text to uppercase, lowercase, or capitalized.
- Text Color: Choose a color for the menu links.
- Text Color Hover: Select a color that appears when a user moves their mouse over a menu link.
How to Change the Logo in Eduma
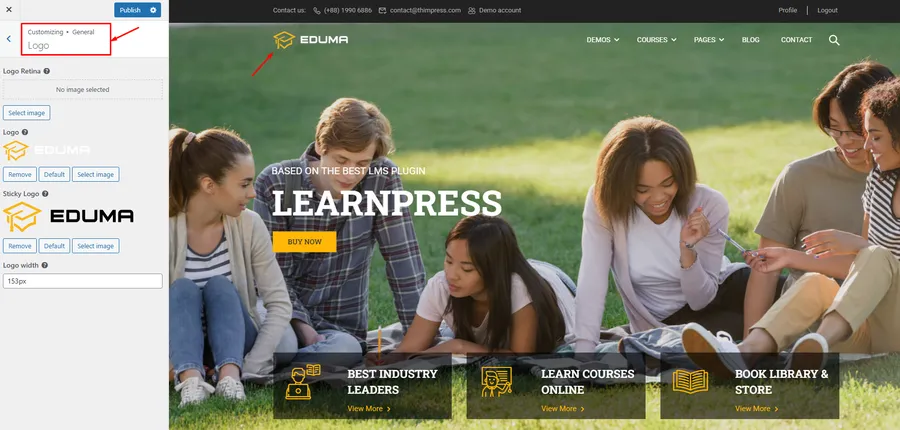
Your logo is a key part of your brand identity. The Eduma theme places the logo settings within the “General” tab of the customizer, making it easy to update.
- From the main Customizer menu, go to General > Logo.
- Here you will see options for the primary Logo and the Sticky Logo (the logo that appears on the sticky header).
- Click “Select image” to upload your new logo file (PNG, JPG, or SVG formats are recommended).
- You can also adjust the Logo width to ensure it fits perfectly within your chosen header layout.
FAQs About How To Edit Header Section In Eduma
Q1: Where do I find the header settings in the Eduma WordPress theme?
You can find all header settings by logging into your WordPress dashboard and navigating to Appearance > Customize > Header. The logo settings are located in Appearance > Customize > General > Logo.
Q2: How do I make my header stay at the top of the page when I scroll?
To make your header fixed, go to Customize > Header > Sticky Menu and turn on the "On Scroll" option. This will enable the sticky header feature.
Q3: Can I change the font and color of my main menu in Eduma?
Yes. You can easily change the menu's typography and colors by going to Customize > Header > Main Menu. There you will find options for font size, weight, and colors for both normal and hover states.
Conclusion: Edit Header Section In Eduma
Customizing your website’s header is one of the most effective ways to establish your brand identity and improve site navigation. As you can see, the Eduma theme provides a powerful yet straightforward set of tools within the WordPress Customizer.
By following the steps outlined above, you can confidently edit header section in Eduma—from selecting the perfect layout and adjusting menu typography to uploading your logo and enabling a sticky header. With these intuitive options, you don’t need any coding knowledge to create a professional and functional header that enhances your educational website.
Read more:
Contact US | ThimPress:
Website: https://thimpress.com/
Fanpage: https://www.facebook.com/ThimPress
YouTube: https://www.youtube.com/c/ThimPressDesign
Twitter (X): https://x.com/thimpress_com


