Whether you’re safeguarding your valuable product data, migrating to a new Shopify store, or making bulk edits for efficiency, exporting your products is a key skill every Shopify merchant should master.
In this post, we’ll guide you through the simple steps to Shopify export products, ensuring a smooth and error-free process. Learn how to create backups, move your inventory seamlessly, and make bulk edits with ease.
Let’s explore the power of product exports and take control of your Shopify store!
COMA – Modern Multipurpose Shopify Theme OS 2.0
We provide an amazing Shopify theme with fast and responsive designs. Let’s find out!
Why Export Products?
Before we dive into the how-to, let’s explore some common scenarios where exporting your products becomes necessary on Shopify:
- Creating a Backup: Having a backup ensures that you can recover your information in case of accidental deletions or unforeseen issues.
- Moving to a New Shopify Store: If you’re planning a store migration, exporting your products is the first step. You can then import the CSV file into your new store, seamlessly transferring your product listings.
- Bulk Editing Products: While Shopify offers a bulk editor within the admin, sometimes you might need the power of a spreadsheet program like Excel to make extensive changes to your products. Exporting to a CSV file allows you to do just that.
1. How To Shopify Export Products
You can easily export products from Shopify with 4 simple steps:
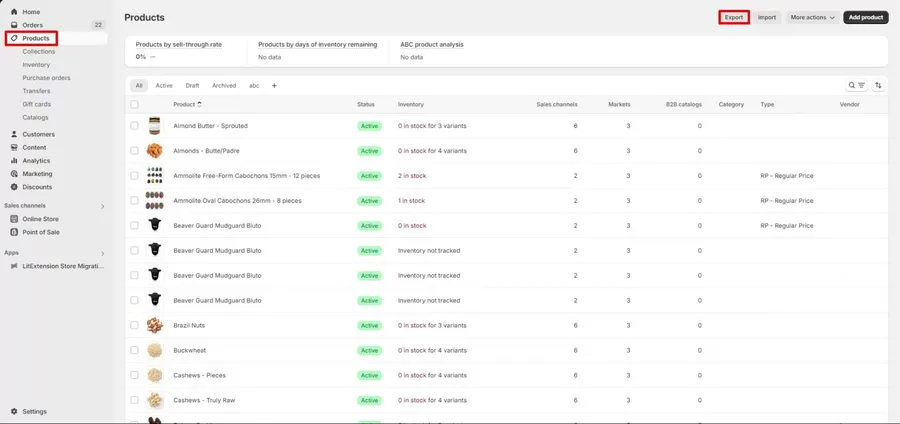
Step 1: Navigate to the Products Page
- Log in to your Shopify admin.
- From the left-hand menu, go to Products.
- If you wish to export only specific products, apply filters to your product list before proceeding.

Step 2: Initiate the Export
- Click the Export button.
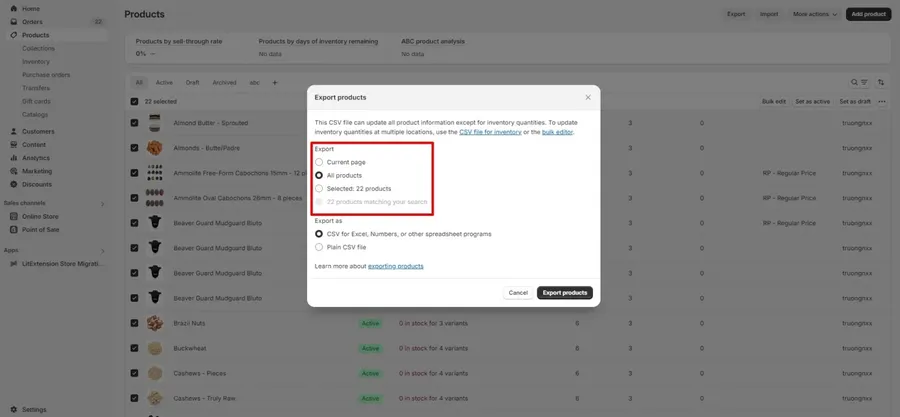
- A dialog box will appear, offering several export options.
Step 3: Choose Export Parameters

Which products to export: Select from options like the current page, all products, selected products, or products matching your filters.
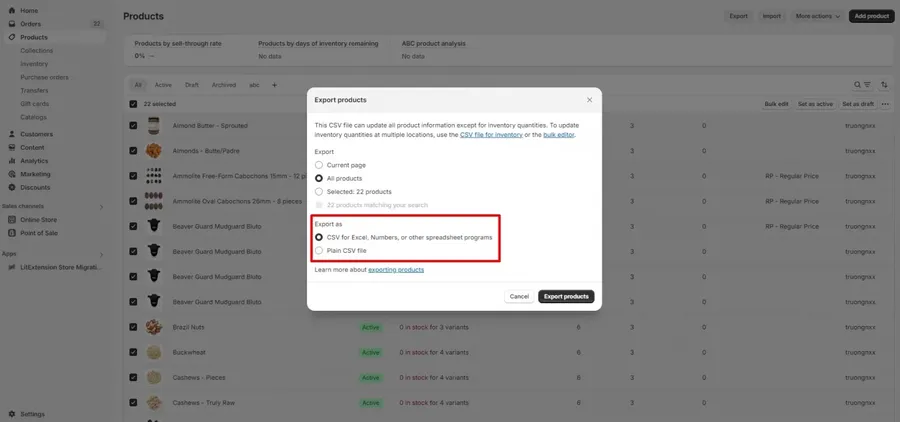
CSV file type:
- For spreadsheet programs: If you plan to edit the CSV file in Excel, Numbers, or another spreadsheet program, choose this option.
- Plain CSV file: If you intend to use a plain-text editor, select this format.

Step 4: Export
- Click the Export products button.
- Depending on the number of products exported, the CSV file will either be downloaded directly to your browser (up to 50 products) or emailed to you and the store owner (51 or more products).
Caution: Be careful when sorting your CSV file in a spreadsheet program. Sorting can cause product variants or image URLs to become disassociated. Importing a sorted CSV file might overwrite your existing products with incorrect data, which cannot be recovered.
Important Considerations for Shopify Product Images
It’s crucial to remember that when you export your products, the CSV file itself doesn’t contain the actual images—only their URLs. If you’re transitioning your products to a new platform and intend to close your current Shopify store or remove some product listings, it’s imperative to upload your product CSV file to the new store while your existing store and its products remain live and publicly accessible.
This is because when you import products into a new store, the associated images are only successfully transferred if their original URLs remain active. To guarantee your product images are correctly linked in your new store, avoid making any changes to your old store or its product visibility until the import process is fully completed. By doing so, you ensure a smooth transition and preserve the visual integrity of your product listings.
2. Use a Text Editor to Edit Your Products CSV File (If Necessary)
If you don’t have access to a spreadsheet program, you can edit your CSV file using a basic text editor.
Caution: Using a text editor should be a last resort. It’s best to use a spreadsheet program if possible, as text editors are more prone to errors. Consider using a text editor only if there are formatting issues with your CSV file that prevent it from opening in a spreadsheet program.
Most computers have built-in text editors that can open CSV files. You can also use a dedicated code editor like Visual Studio Code or Sublime Text for more advanced editing and debugging.
Note: Shopify only supports importing and exporting CSV files with UTF-8 encoding.
When formatting your CSV file in a text editor, keep these points in mind:
- Column headers must be separated by commas (e.g., First Name, Last Name, Email, Company, Address1).
- Lists of tags must be wrapped in quotation marks (e.g., “tag1,tag2,tag3”).
- Tags are not case-sensitive.
- Different records (i.e., rows) must be separated by line breaks.
3. Filter and Export Your Products List (Optional)
If you only need to export specific products, you can use filters to refine your Shopify products list before exporting.

- On the Products page in Shopify, add filters using conditions that will display only the products you want to export.
- Click Export and select the option to export only the products that match your filter.
This will generate a CSV file containing only the products from your filtered list.
4. Import Your Edited CSV File (If Applicable)
After you’ve made any necessary changes to your exported product CSV file, you can import the edited file back into Shopify to update your product data.
Remember: Exporting your Shopify products is a valuable tool for managing your Shopify store. Whether you’re backing up your data, migrating to a new store, or making bulk edits, the process is simple and efficient. By following these steps, you can ensure that your product data is always safe, organized, and up-to-date.
Conclusion: Shopify Export Products
Shopify export products don’t have to be a daunting task. With Shopify’s built-in export functionality and the steps outlined in this blog post, you can easily manage your product information, create backups, migrate to new stores, and perform bulk edits with confidence. Remember to handle your CSV files with care, especially when sorting or editing in a text editor, to avoid data corruption.
Read more: How to Connect Shopify with eBay? 3+ Shopify eBay Integration Apps
Contact US | ThimPress:
Website: https://thimpress.com/
Fanpage: https://www.facebook.com/ThimPress
YouTube: https://www.youtube.com/c/ThimPressDesign
Twitter (X): https://x.com/thimpress_com


