Are you looking to expand your WordPress website’s reach to a global audience? Look no further than Loco Translate! This powerful Loco Translate WordPress plugin simplifies the process of translating your WordPress theme, allowing you to cater to users who speak different languages. In this comprehensive guide, we’ll walk you through each step, ensuring you can seamlessly translate your theme without any hassle.
How To Translate Your WordPress Theme with the Loco Translate Plugin
This guide will walk you through adding your translations to a theme that has already been set up for translation.
1. Check you can switch language
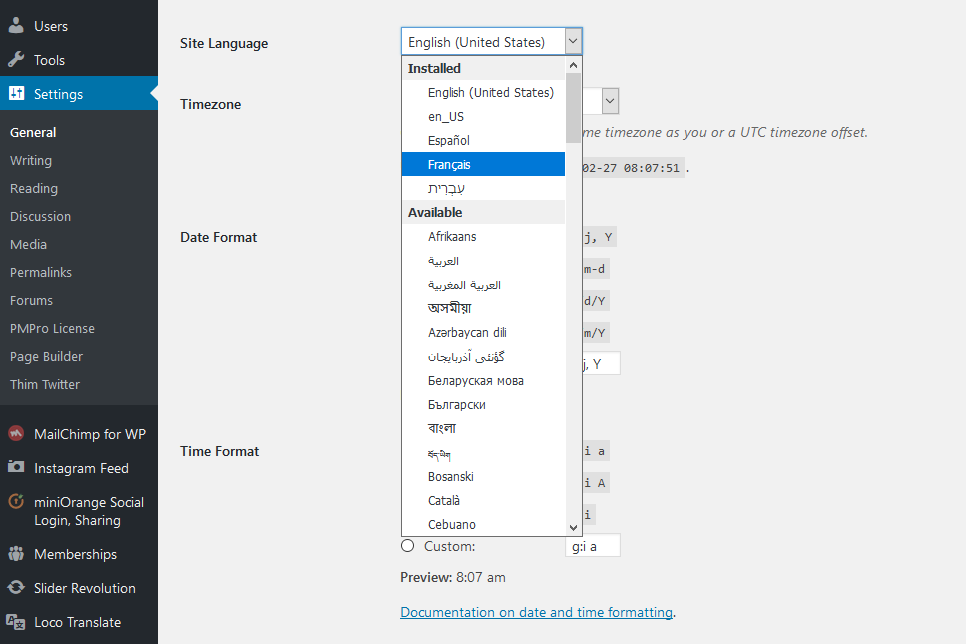
Visit Settings > General > Site Language. Changing this will set a new default language for all site visitors. Try it and you should see something like this:

Continuing the theme of our example, we’re going to set the language to French, listed under “Available > French” in the list.
2. Find the theme in the translation dashboard and add a new language
- If you haven’t installed and enabled the Loco Translate plugin yet, do that now. This guide assumes you already know how to install and enable WordPress plugins.
- Visit Dashboard > Loco Translate and select the “Themes” sub-section. This will take you to a list of all available themes in your WordPress. You should see your theme in the list regardless of whether it’s your active theme.

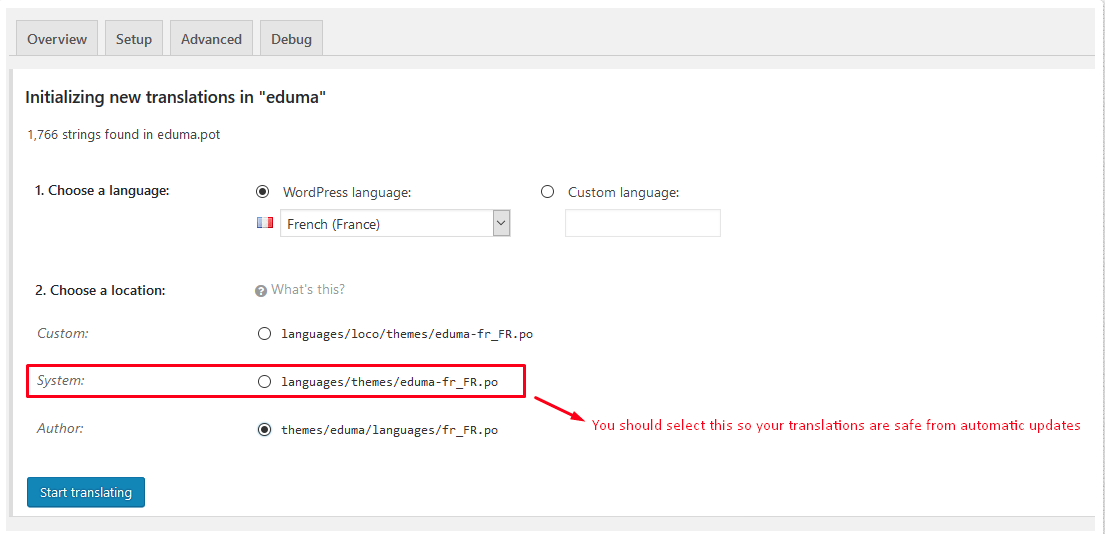
- Click the theme that you want to translate and you should see a button “New language”. Click this button and you’ll be taken to a new screen where you can choose the language you want.
- Select a language from the drop-down list of common languages. In this example, we’ll select ‘French’.

- Click the “Start translating” button and you’ll be taken to the editor screen for translating the theme.
3. Translate some strings
Once on the editor screen, you’ll see all the strings the theme has defined in its template file. Untranslated strings are shown in bold blue. To start with they will all be untranslated.
Select the English string at the top and enter your translation in the panel at the bottom. You can ignore most of the editor buttons for now. We’re just going to enter a translation and save it.
For our example, we’ve picked out the phrase “Leave a comment“. Using the text filter at the top of the editor we can find this phrase quickly and select it in the list. Then we enter the text “Laissez un commentaire” into the bottom panel as our translation.
The string at the top now shows a star icon to indicate that our changes are not yet saved.
Notice: After you have already updated the theme recently, click “Sync” button before translating. This action will update all strings missed before

Continue to translate as much as you like and when you’re ready click the Save icon in the editor toolbar. Congratulations, you’ve saved your first WordPress translation.
Learn More from ThimPress Knowledge Base Articles:
- How to Fix “Broken Theme and/or Stylesheets Missing” Error in WordPress
- One-Click Installation: Launch A WordPress Site in Minutes
- How to Extend Support for ThimPress Product on ThemeForest
- ThimPress’s Documentation Portal
- Outdated Template in WordPress Themes: How to Fix It?
- How to Add LearnPress Instructor to a Course: Step-by-Step
- Custom CSS Support for LearnPress Websites
- How to Import Eduma Landing Page for Your Website?
- Remove Shipping Information on WooCommerce Add-on
- Live Stream Your Lesson with LearnPress
Contact US | ThimPress:
Website: https://thimpress.com/
Fanpage: https://www.facebook.com/ThimPress
YouTube: https://www.youtube.com/c/ThimPressDesign
Twitter (X): https://twitter.com/thimpress
