Do you want to boost engagement and interaction on your WordPress site? HTML forms are your answer! For those seeking AI-powered solutions, exploring the 10+ Best Free AI Tools for Generating HTML Code can further streamline your form creation process. They’re the perfect tools for everything from simple contact requests and newsletter signups to gathering valuable feedback and facilitating complex interactions.
But building HTML forms from scratch can be intimidating, especially if coding isn’t your forte. Don’t worry, though! The HTML Forms plugin for WordPress makes creating and managing forms a breeze, even without coding experience.
This step-by-step guide will show you how to effortlessly add and customize HTML forms using the free HTML Forms plugin. You’ll be able to create engaging forms that seamlessly integrate with your WordPress site in no time. Let’s get started!
Eduma – Education WordPress Theme
We provide an amazing WordPress theme with fast and responsive designs. Let’s find out!
What Are HTML Forms?
HTML forms are the foundation of interactive websites. They’re essentially online questionnaires that allow your visitors to provide information in a structured way. This information can be anything from basic contact details and newsletter subscriptions to detailed feedback, orders, or even complex survey responses.
Unlike forms created with visual drag-and-drop builders, HTML forms are built using code. This means you have granular control over every aspect of the form, defining each field (text boxes, checkboxes, radio buttons, etc.) and its behavior. You’re the architect, designing both the look and the functionality.
Benefits of Creating HTML Forms from Scratch
While form builders offer convenience, hand-coding your HTML forms provides distinct advantages:
- Optimized Performance: HTML forms tend to be lightweight, leading to faster loading times and reduced memory usage. This contributes to a better user experience, especially on mobile devices or slower connections. To further enhance your site’s speed and performance, consider integrating tools from our 15 Best WordPress Site Optimization Plugins.
- Unparalleled Control: You have complete control over the form’s design and functionality. You’re not limited by the features or constraints of a form builder, allowing for unique and tailored solutions.
- Ultimate Customization: HTML forms offer unmatched flexibility. You can precisely tailor the form to your specific needs, integrating it seamlessly with your website’s design and branding.
- Enhanced Accessibility: With careful coding, you can ensure your forms are accessible to everyone, including users with disabilities. This involves using semantic HTML, proper labels, and ARIA attributes.
- Deeper Understanding: Building forms from scratch provides valuable coding experience and a deeper understanding of how web forms function. This knowledge can be beneficial for future web development projects.
Challenges of Hand-Coding HTML Forms
While hand-coding offers numerous benefits, it’s essential to be aware of potential challenges:
- Cross-Browser Compatibility: Ensuring your form looks and functions consistently across different web browsers can require extra effort and testing.
- Form Validation: Implementing robust form validation with JavaScript can be complex, requiring thorough testing to ensure accurate data collection and processing. Clearout’s Form Guard eases this process by adding advanced contact validation that blocks fake or invalid submissions in real time and ensures clean and verified data without developer assistance.
- Time Investment: Building forms from scratch can be more time-consuming than using a visual builder, especially for complex forms. To expedite this process, you might explore our Top 11 HTML Code Generators.
Step 1: Install and Activate the HTML Forms Plugin
Before we begin, ensure you have the HTML Forms plugin installed and activated on your WordPress website. If you haven’t already, you can easily install it by navigating to Plugins » Add New in your WordPress dashboard, searching for “HTML Forms,” and clicking Install Now. Once installed, click Activate.
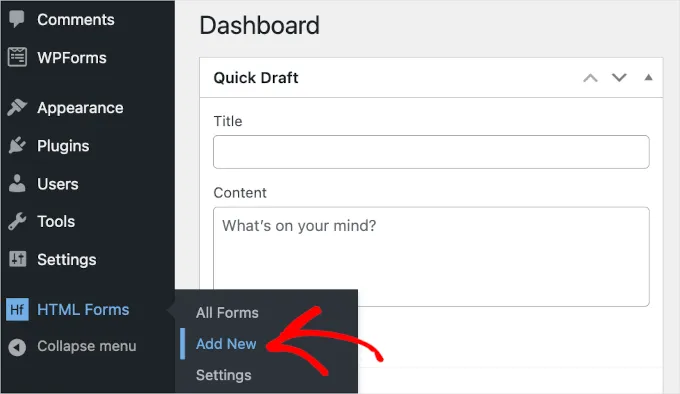
Step 2: Create a New Form
Once the plugin is activated, go to HTML Forms » Add New in your WordPress admin dashboard.
This will take you to the ‘Add New Form‘ page. Give your form a descriptive name in the ‘Form Title‘ field. For this example, we’ll call it “Newsletter Sign-Up.”
Click the Create Form button.
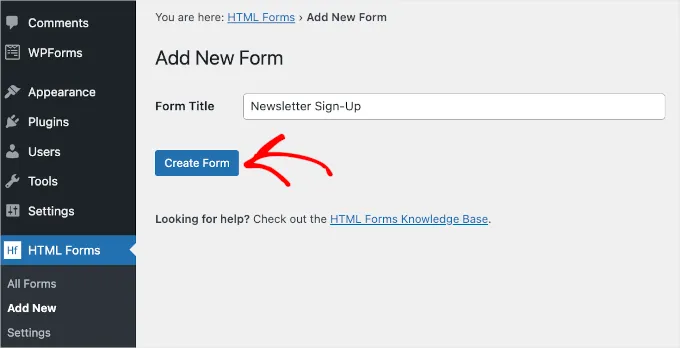
Step 3: Customize Your Form
You’ll now be on the ‘Edit Form‘ page, where you can customize your HTML form.
Familiarize Yourself with the Interface
At the top, you’ll see your form’s title, slug, and shortcode. Below that are the menu tabs: Fields, Messages, and Settings.
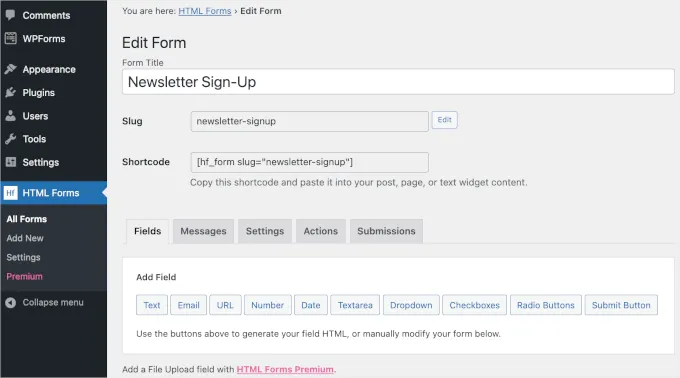
Add Fields to Your Form
The Fields tab contains various field buttons (Text, Dates, Checkboxes, Radio buttons, etc.) that you can add to your form.
Scroll down to see a pre-built HTML form with a preview. This basic contact form includes fields for name, email address, subject, and message.
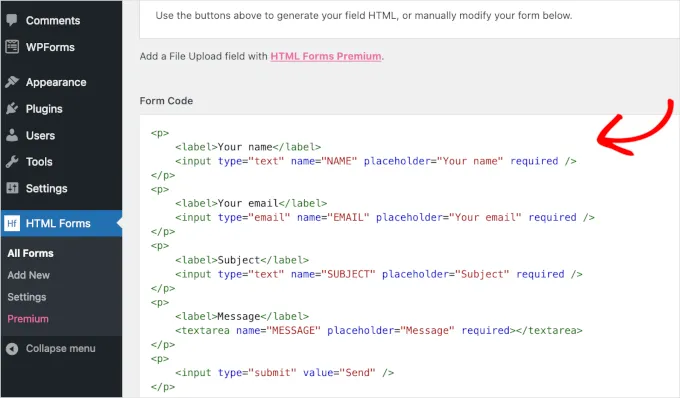
To add a new field, click one of the field buttons above the ‘Form Code‘ section. For our newsletter signup form, let’s add a dropdown field with a “Yes/No” option for subscribing to the newsletter.
Click the Dropdown button to open its configuration options. Enter a label (e.g., “Subscribe to our newsletter?“) and the choices (“Yes” and “No“).
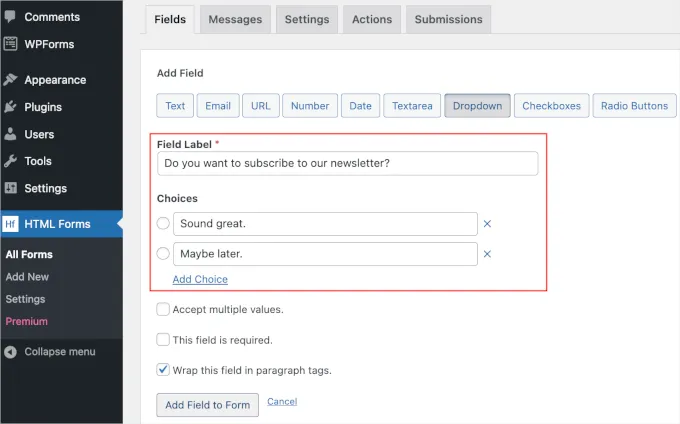
Click Add Field to Form.
You’ll now see the dropdown field tag in the ‘Form Code‘ section.
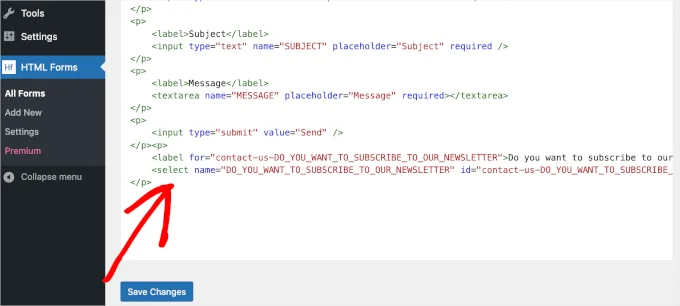
Reorganize and Remove Fields
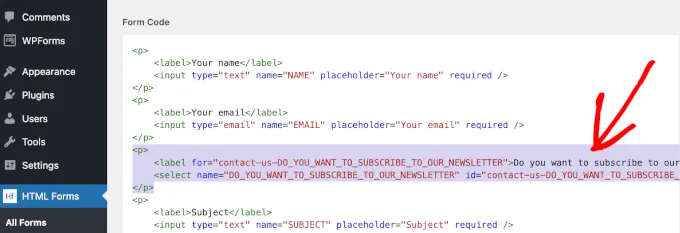
To ensure a logical flow, you may want to rearrange the fields. To do this, cut and paste the field tags within the ‘Form Code’ section. For instance, move the dropdown field tag below the ‘Email‘ tag.
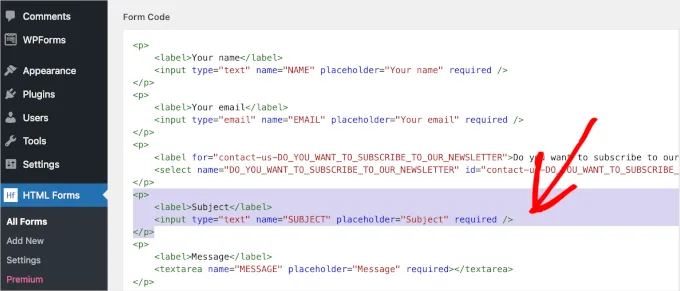
You can also remove unnecessary fields by deleting their tags. In our example, we can remove the ‘Subject‘ field since it’s not relevant to a newsletter signup form.
Preview Your Changes
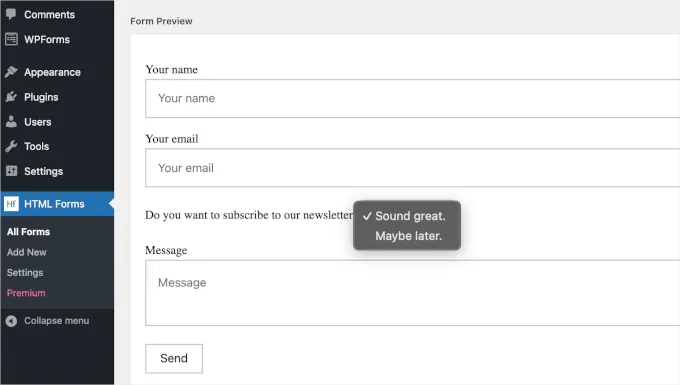
After making changes, scroll down to the ‘Form Preview‘ section to see how your form looks and ensure everything works correctly.
Save Your Form
Once you’re happy with the form, click the Save Changes button under the ‘Form Code‘ section.
Step 4: Configure Form Messages and Settings
Messages Tab
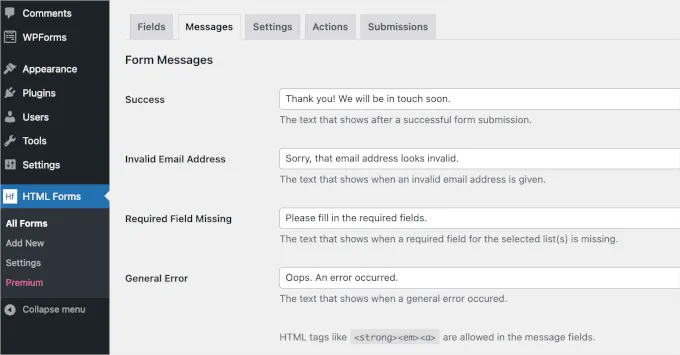
Click the Messages tab to edit the pre-made messages displayed to users upon form submission (e.g., success message, error message). You can customize these messages to match your website’s tone and style.
Settings Tab
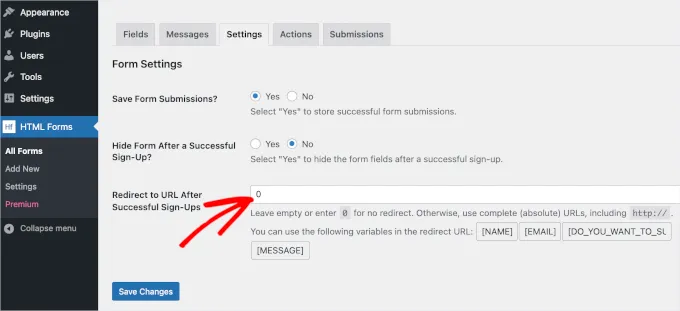
Click the Settings tab to configure form settings. By default, the plugin saves each form submission and doesn’t hide the form after submission. You can change these settings if needed.
You can also redirect users to a different URL after successful form submission by entering the URL in the ‘Redirect to URL After Successful Sign-Ups‘ field. Alternatively, enter “0” to keep users on the same page.
Save your changes after making any modifications in the Messages and Settings tabs.
Step 5: Add the Form to a WordPress Page
Now it’s time to add your form to a page on your website.
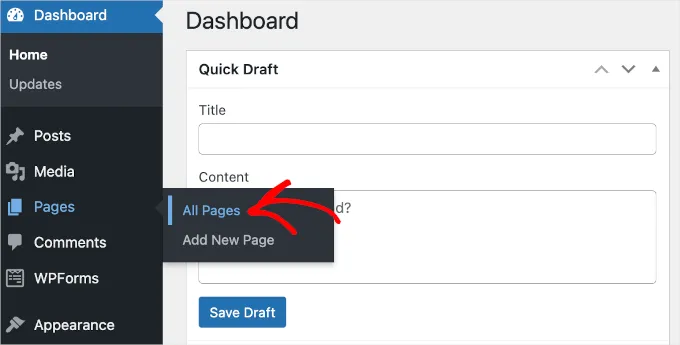
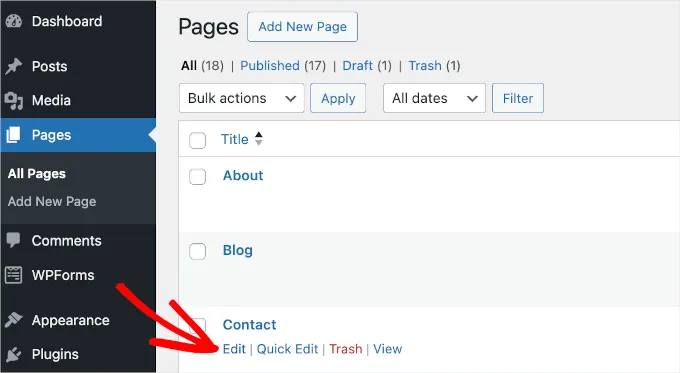
Go to Pages » All Pages in your WordPress dashboard.
Select the page where you want to add the form and click Edit.
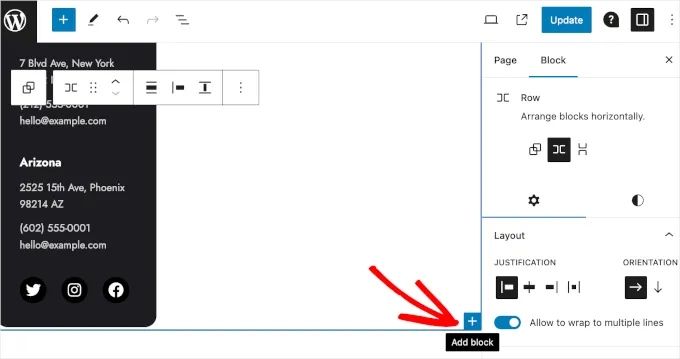
In the block editor, choose the location for your form. Click the + button to add a block and search for “HTML Forms.”
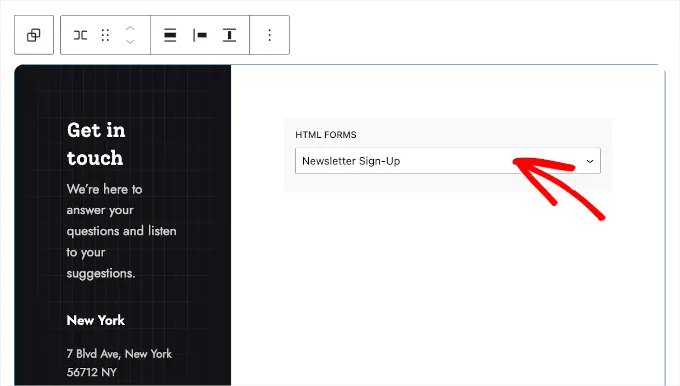
Click the HTML Forms block and select your “Newsletter Sign-Up” form from the dropdown menu.
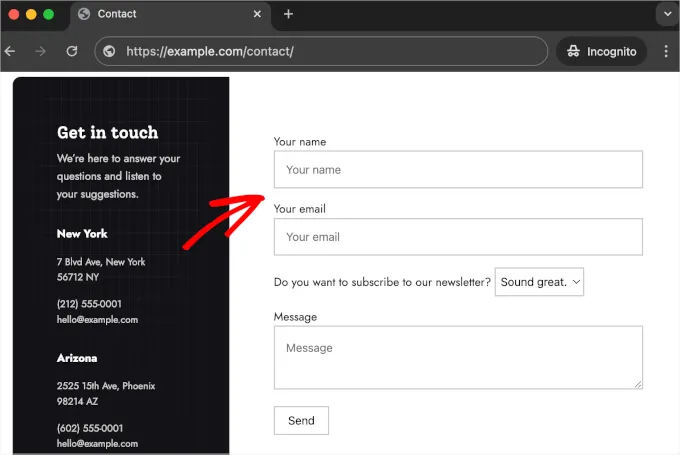
Click Update to publish the page with your form and see it live.
Step 6: View Form Submissions
To view submissions, go to HTML Forms » All Forms in your WordPress dashboard.
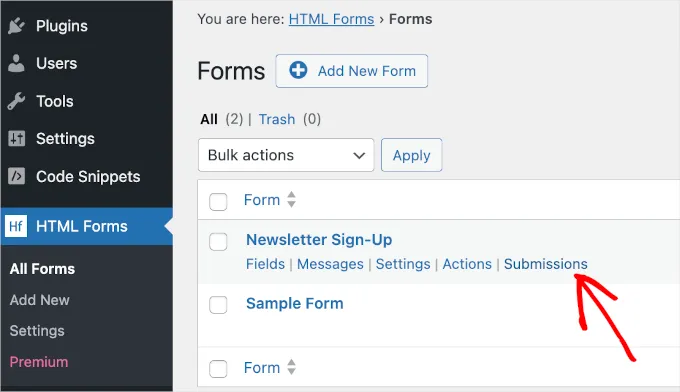
Hover over the form and click the Submissions button.
You’ll see a table with all the form submissions, including the submitted information and timestamp.
Conclusion
The HTML Forms plugin provides a simple and effective way to add custom HTML forms to your WordPress website. By following this guide, you can easily create and configure forms to collect information from your visitors, whether it’s for newsletter signups, contact requests, or other purposes.
Remember to explore the plugin’s features and experiment with different field types and configurations to create forms that perfectly suit your needs. Additionally, enhancing your site’s SEO through effective internal linking strategies can further improve user engagement. Learn more in our guide on 12 Techniques to Index Your Website on Google.
Read more: 10+ Best Tools to Convert HTML to PDF
Contact US | ThimPress:
Website: https://thimpress.com/
Fanpage: https://www.facebook.com/ThimPress
YouTube: https://www.youtube.com/c/ThimPressDesign
Twitter (X): https://x.com/thimpress_com


