No one wants to have poor navigation features on their websites, right? These matters cause a bad user experience and a high bounce rate. Plus, visitors have trouble playing around and finding what they need on your website quickly. So it’s time for you to create a WordPress Dropdown Menu!
A dropdown menu is a menu showing a list of links. When you hover, move the mouse to an option on the menu. If you notice, most websites use this kind of menu. You can check by taking your mouse to our menu and seeing it.
So in this guide today, we’ll show you steps to create a dropdown menu on your website. Let’s dive in!
The Benefits of Using Dropdown Menus in WordPress
If your website is built on the WordPress platform, you can easily make a WordPress Drop Down Menu without requiring any code.
These menus include options that link to your website pages. You can find navigation menus quickly on the top of your site and next to your website’s logo.

Please note that if you have just started a blog or a basic website with some pages, you can add them in a single row. However, if you have a large site, you need to add more options to the navigation menu.
These menus are the perfect solution for the limited space problem by using menu links when visitors hover their mouse over each parent item. Moreover, you can divide and organize your menu structure based on topics or hierarchy. These help your site look amazing and impress visitors as well.

How to Build a WordPress Dropdown Menu with No Coding Required?
Step 1: Choosing a Theme with Dropdown Menu Support
To display the Drop Down Menu WordPress, we have to access your theme since most themes come with menu support. So how can you tell if your theme has a dropdown menu feature? It’s easy to visit the theme’s website and find the theme demo’s link.
If that demo shows a dropdown menu in the navigation menu, then you can create these menus now. If not, you have to find a theme that supports the features.
We have listed some of the great themes that offer the WordPress Dropdown Menu such as Eduma, Astra, Oceanwp, Ultra, and Divi.
- Eduma: It’s a best-selling WordPress education theme on the Themeforest marketplace. You can use it to create any education websites such as academies, schools, LMS, etc.
- Astra: This is a multipurpose WordPress theme. You can download it easily for free via WordPress.org. If you go with premium versions, there are a dozen starter sites to choose from.
- Oceanwp: It’s a free theme and you can use it for creating all kinds of sites.
- Ultra: It’s a famous WordPress theme created by Themify Builder.
- Divi: Divi does not use a 3rd-party builder plugin since they have their page builder and offer a lot of amazing features. All levels can use Divi easily without coding skills.
Step 2: Creating a Navigation Menu in WordPress
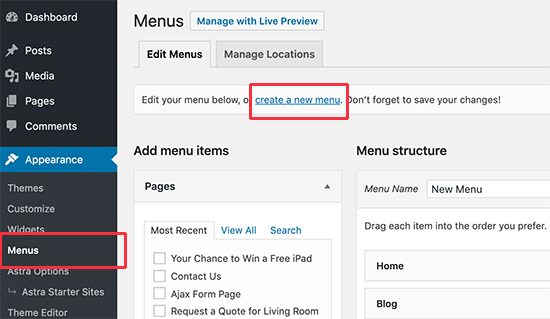
Firstly, you have to open your WordPress dashboard -> find Appearance -> select Menus -> click Create a new menu link in the Edit Menus tab.
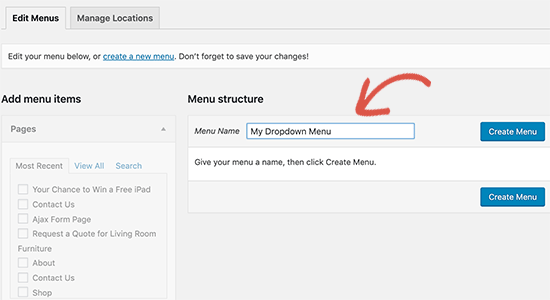
Then type the Menu Name and click Create Menu. Visitors will not see this menu name on your website. It is just for identifying each menu easily in your admin area.
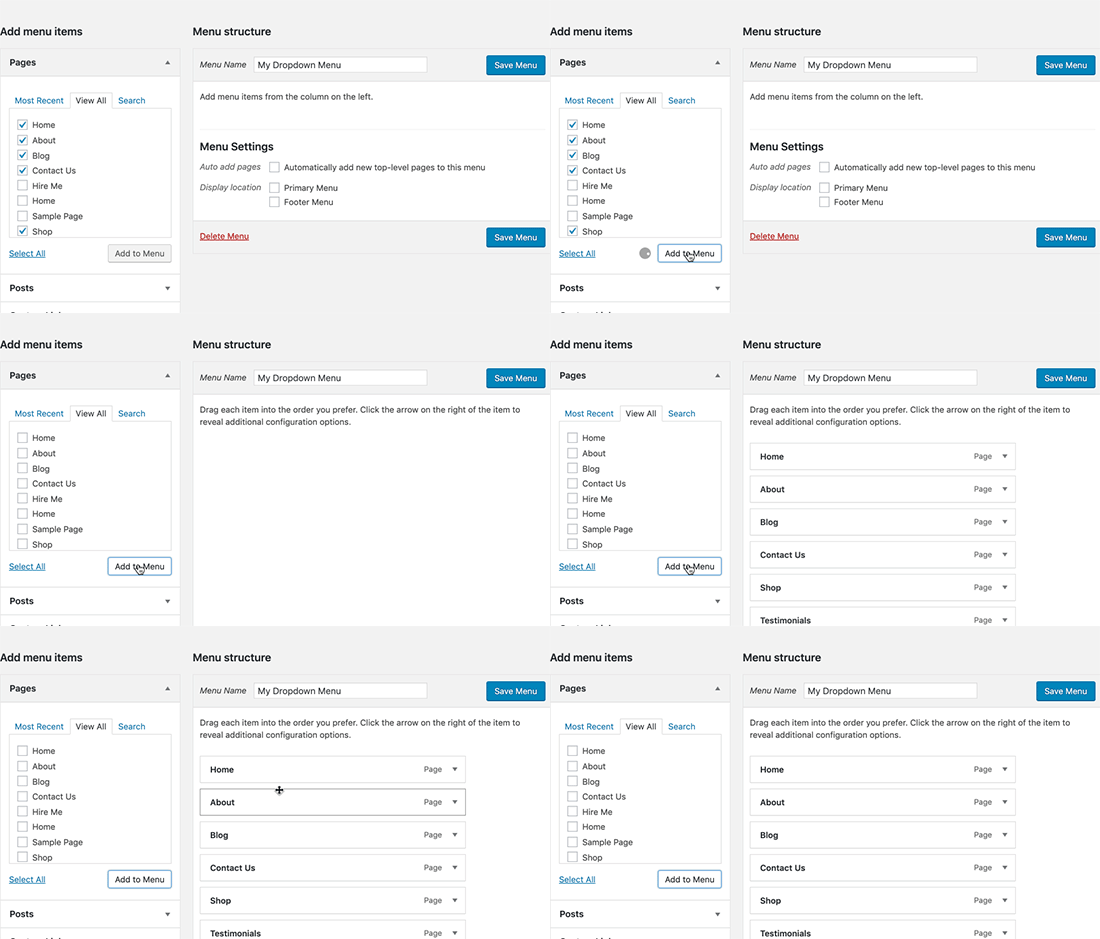
Next, you’ll see a new empty menu to add menu items to your navigation menu. They will appear in the top row of your website menu.
After selecting the pages you need to add to the menu from the left side, click Add to Menu so your pages will be displayed in the new menu. There are blog posts and categories to select too. Add custom links is available as well.
Step 3: Creating Sub-Items in a Navigation Menu
When hovering your mouse over your WordPress Dropdown Menu, you will see sub-items. To have these sub-items, you have to add them under existing items.
We will go to Categories to make sub-items as an example.
Firstly, select items in Categories and click Add to Menu. All those items now will be in the right column.
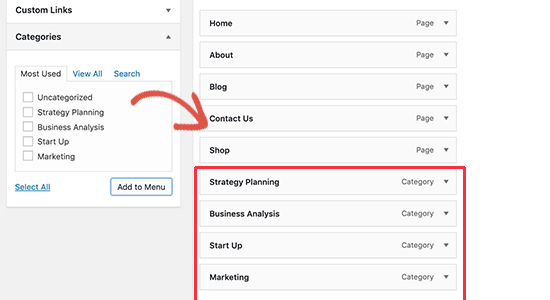
However, it looks the same with others. So you have to make these items sub-items.
Simply drag a menu item and drop it below the parent item you want. Then you should move it slowly to the right side and it will immediately become a sub-item.
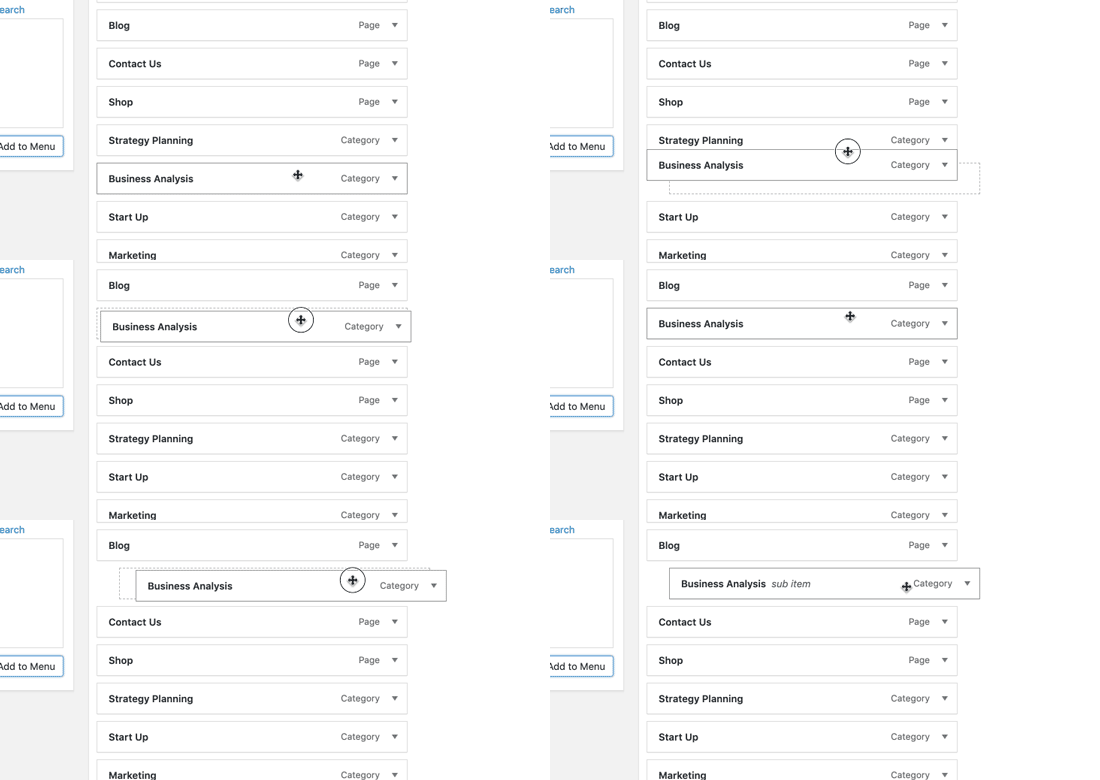
Do it again for others to make your WordPress Dropdown Menu.
When you’re done, click Save Menu to save all your changes.
Step 4: Publish Your Dropdown Menu
In the Menu Settings, there are different locations to choose for displaying these new menu items. It depends on the theme to define the menu locations.
For example, you choose Primary Menu in the Display location and click Save Menu to publish your Dropdown Menus in WordPress.
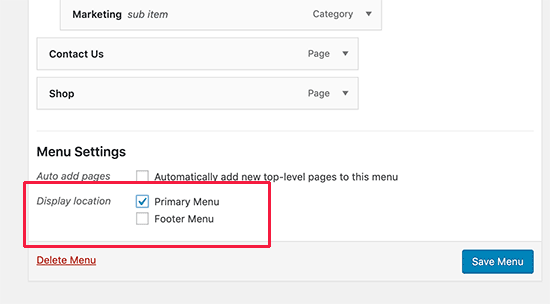
Now is the time to visit your site to see how it looks.

However, if your WordPress Dropdown Menu is live on your website and you just edit it, you don’t have to do anything since all changes will appear on your website right away.
Some Tips When Creating Interactive WordPress Dropdown Menus
When visitors visit your website and they want to read more information, WordPress Dropdown Menus are exactly the first place to look. Hence, you should correctly create these menus to keep users staying on your website longer with your useful content. Of course, it’ll help to increase your site’s pageviews, conversions, and even sales.
So let’s work through our few tips below while creating your interactive dropdown menus.
Allowing to Make Multi-level Dropdown Menus
Apart from making a sub-item under your parent item, you can also create another sub-item below the existing sub-item as well. It means your website can have multi-level dropdown menus. Find out how it looks in our WordPress Dropdown Menu image example below.
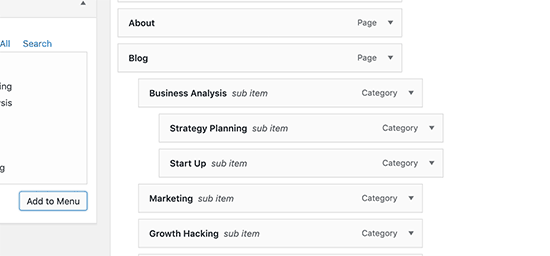
When moving each sub-item to the right, your theme will automatically show “sub item” in each dropdown.

Allowing to Creation of Multiple WordPress Dropdown Menus
It’s possible to create multiple-level dropdown menus and of course, you can create multiple dropdown menus on your website.

Create Menus with a Live Preview
Another way to help you see your WordPress Dropdown Menu look while creating is to switch to the live preview.
Let’s open your WordPress dashboard -> Appearance -> Customize to use the live customizer.
Find the Menu tab and select the navigation menu to open the menu editor. You can drag and drop each item and see your changes right away on your screen’s right side.

Final Thoughts
Hopefully, you will enjoy our guide today and understand How to Create a WordPress Dropdown Menu. Surely, your live menu will be useful, easy to use, and increase the user experience with high performance.
Read More: Beginner’s Guide: How to Change WordPress Theme?
Contact US | ThimPress:
Website: https://thimpress.com/
Fanpage: https://www.facebook.com/ThimPress
YouTube: https://www.youtube.com/c/ThimPressDesign
Twitter (X): https://x.com/thimpress_com


