When it comes to eCommerce and online shopping, the need to do A/B testing is almost always a priority. That’s why many customers often ask us about how to edit the button in Eduma.
The reason is simple: even the tiniest detail can make the most difference. One such thing is your website’s wording. When building the best education WordPress theme, Eduma, and LearnPress – WordPress LMS, we have tried our best with A/B testing, and we’ve set the “Buy Now” button as the default text for the CTA of asking people to buy the course.
However, in many situations, you may want to change it to something else like Take This Course, Buy Now, Add To Cart, etc. There’s a very easy and simple way to do this using a translation plug-in called Loco Translate.
A Step-by-Step Edit The Button in Eduma
Here is a step-by-step guide to editing the button in Eduma:
1. Install the Loco Translate Plugin
Go to your WordPress Admin, go to Plugins > Installs > Search for Loco Translate.
Install and Activate the plugin Loco Translate.
What is Loco Translate and what it does: Loco translate is a WordPress plugin for translating and localizing your WordPress theme to match your site’s audience. You can create translations for any language, or you can change the wording of some words or phrases that are used by default in your theme or your plugin.
The best thing is that Loco Translate can be used to efficiently translate any plugin or theme, not just Eduma and LearnPress.
2. Change Your Site’s Language
For ease of use, let’s use an example situation: Your site’s language is at the default setting – English (USA), but you want to change only the word Buy This Course to Take This Course Now.
First, you will need to change your site’s language to something else other than English (USA). Let’s say English (UK). This doesn’t mean that you will have your site translated from English (USA) to English (UK).
The translation of English (UK) is non-existent on your site, and we are only using it as a bridge for you to store your translation for all of your changes.
If you want to change something else apart from “Buy This Course”, you can just make all the changes there and save it. This way, you won’t lose your translation for English (USA), and you will still keep your translation later on (for example, when you want to move to another theme or when you want to update).
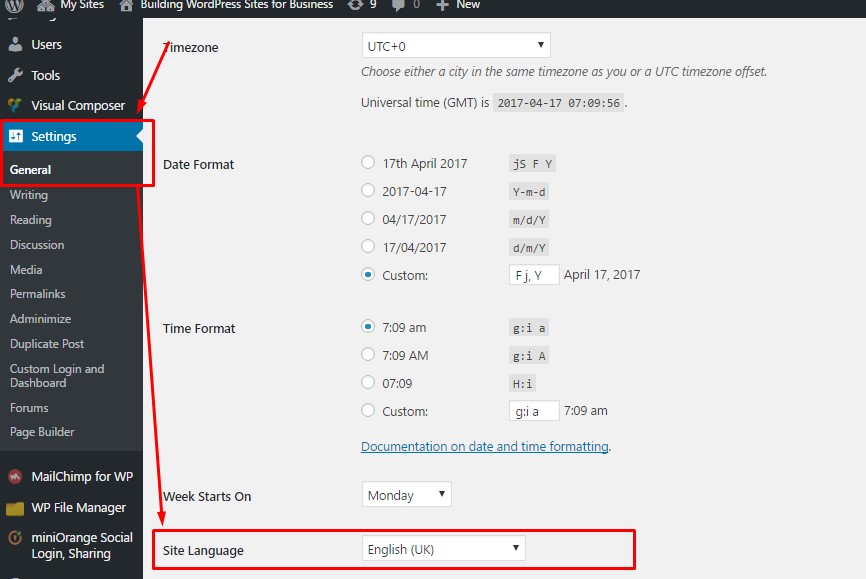
To change your site’s language, please go to your WordPress Admin, go to Settings > General, edit the Site Language field to English (UK), and Save Changes.
3. Edit The Theme’s Translation Bundle
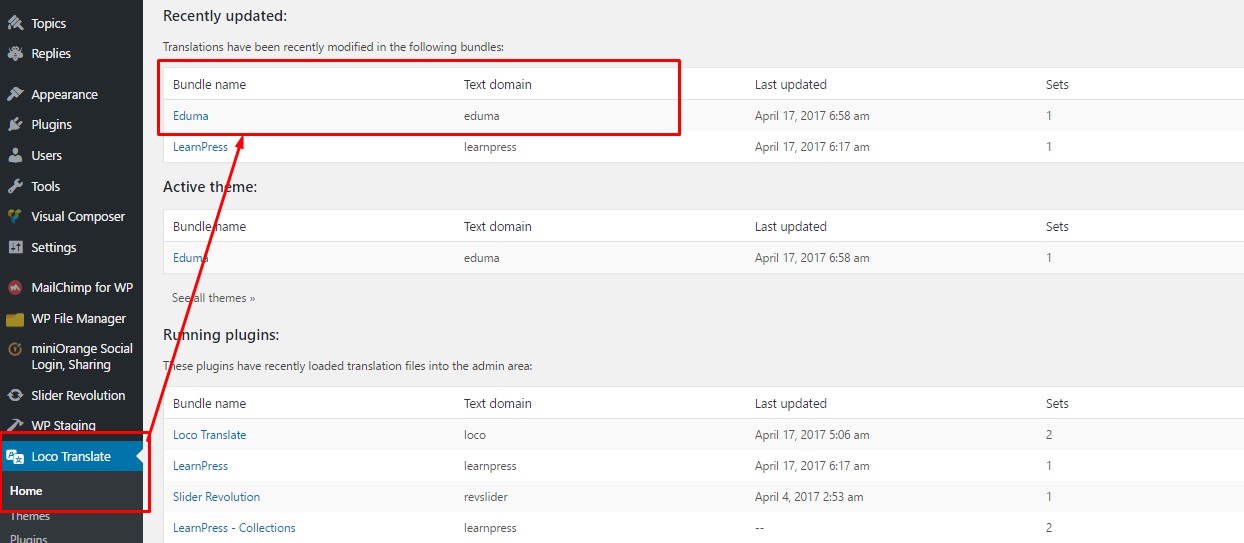
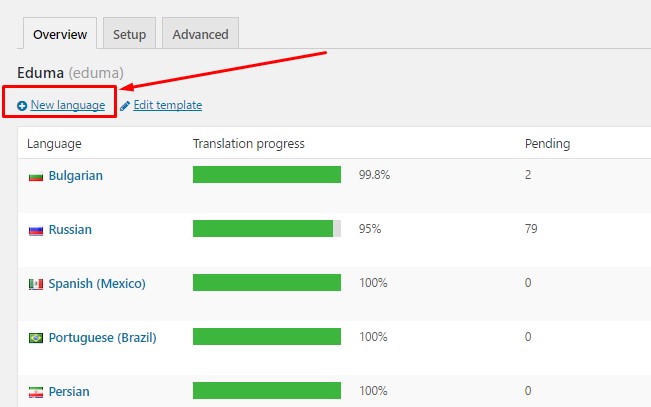
Go to Loco Translate, and click on the Bundle name Eduma to edit it.
4. Create a new translation by clicking on New Language
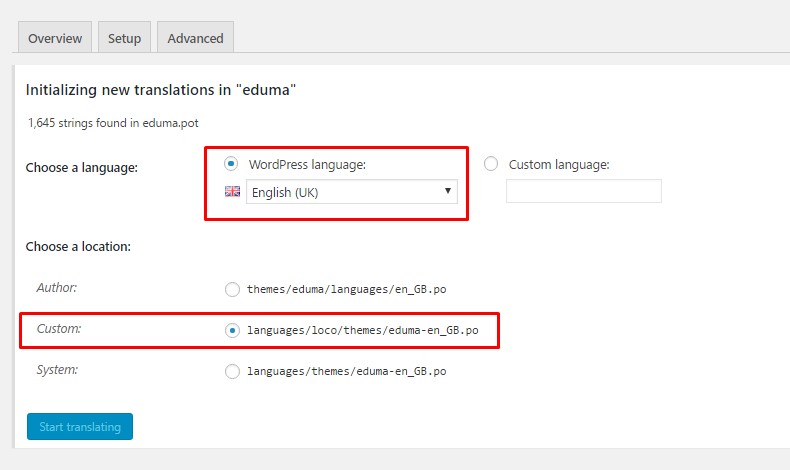
Then, you will need to choose English (UK) as a WordPress language under the Choose a language field
You can choose a custom location if you want (eduma-en_GB.po) so that in the future, even if you want to add a real UK translation, it won’t be too difficult.
5. Successfully Edit The Button in Eduma
You will be redirected to the page to edit the translation for the English(UK) language.
Please click on Filter Translation and search for the phrase you want to edit. For example, here it will be “Buy this course“
Then choose the Buy this course item. You will need to insert a translation for this text under the English (UK) translation box. For example, I’ll put “Take This Course Now“.

All there’s left to do is save and go to the course page to see the result.

Hopefully, with this tutorial, you can start customizing your site for whatever you want.
Should you encounter any issues during installation or while using LearnPress, please feel free to reach out to us or consult the comprehensive LearnPress Tutorial & Guide articles provided by ThimPress.
Read More: Use a landing page to drive more people to sign up for your online courses
Contact US | ThimPress:
Website: https://thimpress.com/
Fanpage: https://www.facebook.com/ThimPress
YouTube: https://www.youtube.com/c/ThimPressDesign
Twitter (X): https://x.com/thimpress_com

