Have you created a beautiful HTML page that you want to seamlessly integrate into your WordPress website? Uploading an HTML page to WordPress can sometimes lead to frustrating 404 errors if not done correctly.
In this guide, we’ll walk you through the step-by-step process of how to upload an HTML page to WordPress without encountering these errors.
Whether you’re a beginner or an experienced WordPress user, this tutorial will equip you with the knowledge to effortlessly add your HTML content to your WordPress site.
Let’s get started!
Eduma – Education WordPress Theme
We provide an amazing WordPress theme with fast and responsive designs. Let’s find out!
When and How to Upload an HTML Page to WordPress Without 404 Errors
WordPress is a great platform for building websites, offering easy ways to create pages with built-in tools and customizable templates.
But what if you have an existing HTML page you want to use on your WordPress site?
There are a few reasons you might want to do this:
- You have a static HTML page from an old website: If you’re transitioning to WordPress, you may want to preserve some of your existing content.
- You found a static template you like: Maybe you’ve discovered an HTML template that perfectly fits your needs and wants to integrate it into your WordPress site.
However, if you simply upload your HTML page to WordPress, it might not work as expected. WordPress has a way of organizing pages, and a direct upload could lead to a “404 Page Not Found” error.
Fortunately, there are easy methods to upload an HTML page to WordPress without 404 errors. By following simple steps, you can integrate your existing HTML content seamlessly into your WordPress website.
3 Simple Steps To Upload an HTML Page to WordPress Without 404 Errors
Do you want to add a custom HTML page to your WordPress site?
Here’s how to do it without encountering pesky 404 errors:
1. Prepare Your HTML Page:
- Single HTML Page: If your page doesn’t use separate CSS or images, you’re good to go as is.
- Multiple Files: If your HTML page has separate CSS files and images, organize them into folders for a clean upload. Create a main folder (e.g., “landing-page”) and put your HTML file (“index.html”), CSS files, and image files inside.
- Test: Open your “index.html” file in a web browser to make sure it looks as expected before uploading.
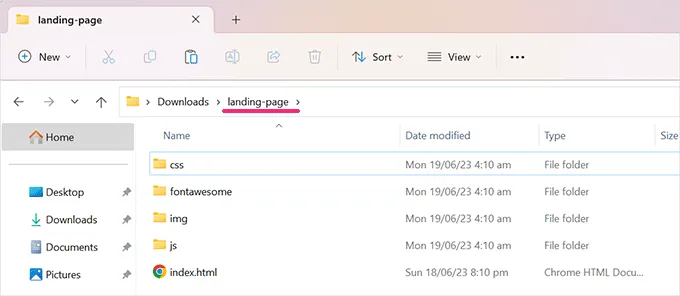
2. Upload Your Files to WordPress:
- Access Your Site: Use an FTP client or the File Manager in your hosting control panel to connect to your WordPress website.
- Root Folder: Upload your prepared folder to the root directory of your WordPress site. This is usually the same folder that contains the “wp-content,” “wp-admin,” and “wp-includes” folders.
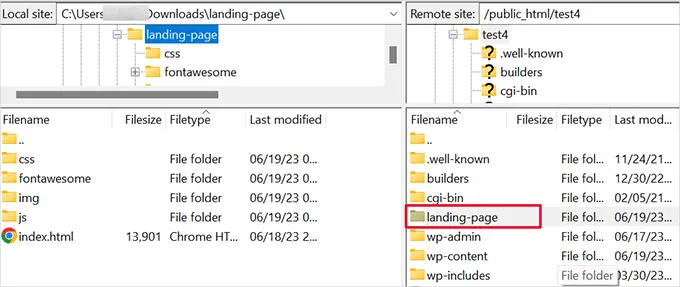
3. View Your HTML Page:
- Folder Upload: If you uploaded a folder with multiple files, add the folder name to your website’s address (e.g., https://example.com/landing-page/).
- Single File Upload: If you uploaded a single HTML file, add the file name to your website’s address (e.g., https://example.com/landing-page.html).
Troubleshooting Tips After HTML Page Upload in WordPress
After uploading your HTML page to WordPress, it should be accessible directly. However, you might encounter errors due to WordPress or your web server’s settings.
Here’s how to fix them:
Fixing 404 Error After HTML Page Upload in WordPress
The 404 error, a common WordPress issue, means the page isn’t found. Usually, adding this rewrite rule to your .htaccess file solves it:
RewriteRule ^(.*)index\.(php|html?)$ /$1 [R=301,NC,L]
Fixing 403 Error After Uploading an HTML Page in WordPress
The 403 error indicates a permission problem with your HTML page or its folder. To fix this:
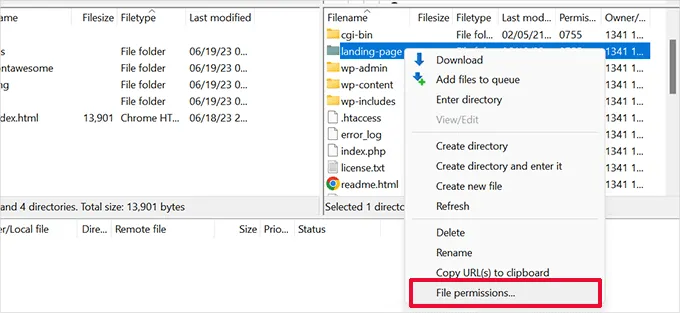
- Connect to your website via FTP.
- Right-click on the HTML page or folder and select ‘File permissions’.
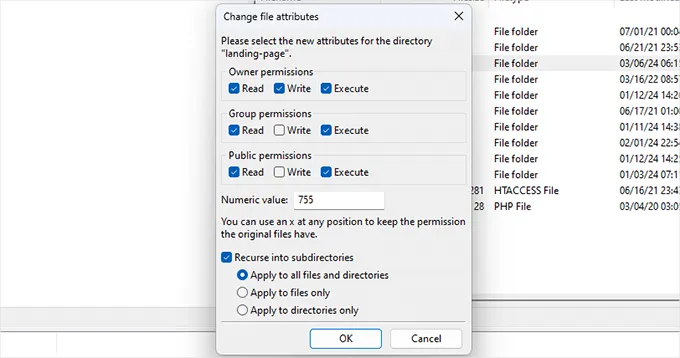
- In the popup, enter “755” in the numeric field, check “Recurse into subdirectories”, and select “Apply to all files and directories”.
- Click “OK” to apply the permissions.
These steps should resolve most issues when you upload an HTML page to WordPress. If problems persist, consider consulting your hosting provider or a WordPress expert.
How to Make Search Engines See Your Uploaded HTML Page in WordPress
After you’ve successfully uploaded your HTML page to WordPress, it’s crucial to let search engines like Google know that it exists and should be included as part of your website.
The simplest way to accomplish this is by incorporating it into your website’s XML sitemaps.
What are XML Sitemaps?
XML sitemaps are files that provide search engines with a roadmap of all the pages on your website. Think of it like a table of contents for a book but for search engines.
How to Add Your HTML Page to XML Sitemaps
If you haven’t set up sitemaps yet, there are many resources available online to guide you through the process of adding them to WordPress.
- Install the All-in-One SEO Plugin: Start by installing and activating the All-in-One SEO plugin for WordPress. This plugin simplifies the process of managing your sitemaps.
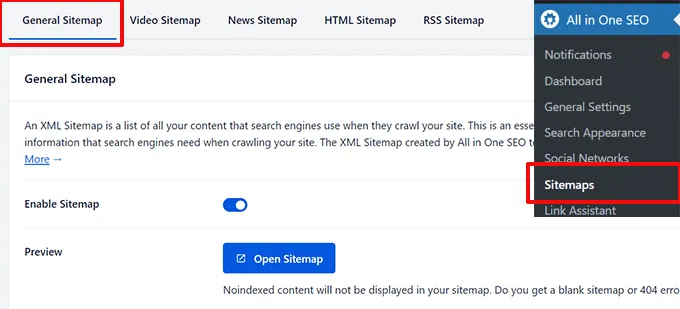
- Activate Sitemaps: After activating the plugin, go to the “Sitemaps” page within the All in One SEO settings and make sure sitemaps are enabled.
- Additional Pages Section: Scroll down to the “Additional Pages” section and toggle it on.
- Enter Your HTML Page URL: In the “Page URL” field, paste the URL of your uploaded HTML page or folder.
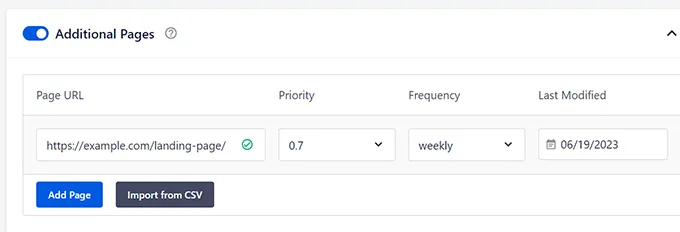
- Add and Save: Click on the “Add Page” button, and then remember to click “Save Changes” to store your settings.
With these steps completed, All in One SEO will automatically add your custom HTML page to your sitemap. This tells search engines where to find your HTML page and that it’s part of your website, ensuring it gets included in search results alongside your other pages.
Final Thoughts
Uploading an HTML page to WordPress doesn’t have to be a headache. With these simple steps and troubleshooting tips, you can easily integrate your existing HTML content into your WordPress site and avoid those dreaded 404 errors.
Read More: How to Edit HTML in WordPress
Contact US | ThimPress:
Website: https://thimpress.com/
Fanpage: https://www.facebook.com/ThimPress
YouTube: https://www.youtube.com/c/ThimPressDesign
Twitter (X): https://x.com/thimpress_com
