Is it your first time using the Shopify platform to create and run an eCommerce store? Shopify does everything for you and lets everyone sell online products easily. However, it’s not easy like that. You should know some Shopify Tips to use this platform effectively and level up your store revenue, especially if you’re a newbie.
So in this article today, we’ll share with you the top 10 useful Shopify tricks that beginners need to focus on and take the right steps from the beginning.
How to Upload Shopify Theme? – Shopify Tips
To get started, you should create your Shopify store and log into its backend. Then the next step is to install a free theme, paid theme, or zip file theme on your platform. There are many ways to choose from:
- Installing a free theme from your dashboard
- Installing a paid theme from the Shopify store. Unlike others, Shopify lets you preview the theme you like and customize your theme via the theme editor. Of course, you should purchase it before publishing that theme. Your customizations from earlier can be saved.
- Uploading a Zip file from your computer to your Shopify.
These are the best Shopify Tips for beginners to add a theme. However, if you’re a programmer or developer or you’re working with a Shopify agency or partner, you can install a theme in other ways. In this article, we will just introduce the simple ways for beginners.
Please note that you need to have a Shopify theme to create your online store. And we’ll use Storepify from ThimPress as an example in this guide. It’s a minimal, multipurpose Shopify theme with tons of gorgeous features you should go with.

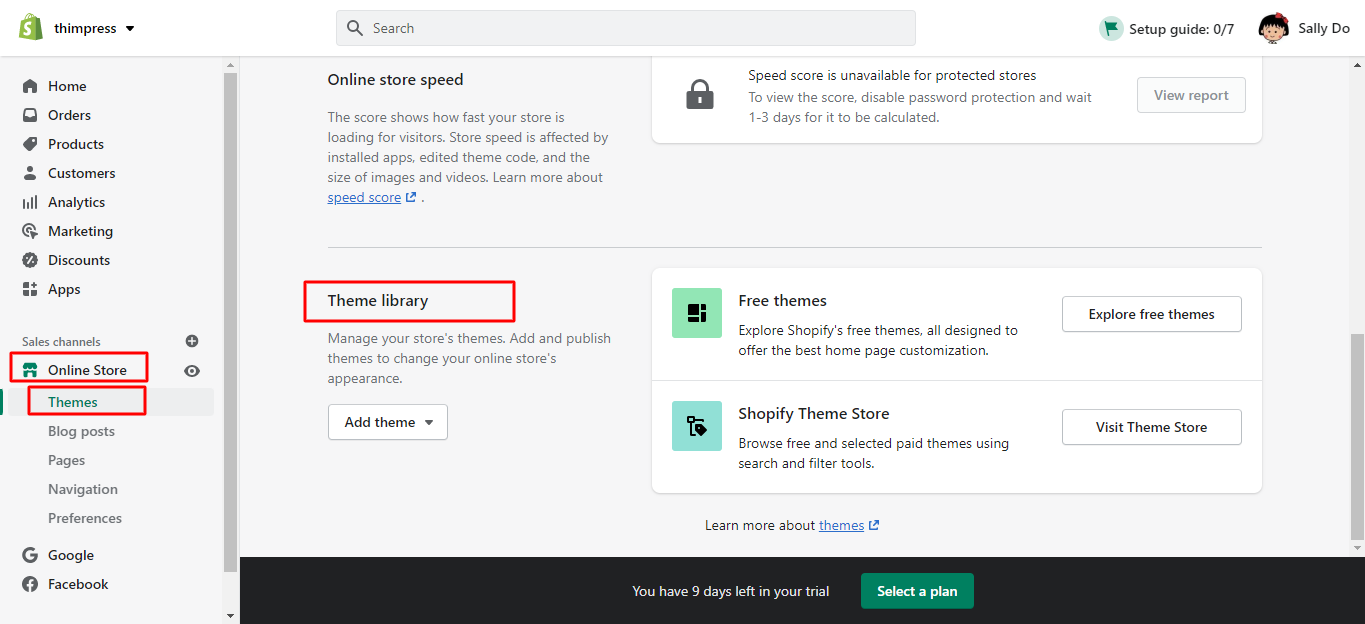
To install a theme, you need to open your Shopify backend -> Find Online Store, and hover your mouse on the Theme library:
- Uploading a Theme File From Your Computer:
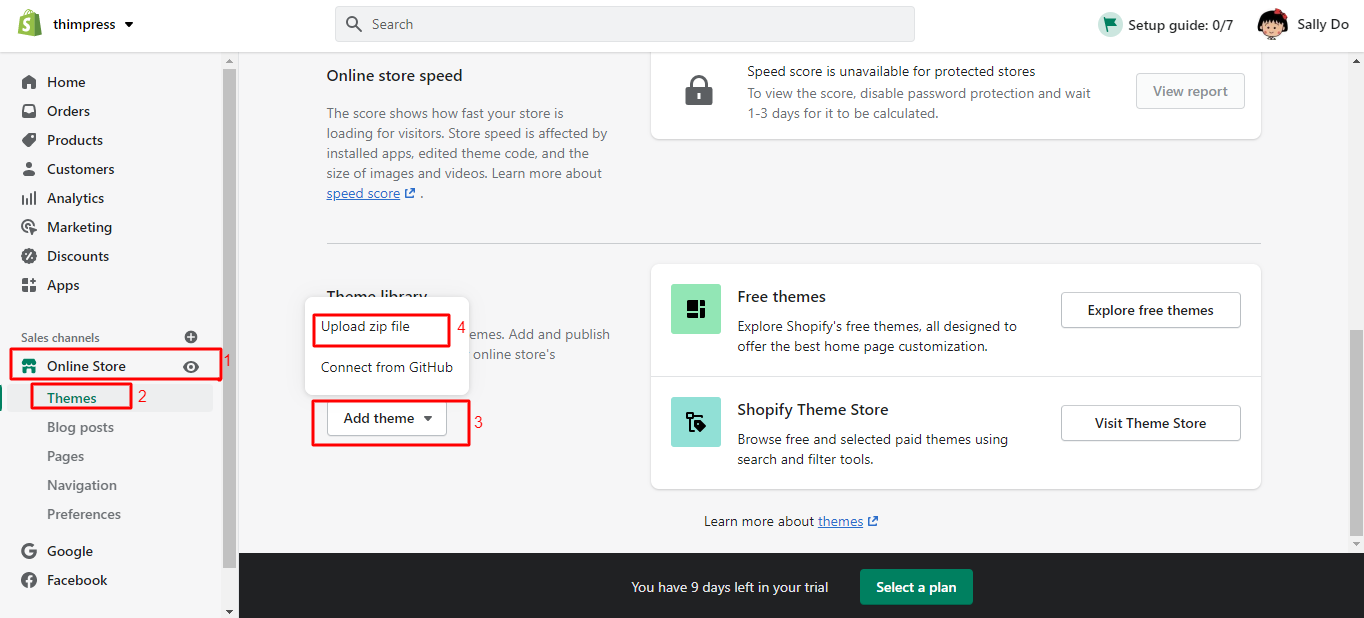
If you already have a theme file on your computer, you can upload it easily. There is Add Theme option so please click on this and choose Upload zip file.
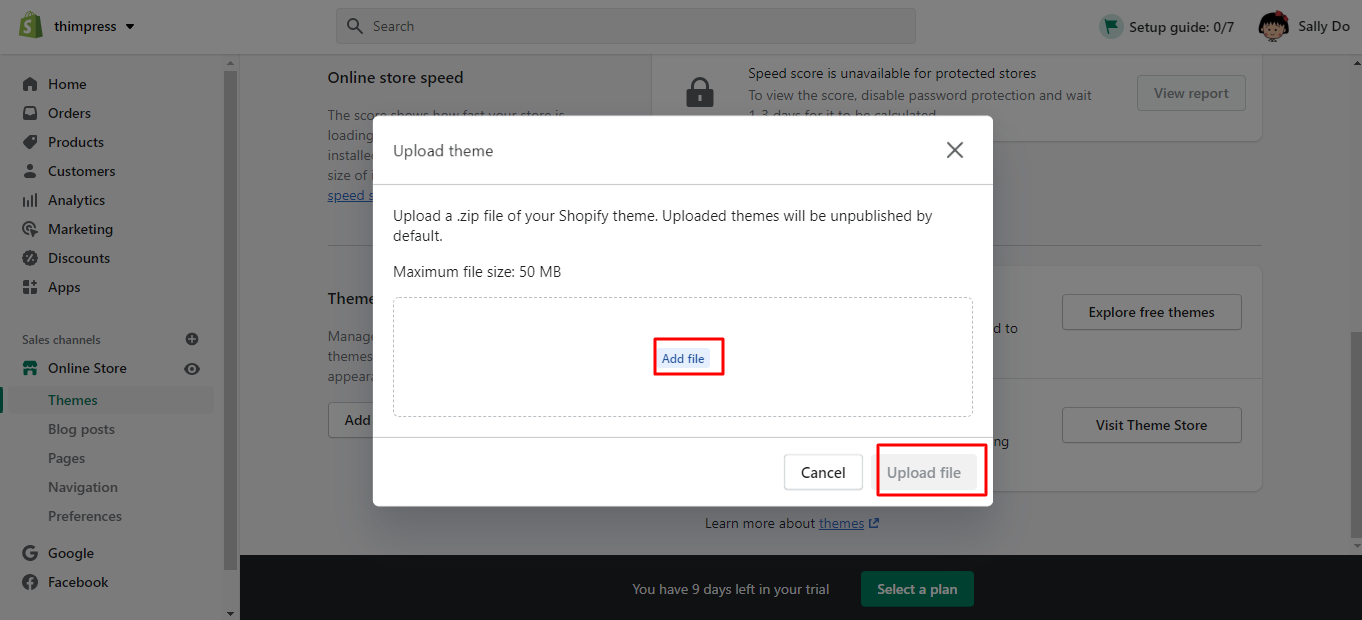
A new window will show up and hit Add File to upload the Zip theme file you want. After that, click Upload File, and your theme is added to your admin.
Please make sure you already compressed your theme files into the ZIP theme file.
- Adding a Free Theme From The Admin
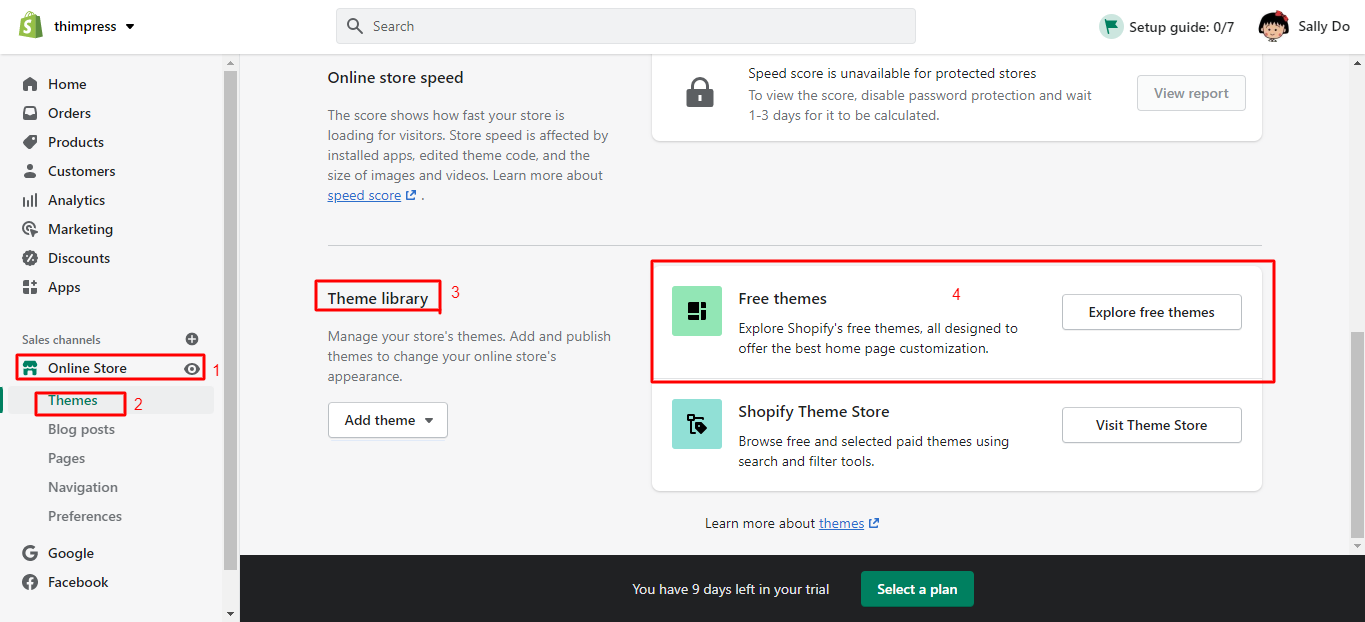
If you want to add a free theme from the Shopify dashboard, you can follow our steps:
In the Theme Library section, you can find Free Themes as well. There is the Explore free themes button then click it.
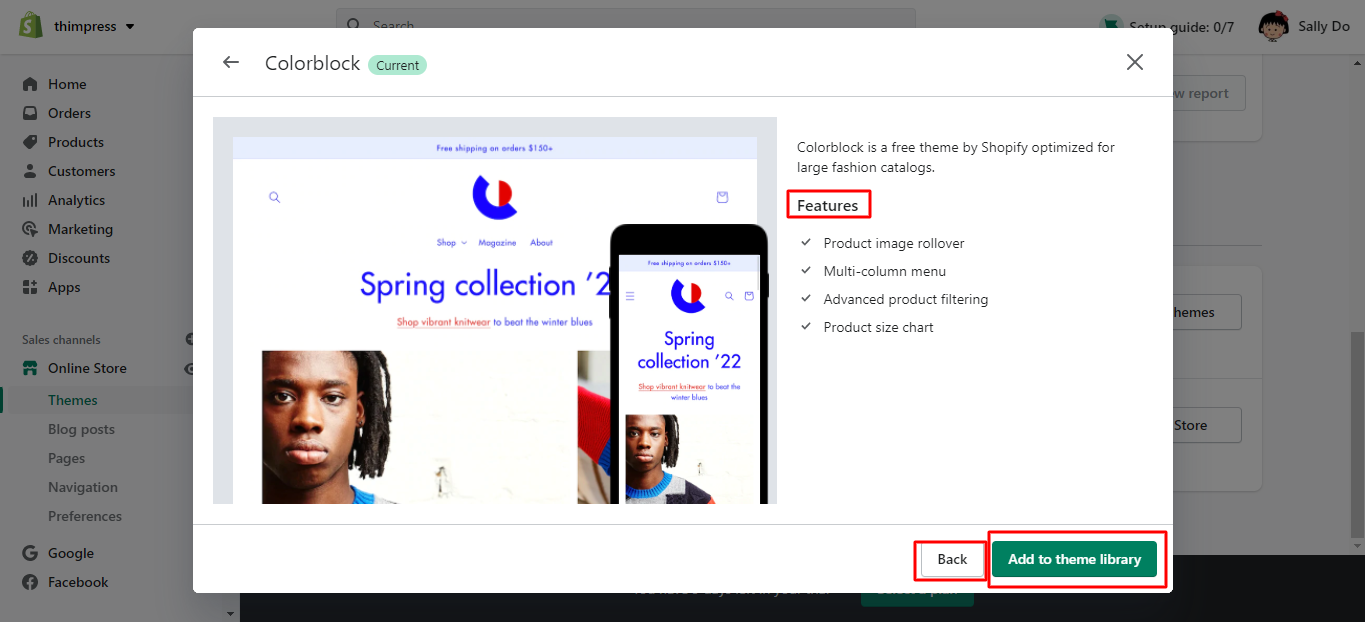
Now you can see all free themes available on a new window. Click the theme you like and you can see its introduction and features. Then click the Add to Theme Library button and that theme will be added immediately in your admin. You can also click the Back button if you want to choose another free theme.
- Installing a Paid Theme From Shopify Theme Store
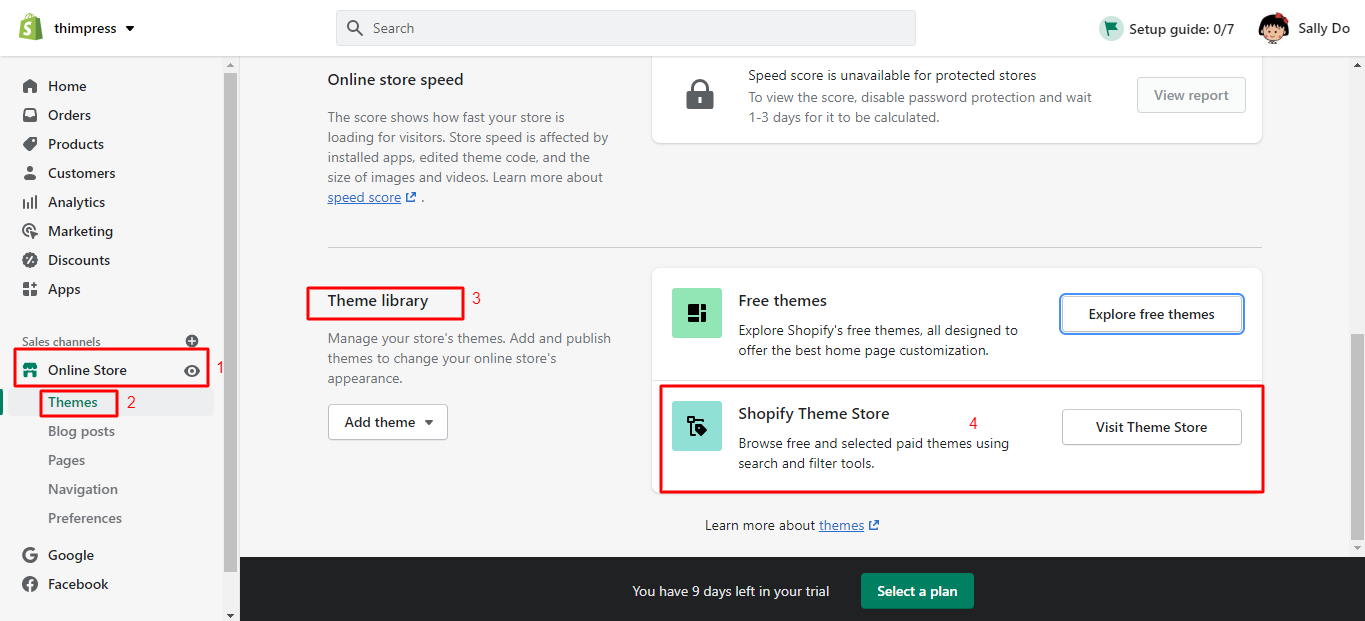
Go to the Theme library, there is a Shopify Theme Store option -> Visit Theme Store. Then it will redirect you to the new site, Shopify Theme Store, and you can choose a paid theme here. Plus, you can find many themes that fit any business you need in this store.
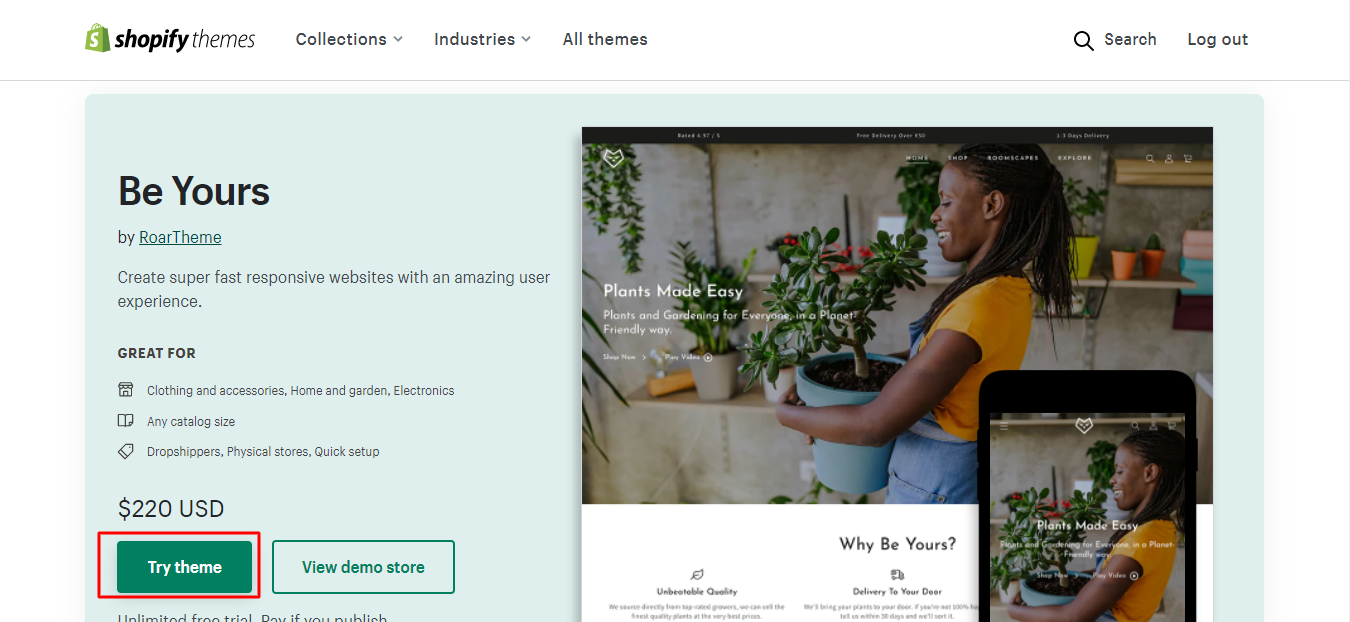
For example, we try the paid Be Yours theme so we will click the Try theme button to add it to our online store.
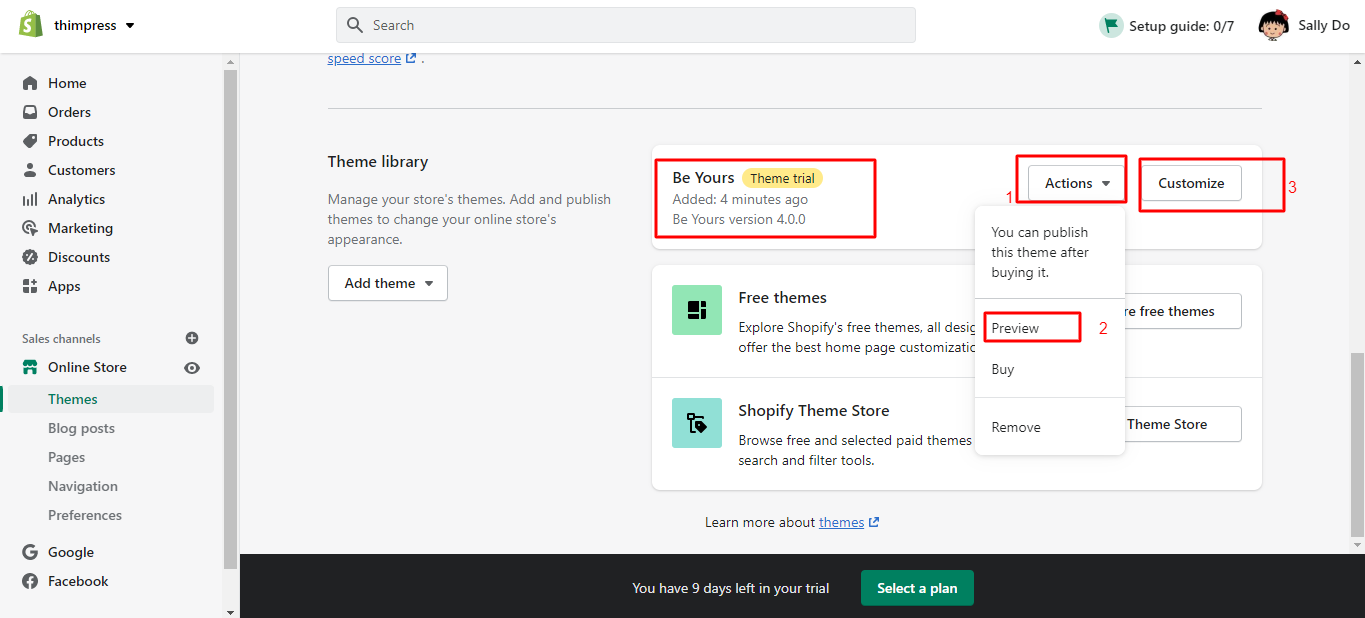
After a second, you will see the Be Yours theme in your Shopify admin in the Theme library. After that, click the Actions option -> select Preview to see how it looks in your store. You can also hit the Customize button to customize the preview theme.
Then if you’re satisfied with the theme, you can buy it by clicking Actions -> select Buy -> choose Payment Method and click Approve. All the customizations that you did earlier while previewing can even be kept as well.
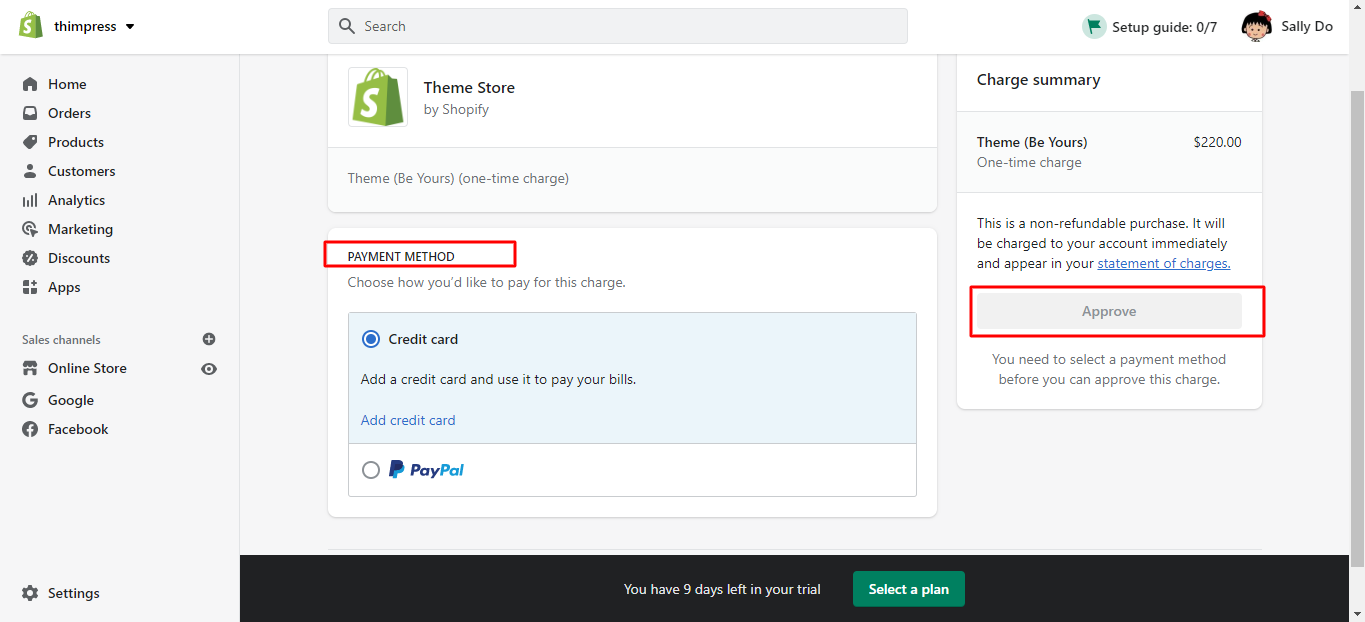
That’s all for uploading or installing a Shopify theme on your admin.
- Shopify Tips Extended: Switch Themes
Shopify allows you to install many themes you want and you can find them in your Theme library. Find the Theme library section by clicking on Online Store -> select Themes. If you have plans to switch to your new Shopify theme, find the publish option to publish it and you’ll have a new store.
Moreover, after publishing that new theme, you can find the old one in your theme library and use it when you want to switch it back. Please note that you can customize the theme before publishing it. Hence, you can check your new theme, edit the settings, and change content. Another key point is you don’t need to set up the theme again if you did it. Just switch them.
In addition, you’ll find the updated version of your theme in your theme library separately when updating your theme in a manual way. Similarly, you can switch to that updated version of your theme and the old theme version is still in your theme library.
How to Add Font to Shopify theme? – Shopify Tips
The font is an important factor to impress your visitors and also impacts your design. Apart from using the free fonts, Shopify themes have the option to install custom fonts. Before introducing Shopify Tips to add custom fonts on Shopify, we highly recommend you check on the steps to change fonts first.
- Steps to Change Font in Your Shopify Theme
Similarly, you have to log in to your Shopify Dashboard -> click the Online Store section -> select Themes and choose Customize.
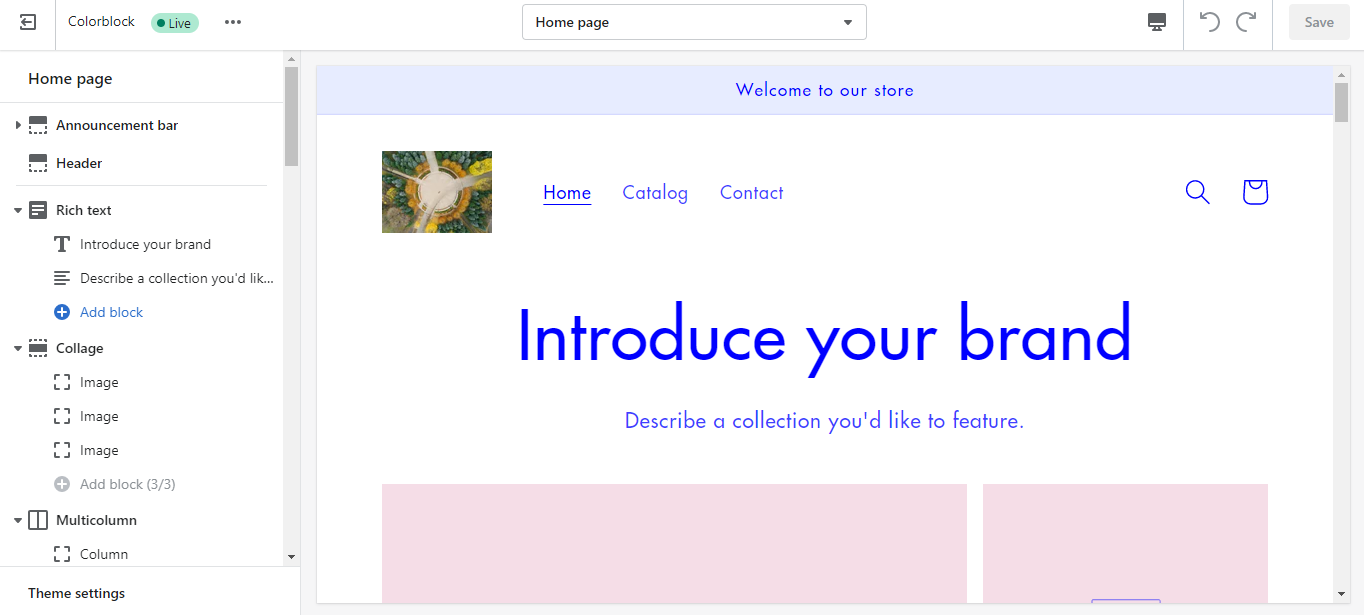
So now you’ll see your theme’s editing screen. Plus, you can customize everything in your theme to make the look of your online store the way you want.
To change fonts, find Theme Settings at the bottom of your menu -> select Typography.
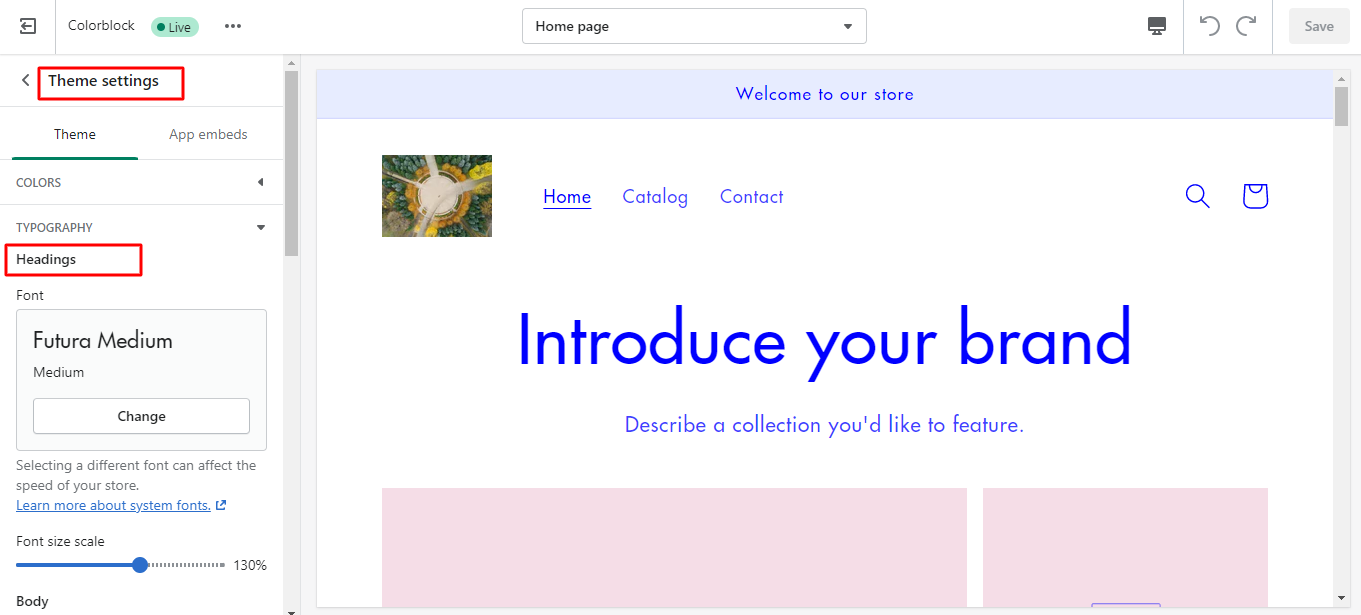
Then you can edit the default font of the Headings, Accent text, and Body text. It is also possible to adjust the font sizes and font weights too.
After all, don’t forget to click the Save button and preview your theme fonts.
- Steps to Add a Custom Font to Your Shopify Theme
The first thing to remember is that you have to find and install the 3rd-party font you like. The font files should have at least the WOFF and WOFF2 format.
Then, open your Dashboard -> Online Store -> Themes -> Action -> Edit Code.
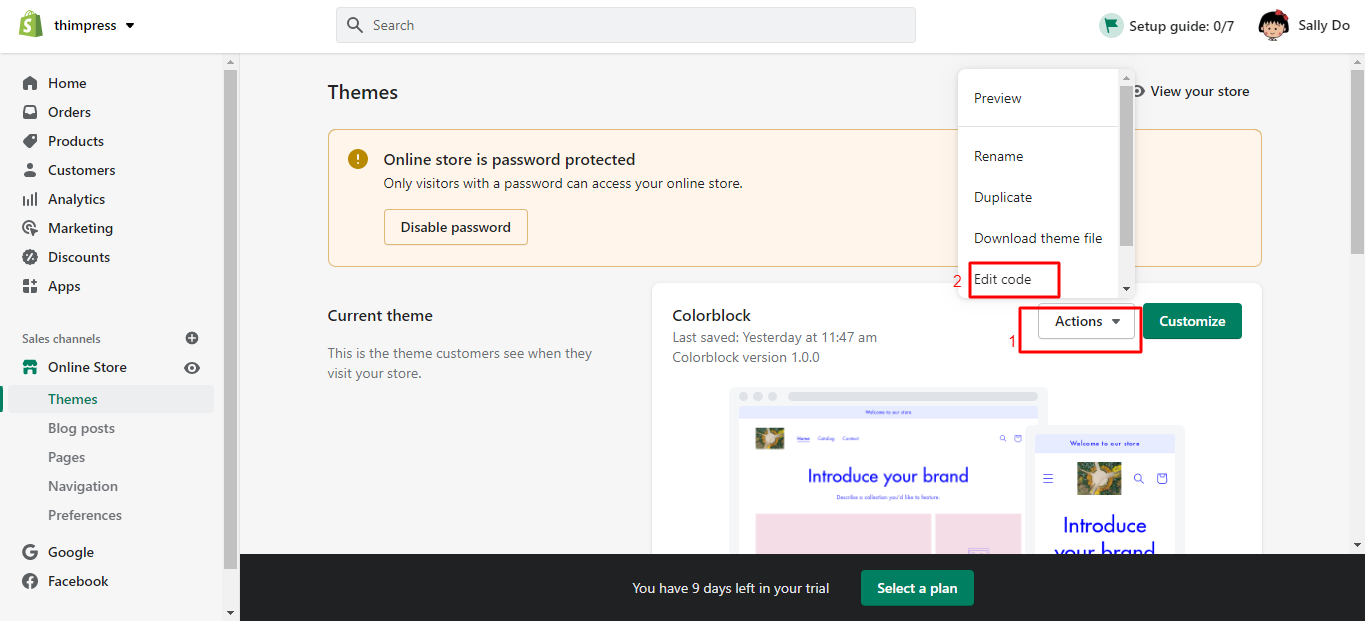
After that, scroll down to the Assets section -> click the Add a new asset. Then find your font file and click the Upload asset button.

Go to Assets -> click theme.scss.liquid. Then scroll down until the end of your CSS file & paste the code below:
@font-face {
font-family: ‘Font-File-Name’;
src: url(‘Font-File-Name.woff’) format(‘woff’),
font-weight: normal;
font-style: normal; }
h1, h1 a, h2, h2 a, h3, h3 a, h4, h4 a, h5, h5 a, h6, h6 a, #nav li a, div.title a, .headline, .subtitle { font-family: ‘FontName’ !important; }
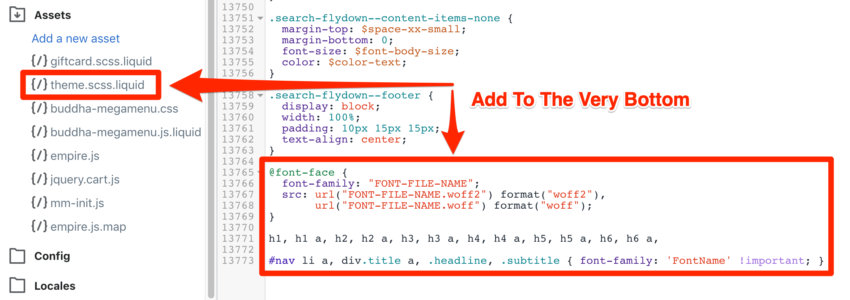
Inside the code that you have pasted, replace Font-File-Name with the name of your chosen font that you have uploaded in the Assets -> Add a new asset step.
Lastly, click the Save button to add your new custom font on your website.
Which Shopify Theme Is It? – Shopify Tips
Do you know that we can use a tool to detect which Shopify theme was used to make a Shopify site? This is the best Shopify Tips you should try.
When you see an amazing website, you might wonder which theme they are using and want to make your site like that. Many people do the same thing, detecting themes every day on different types of website systems.
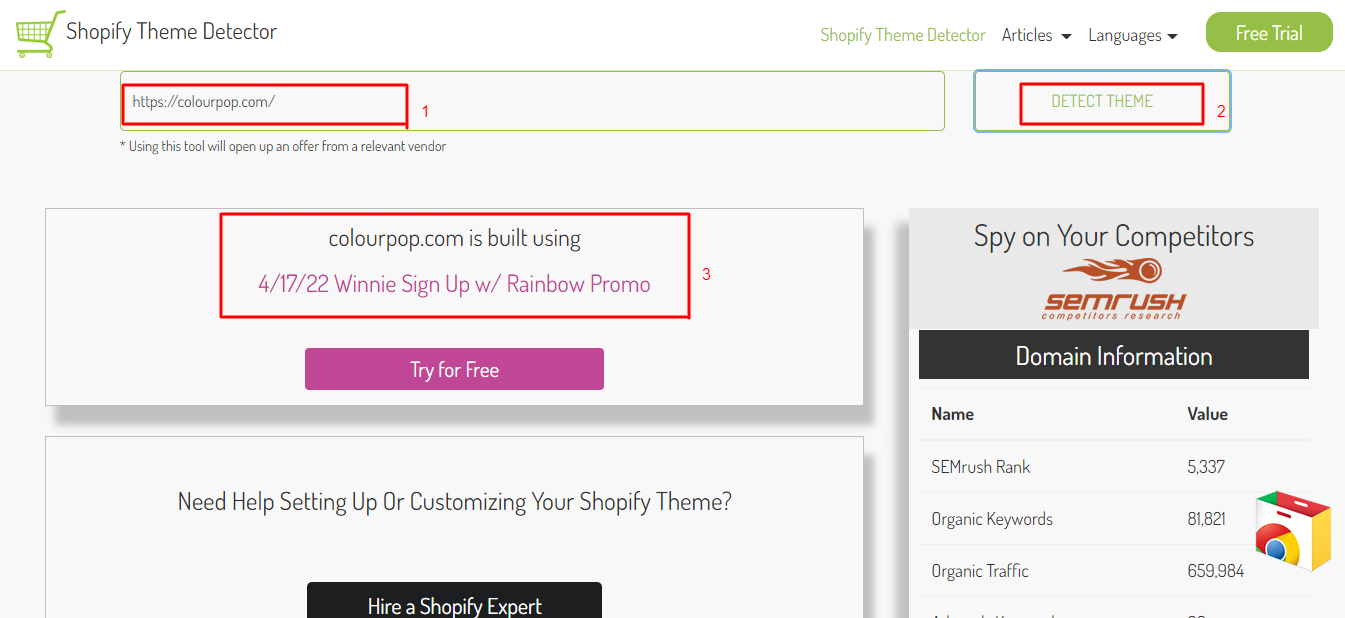
With Shopify Theme Detector, you just need to paste the URL link of the intended Shopify site and click the DETECT THEME button. After a second, the system will show the Shopify theme that the site uses. Then, you can check and purchase that theme and build your dream Shopify store site.
How to Customize a Shopify Theme?
After having a theme, just customize it to match your brand and your business. Please note that you can install many themes on your store but you can only publish one theme at a time. That is a critical Shopify Tips.
Below is the easiest way for beginners to customize the theme without coding skills.
First of all, you have to log in to your Admin Dashboard -> Online Stores -> Themes -> Click the Customize button.
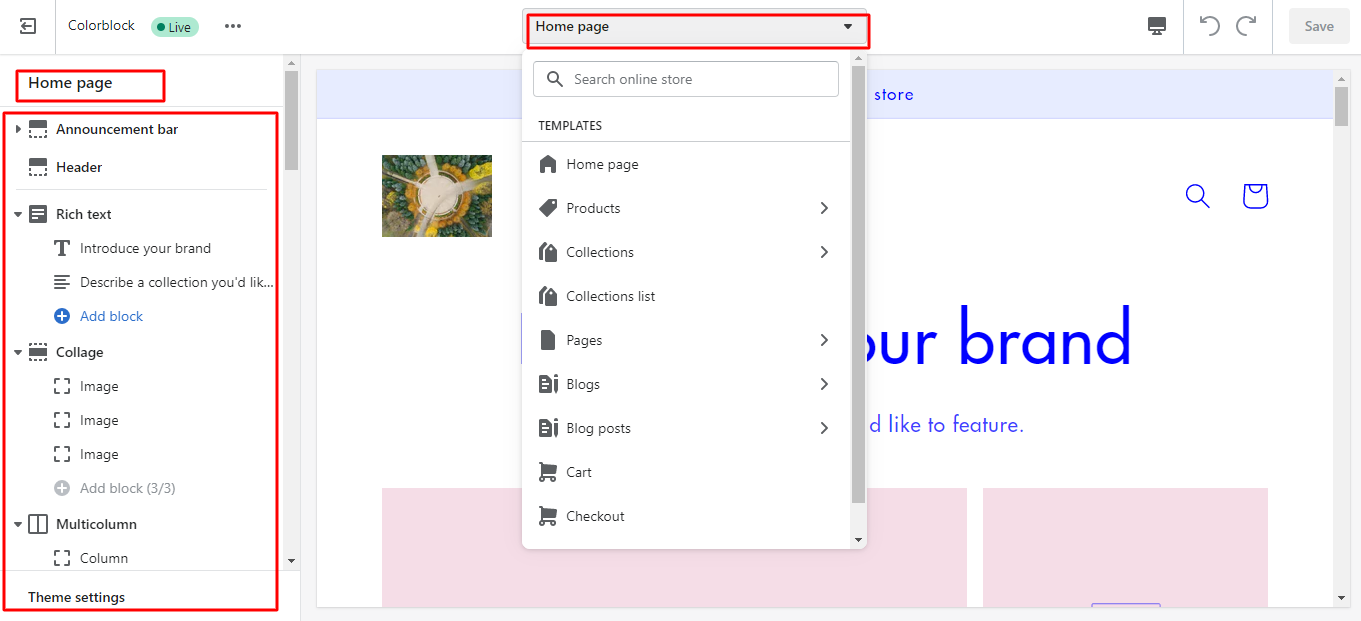
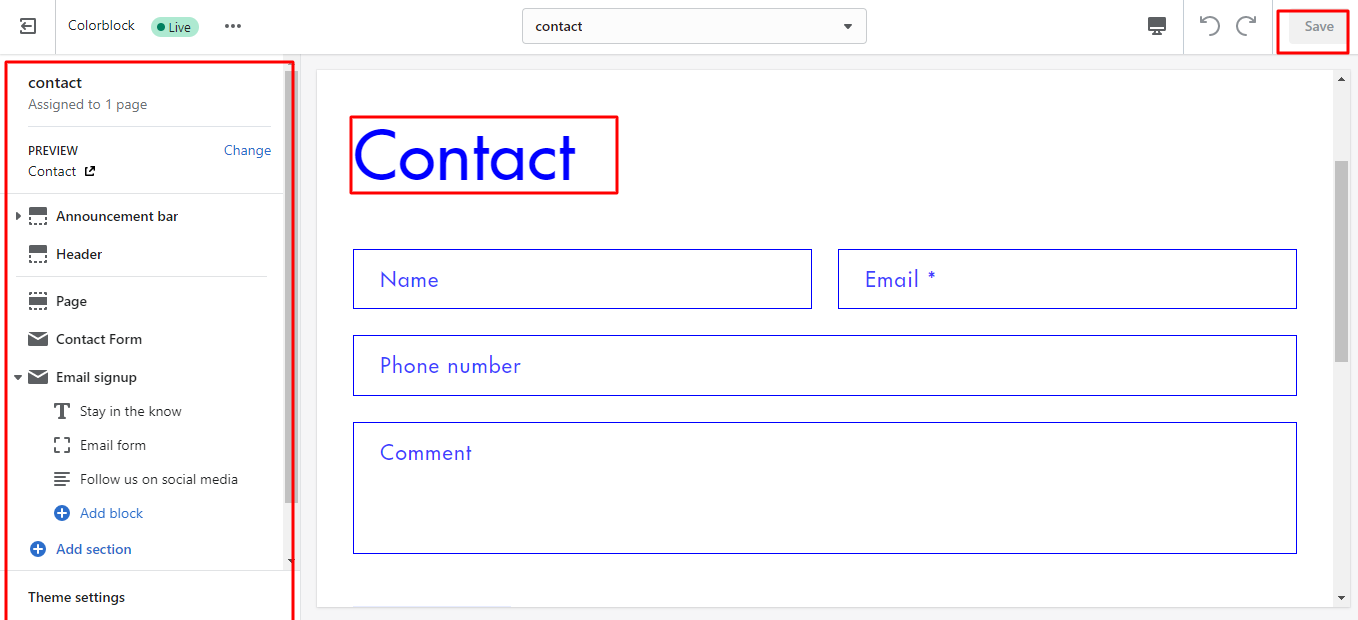
Then you’ll see all pages & sections of the theme to customize your website like the home page, contact page, checkout page, product page, blog page, etc.
Click on each page to edit the sections according to your requirements. Plus, you can preview changes before saving them.
Apart from customizing your theme without using code, you can customize your theme with code if you know about HTML, Javascript CSS, and Liquid. If not, you can hire an expert too. So follow these steps to edit your code page:
Firstly, open your Shopify Dashboard -> choose Online Store -> select Themes. Then click the Action button -> choose Edit Code. Now you can start editing code in each file to fit your look.
How to Reset Shopify Theme?
Have you ever found a reset button on the Shopify platform to roll back to the previous version of your theme? Sadly, there is no reset button. So if you want to reset your theme, you need to do it another way. Simply follow the Shopify Tips here:
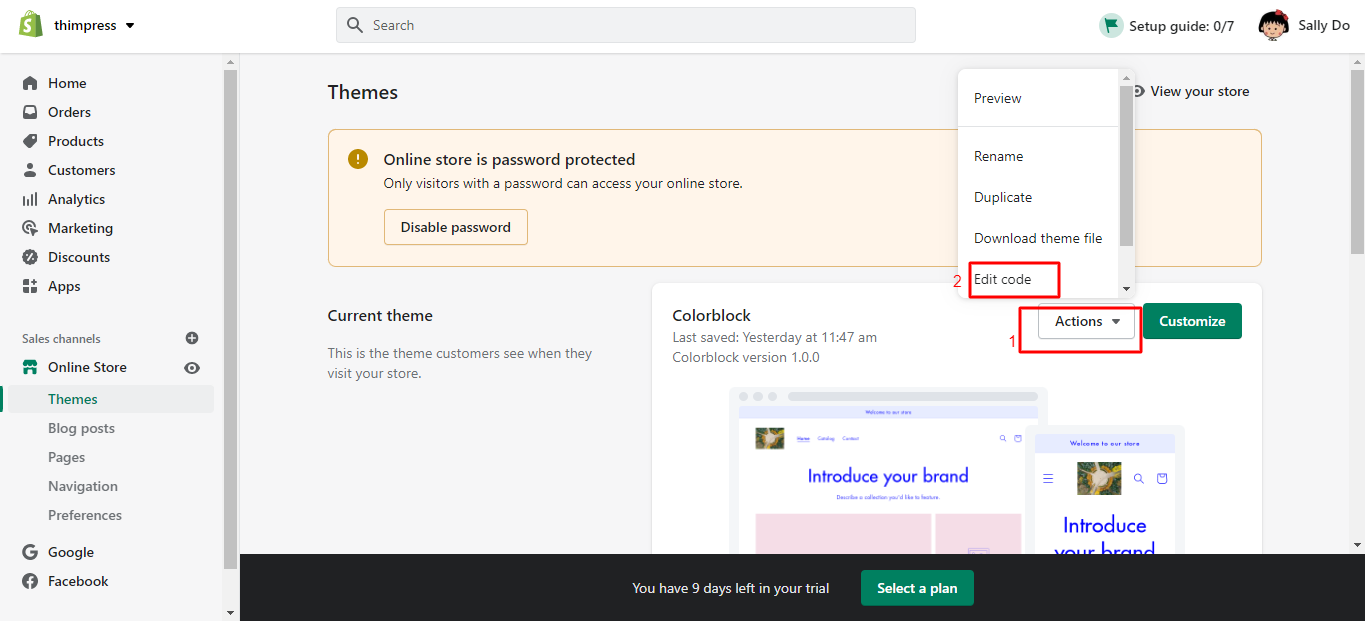
In the same way, you need to log in and open your Shopify Dashboard -> click Online Store -> select Themes section. Then you can see all the themes that you installed on the platform. Pick one of them, there is an Actions button next to that theme, click on it and choose the Edit Code option.
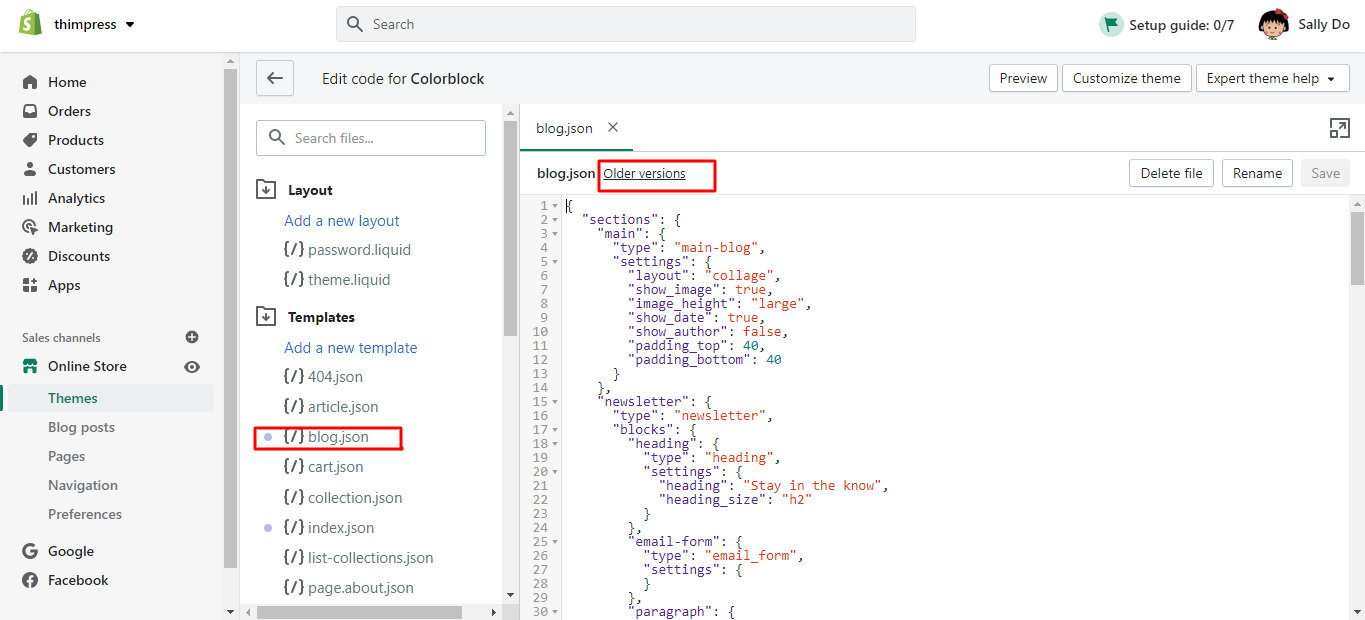
You will see all files of the theme and now select a file you want to reset. For example, select the Blog file and there is the Older versions option next to the file’s name at the top. Then you click on it to see all the older versions, and select the version with the timestamp you want to reset your theme.
Once you have done everything, hover to the Save button. Lastly, click the Preview button to see all your changes if it meets your expectations.
How to sell digital products on Shopify
Shopify doesn’t have an in-built method to sell digital products. Instead, you must use their app store to install the system. But don’t worry, the apps are approved by Shopify, and it’s much easier than you think.
- Installation
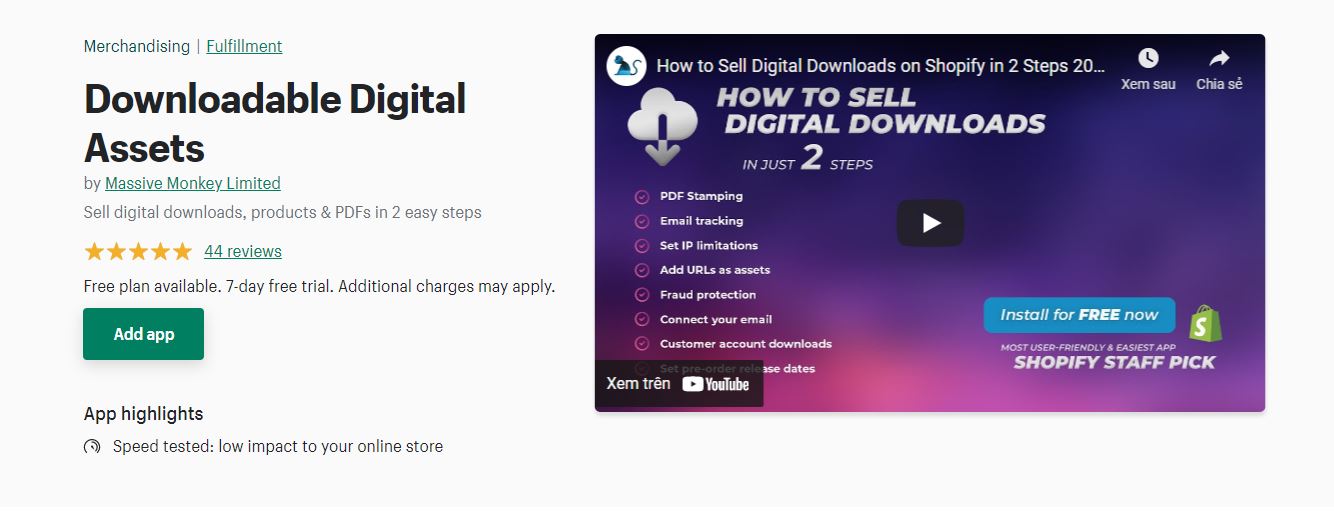
Install the Downloadable Digital Assets app from the Shopify app store. They have a free plan that you can install, plus there is a 7-day free trial for you to play with the paid plans.
- Upload your files
Upload your digital files to the app by going to the “Assets” page and then clicking the “Upload new asset” button. Here you can drag and drop your files to upload.
- Attach the files to your Shopify products
Go to the “Products” page and click the product that you want to attach products to. You will see a search box where you can attach the uploaded files directly to the product. Once you have done this, the digital products are ready to be delivered.
- Set up your settings
Now you are ready to sell, you may want to revise your settings to make sure you are using the app to the best advantage. Go to the “Settings” page and check out what they have to offer.
That’s all you need to do to sell digital products on Shopify.
Can I use the WordPress theme on Shopify?
WordPress and Shopify themes are 2 platforms that are coded in different programming languages. WordPress mainly uses PHP language and Shopify uses Liquid language. In addition, you can not find a simple method to convert WordPress over to Shopify.
So you have to build a new store from scratch or purchase a theme on the Shopify theme store. Similar to WordPress, Shopify also allows you to customize any aspect of your website using drag-n-drop interface. In short, you can not use WordPress theme on Shopify.
Final Thoughts
These are our useful Shopify Tips we highly recommend you to know and keep in mind. If so, you can start using Shopify to create your online store without any issues: From how to upload a theme to adding font or customizing it, from detecting which Shopify theme was used to build a Shopify site to resetting a Shopify theme. Hopefully, our article can help you solve your concerns.
Read More: Introducing WordPress Pro: Explore Appealing Themes for your Online Store
Contact US | ThimPress:
Website: https://thimpress.com/
Fanpage: https://www.facebook.com/ThimPress
YouTube: https://www.youtube.com/c/ThimPressDesign
Twitter (X): https://x.com/thimpress_com


