This guide will help you understand how to install and set up Loco Translate to translate WordPress themes into other languages in a concise and easy-to-understand way.
Table of Contents
Install the Loco Translate Plugin
Loco Translate is a popular plugin used for translating WordPress themes and plugins directly within your WordPress dashboard.
Here’s how you can install it:
- Step 1: Access your WordPress admin dashboard.
- Step 2: Navigate to Plugins > Add New.
- Step 3: Type “Loco Translate” in the search bar.
- Step 4: Click “Install Now” on the Loco Translate plugin card.
- Step 5: Once installed, click “Activate” to enable the plugin.
Check if You Can Switch Language
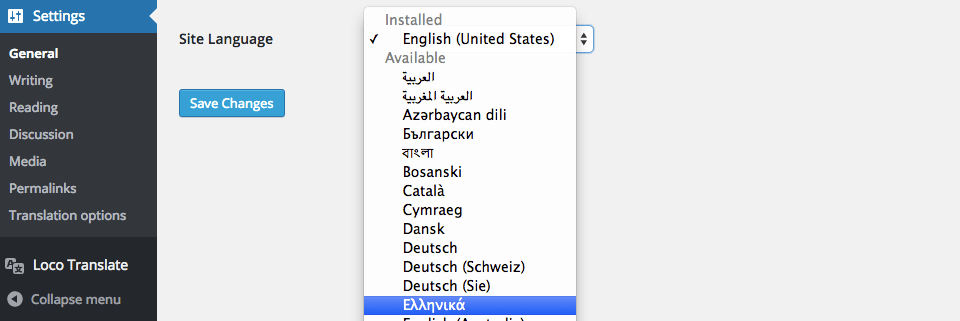
To have your translation plugin, first, you have to check if you can switch languages. So, just head to Settings > General admin screen and scroll to the bottom.
You should see a dropdown list with the label “Site Language”. Changing this will set a new default language for all site visitors. Try it and you should see something like this image:

Continuing the theme of our example, we’re going to set the language to Greek, listed under “Available > Ελληνικά” in the list.
Add a New Language with Loco Translate
If you haven’t installed and enabled the Loco Translate plugin yet, do that now. This guide assumes you already know how to install and enable WordPress plugins.
Click the admin menu item that says “Loco Translate” and select the “Themes” subsection. This will take you to a list of all available themes in your WordPress. You should see “Eduma” on the list regardless of whether it’s your active theme.
Above the language list (which may be empty) you should see a button that says “New language” with an additional icon. To start translating the theme into another language click this button and you’ll see a new screen where you can choose the language you want.
Select a language from the dropdown list of common languages. In this example, we’ll select ‘Greek’. You could achieve the same result by entering "el" into the text field instead, but we won’t talk about language codes right now.

You should select this so your new translations are safe from automatic updates.
With the language and folder location selected, click the “Start translating” button and you’ll be taken to the editor screen for translating the theme. Finally, you have a translation plugin that will help you.
Translate Some Strings in Loco Translate
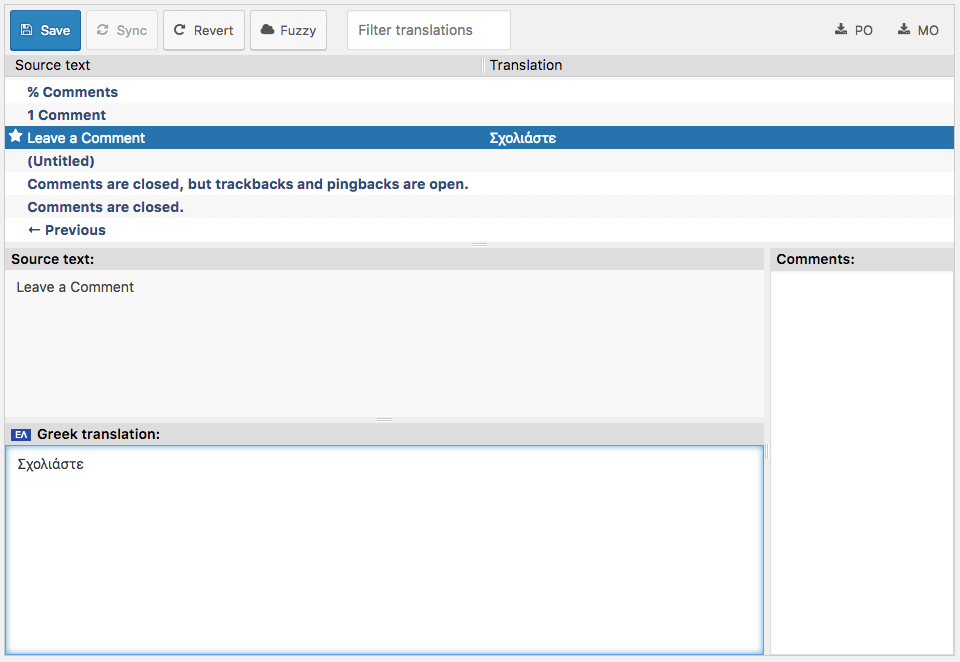
Once on the editor screen, you’ll see all the strings the theme has defined in its template file. Untranslated strings are shown in bold blue. To start with they will all be untranslated.
The basics of the editor should be fairly intuitive. Select the English string at the top and enter your translation in the pane at the bottom. You can ignore most of the editor buttons for now. We’re just going to enter a translation and save it.

For our example, we’ve picked out the phrase “Leave a comment”. Using the text filter at the top of the editor we can find this phrase quickly and select it in the list. Then we enter the text “Σχολιάστε” into the bottom pane as our translation.
The string at the top now shows a star icon to indicate that our changes are not yet saved.
Continue to translate as much as you like and when you’re ready click the Save icon in the editor toolbar. Congratulations, you’ve saved your first WordPress translation plugin. After entering your translations, you can further enhance your localized content by utilizing dubbing AI, which can automatically generate voiceovers for your translated strings, providing a seamless multilingual experience for your audience
Troubleshooting
The Eduma theme is known to work with Loco Translate, so if any of these example steps failed the problem could be due to some other part of your setup. We will try to help in the support forum if you provide enough information.
Should you encounter any issues during installation or while using LearnPress, please feel free to reach out to us or consult the comprehensive LearnPress Tutorial & Guide articles provided by ThimPress.
Read more: How to Edit The Button in Eduma with Loco Translate
Contact US | ThimPress:
Website: https://thimpress.com/
Fanpage: https://www.facebook.com/ThimPress
YouTube: https://www.youtube.com/c/ThimPressDesign
Twitter (X): https://twitter.com/thimpress


