Canva is a fantastic online design platform that allows you to create stunning visuals for almost anything you can imagine. From social media posts and presentations to posters and flyers, Canva allows you to express your creativity and design like a pro—even if you have no prior design experience. But what if you want to take your designs from the digital world to the physical one? How to print in Canva for your creations?
This blog post will guide you through the steps of printing in Canva, ensuring your designs look just as amazing on paper as they do on screen. We’ll cover everything you need to know, from downloading your design in the right format to setting up your printer for optimal results.
Eduma – Education WordPress Theme
We provide an amazing WordPress theme with fast and responsive designs. Let’s find out!
What is Canva?

Canva is a graphic design platform that simplifies creating visual content. It offers a user-friendly interface with drag-and-drop functionality, making it accessible to both beginners and experienced designers. It is a great option for individuals, small businesses, and even large organizations looking to create high-quality visuals for various purposes. However, exploring Canva alternatives can be beneficial, especially if you require more advanced features, prioritize specific design styles, or seek more budget-friendly options.
Why Should You Use Canva?
Here are some of the key reasons why you should consider using Canva:
- User-Friendly Interface: Canva is designed with simplicity in mind, making it easy for anyone to use, regardless of their design experience. The drag-and-drop interface and intuitive tools make it straightforward to create professional-looking designs.
- Extensive Template Library: Canva offers a vast collection of pre-designed templates for various purposes, such as social media posts, presentations, posters, flyers, and more. These templates can be easily customized to fit your specific needs.
- Free Version Availability: Canva offers a free version that provides access to many essential features, including basic templates, elements, and fonts. This makes it an accessible option for individuals and small businesses on a budget.
- Collaborative Features: Canva allows multiple users to collaborate on designs simultaneously, making it a great tool for teams and group projects.
- Regular Updates and Additions: Canva is constantly being updated with new features, templates, and elements, ensuring that it remains relevant and provides users with the latest design tools.
- Drag-and-drop Functionality: Canva’s drag-and-drop interface makes it easy to add and arrange elements on your designs, streamlining the design process.
- Customisable Brand Kit: Canva allows you to create a brand kit to store your brand colors, fonts, and logos, ensuring consistency across all your designs.
- Print and Delivery Services: Canva extends its services beyond design by offering print and delivery options, making it a one-stop shop for your design and printing needs.
- Integrated Stock Photo Library: Canva has a built-in stock photo library, allowing you to easily find and add high-quality images to your designs.
- Web-based Platform: Canva is a web-based platform, meaning you can access and use it from any internet-connected device, providing flexibility and convenience.
How To Print in Canva
Now that you know why Canva is a great tool for creating designs, let’s dive into how to print in Canva. Here’s a step-by-step guide:
1. Design Preparation To Print in Canva
Begin by either creating a new design in Canva or opening an existing one that you want to print.
When designing for print, it’s crucial to consider margins and bleed. Margins are the blank spaces around the edge of your design, while bleed refers to the extra area that extends beyond the margins. This bleed area will be trimmed off during the printing process, ensuring your design goes right up to the edge of the paper without any unwanted white borders. Canva allows you to add margins and bleed easily within the editor.
2. Downloading Your Design for Print in Canva
Once your design is ready for printing, it’s time to download it. Here’s how:

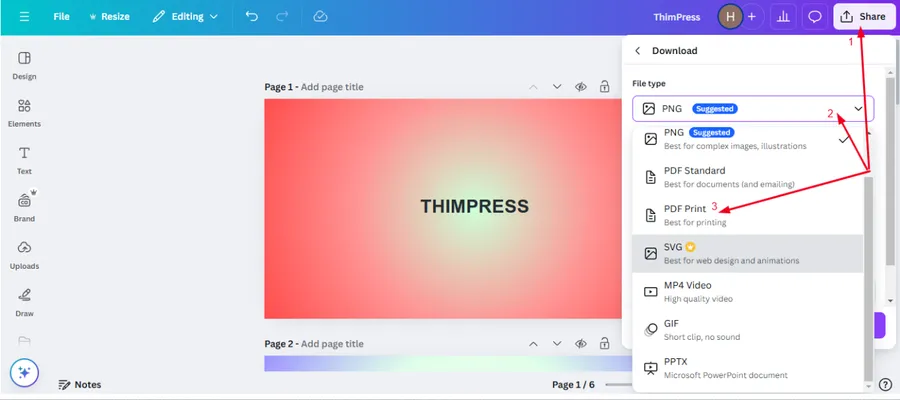
- Select Share: Click on the “Share” button located in the top right corner of the editor menu bar.
- Choose Download: From the dropdown menu, select “Download.”
- Select File Type: In the file type dropdown menu, choose “PDF Print” for the best printing experience.
- Optional Settings: Canva offers a couple of optional settings you can adjust before downloading your design:
- Crop Marks and Bleed: If you haven’t already added crop marks and bleed in the design phase, you can enable them here by ticking the “Crop marks and bleed” checkbox. This will ensure your design is printed accurately with the correct margins.
- Flatten PDF: Ticking the “Flatten PDF” checkbox optimizes your PDF file for printing. This can help ensure compatibility with various printers.
- Download: Once you’ve selected your desired settings, click “Download” to download your design as a print-ready PDF file.
Note: If you’ve used any premium elements in your design, you’ll need to pay for them before downloading the PDF.
3. Printing Your Design
Now that you have your design downloaded as a PDF, it’s time to print in Canva! The following steps will guide you through the printing process:
- Open the PDF: Locate the downloaded PDF file on your device and open it using your preferred PDF viewer (such as Adobe Acrobat Reader, Preview for Mac, or the default PDF viewer on your operating system).
- Select Print: Click on the “Print” button or press Command + P (Mac) or Ctrl + P (Windows) to open the print dialog box.
- Choose Your Printer: Select your desired printer from the list of available printers. Ensure that your selected printer is compatible with the size and format of your design.
- Check Printer Settings: Carefully review the printer settings to ensure optimal print quality.
- Scale: Set the scale to 100% to ensure your design prints in the correct size.
- Color: If your design includes colors, ensure the color settings are correctly configured (e.g., CMYK for professional printing).
- Paper Size: Select the correct paper size that matches your design dimensions.
- Orientation: Choose between portrait or landscape orientation depending on your design.
- Print: Once you’ve verified all the settings, click “Print” to begin the printing process.
FAQs
Q1: What is the best file format for printing from Canva?
For the highest quality prints, always download your design as a PDF Print. This format is optimized for printing and ensures that your colors and details are preserved.
Q2: Why is there a white border on my printed design?
A white border usually appears if your design doesn't have a bleed area. A bleed extends your design beyond the trim edge, so when the paper is cut, the color goes right to the edge. To avoid this, enable the "Crop marks and bleed" option when downloading your PDF.
Q3: Can I print directly from the Canva app?
While you can't print directly from the Canva mobile app, you can download your design to your phone and print it using your device's printing functions or a printing app.
Q4: What color mode should I use for printing?
For professional printing, CMYK is the standard color mode. Canva's "PDF Print" option automatically converts your design to CMYK, so you don't have to worry about color inaccuracies.
Q5: How do I ensure my text is readable when printed?
Use a clear, legible font and make sure the font size is large enough for your printed format. It's also a good idea to do a test print to check the readability before printing in bulk.
Final Thoughts
Printing your Canva designs is a straightforward process that can be easily accomplished by following these steps. Remember to prepare your design appropriately by adding margins and bleed, and choose the “PDF Print” option for optimal results. Hopefully, your printed designs look as vibrant and professional as they do on screen.
With Canva’s powerful design tools and user-friendly interface, you may express your creativity and bring your designs to life both digitally and in print. So, start designing, experiment with different printing options, and enjoy the satisfaction of seeing your creations come to life on paper!
I hope this comprehensive guide helps you successfully print in Canva designs. If you have any further questions or encounter any issues during the printing process, please refer to Canva’s help center for additional support.
Read more: Canva Website Builder: How To Create a Website With Canva?
Contact US | ThimPress:
Website: https://thimpress.com/
Fanpage: https://www.facebook.com/ThimPress
YouTube: https://www.youtube.com/c/ThimPressDesign
Twitter (X): https://x.com/thimpress_com


