Creating a user-friendly and intuitive navigation experience is crucial for any website, especially educational platforms built with the Eduma theme. According to research, 88% of online consumers are less likely to return to a site after a bad user experience, making smooth navigation essential.
The custom layout menu Eduma feature provides you with the flexibility to design menus that perfectly align with your site’s structure and user needs.
In this detailed guide, we’ll walk you through the process of customizing your menus, ensuring your visitors can easily find the information they’re looking for.
Eduma – Education WordPress Theme
We provide an amazing WordPress theme with fast and responsive designs. Let’s find out!
Understanding WordPress Menus and Eduma’s Customization
Understanding WordPress menus and Eduma’s customization involves grasping the core functionality of WordPress navigation and how the Eduma theme enhances and modifies it for educational websites.
With the custom layout menu Eduma, you can tailor your menus to reflect your website’s content hierarchy and prioritize essential pages. This level of customization allows you to create a seamless browsing experience, encouraging visitors to explore your site further.
Step-by-Step Guide to Custom Layout Menu Eduma
Step 1. Accessing the Menus Section:
Log in to your WordPress Dashboard: Navigate to your website’s admin area (usually yourdomain.com/wp-admin) and enter your username and password.
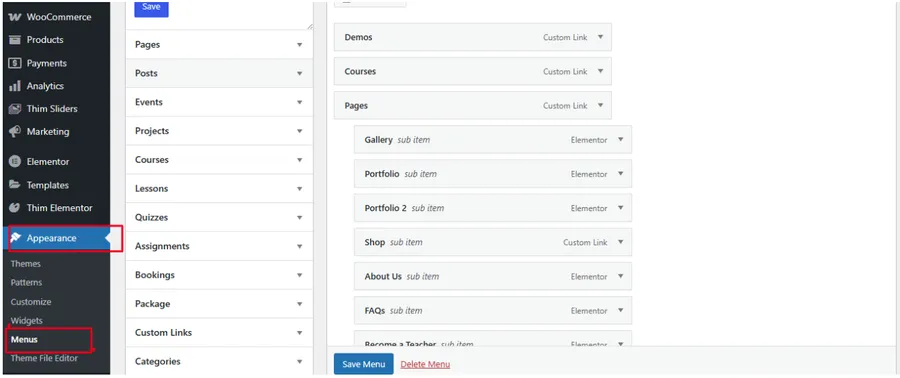
Go to Appearance > Menus: In the left-hand navigation menu of your WordPress dashboard, find “Appearance” and click on “Menus.” This will take you to the menu management interface.
Step 2. Choosing or Creating a Menu:
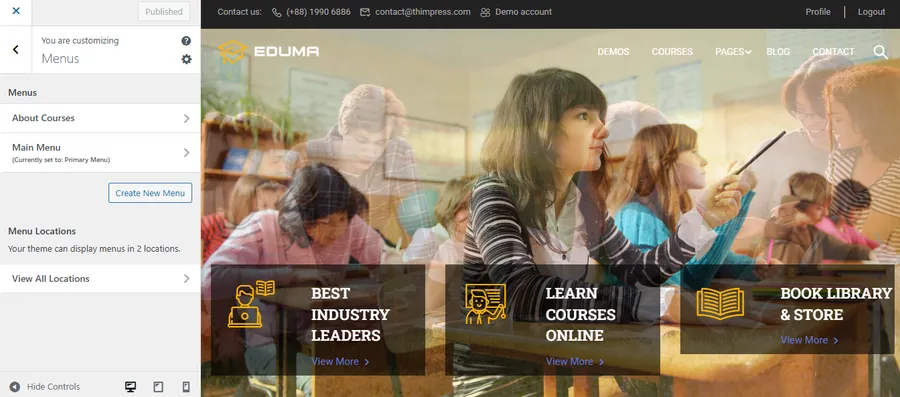
Existing Menus: If you already have a “Main Menu” (or any other menu), you can select it from this dropdown. The provided information indicates a “Main Menu” with specific items.
Creating a New Menu: If you need to create a new menu, click the “+ Create New Menu” link. Give your new menu a descriptive name (e.g., “Secondary Menu,” “Footer Menu”) and click “Next” to start adding links to your new menu.
Step 3. Editing the “Main Menu” (or Your Chosen Menu):
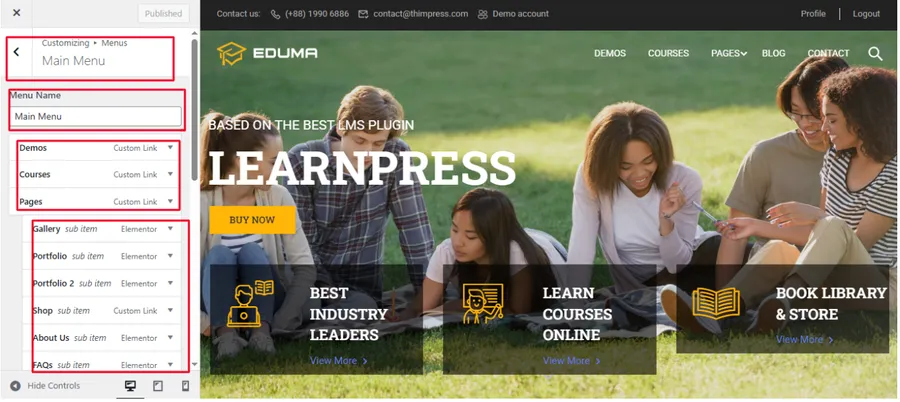
Understanding the Existing Structure:
- The information shows your “Main Menu” currently has top-level items like “Demos,” “Courses,” “Pages,” “Blog,” and “Contact.”
- “Pages” has several sub-items built with Elementor or using custom links.
Editing Existing Menu Items:
- Expanding Menu Items: Click the down arrow next to a menu item to expand its settings.
- Editing Labels and URLs: You can change the “Navigation Label” (the text displayed in the menu) and the “URL” (where the link goes).
- Sub-Items: Items indented under another item are sub-items (dropdown menu items).
- Elementor Items: Items labeled “Elementor” indicate that the page content was created using the Elementor page builder.
- Custom Links: Items labeled “Custom Link” indicate that the URL is a manually entered link.
- Posts Page: Items labeled “Posts page” indicate that the link is to the default blog page that displays the posts.
Reordering Menu Items:
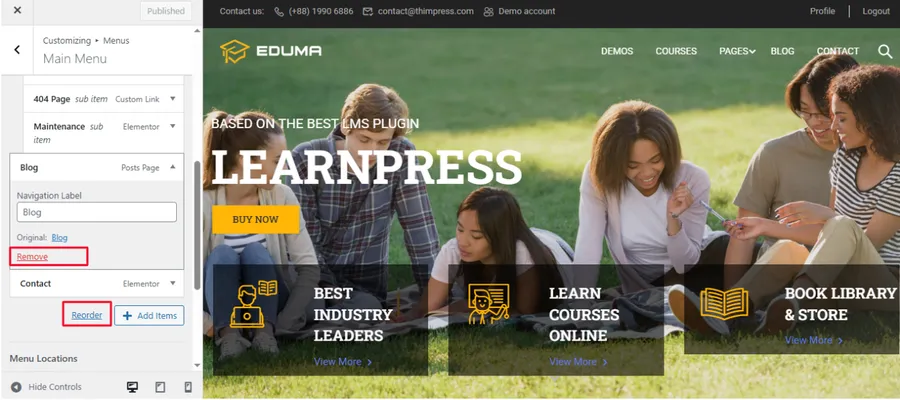
- Drag and Drop: Click and drag menu items to change their order.
- Sub-Item Placement: Drag items slightly to the right to make them sub-items of the item above.
- Reorder mode: The reorder mode is activated by the action of dragging and dropping the menu items.
Removing Menu Items:
- Expand the menu item you want to remove.
- Click the “Remove” link.
Step 4. Adding New Menu Items:
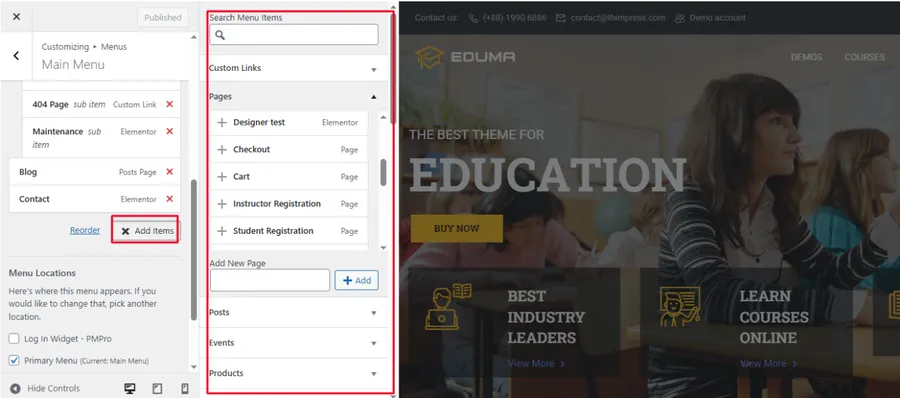
Using the “Add Items” Panel: Click the “Add Items” and you’ll see panels labeled “Pages,” “Posts,” “Custom Links,” “Categories,” etc.
- Pages: Find the page you want to add (e.g., “Demo Main,” “User Account,” “Checkout”). Check the box next to the page name. Click the “Add to Menu” button.
- Posts: Find the post you want to add. Check the box next to the post name. Click the “Add to Menu” button.
- Custom Links: Enter the URL in the “URL” field. Enter the link text in the “Link Text” field. Click the “Add to Menu” button.
- Categories, Tags, etc.: These panels allow you to add category or tag archives to your menu. The provided information shows that you can add many different items, such as “Events”, “Products”, “Courses”, “Lessons”, “Quizzes”, “Assignments”, and much more.
Search Menu Items: The search bar allows you to type in the name of the page, post, or other item that you want to add to the menu. The search results will be updated as you type.
Step 5. Setting Menu Locations:
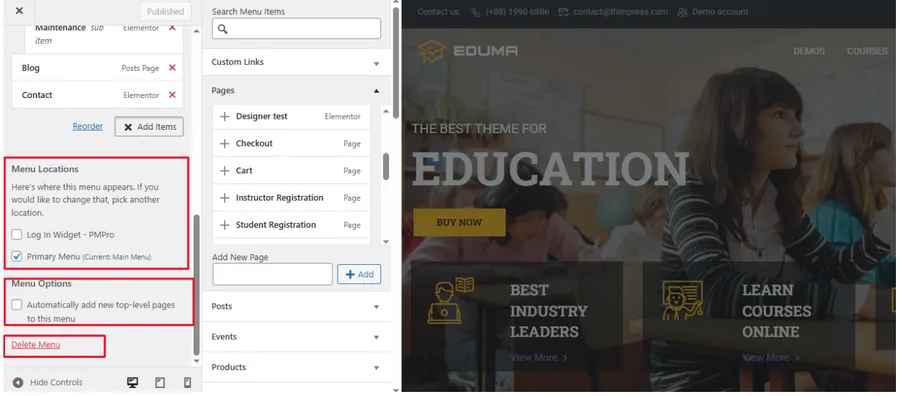
Menu Locations:
- Below the menu structure, you’ll find “Menu Settings” and “Menu Locations.”
- “Menu Locations” determine where your menu will appear on your website.
- Eduma likely has specific locations (e.g., “Primary Menu,” “Log In Widget – PMPro“).
- Assigning a Menu: Check the box next to the location where you want your menu to appear.
- The documentation shows that the user can select between the “About Courses” or the “Main Menu” to be displayed in the “Log In Widget – PMPro” and the “Primary Menu” locations.
Widgets:
- The documentation also mentions that menus can be added to widget areas.
- To do this, navigate to “Appearance” > “Widgets”.
- Add the “Navigation Menu” widget to the desired sidebar or footer area.
- Select the menu that you want to display in the widget.
Step 6. Menu Options:
Automatically add new top-level pages to this menu: This option, when checked, will automatically add any new pages you create to the top level of this menu.
Saving Your Menu: After making any changes, click the “Save Menu” button.
Step 7. Delete Menu:
If you need to delete a menu, there is a delete menu button in the menu options section.
Final Thoughts
Creating a custom layout menu Eduma that is both functional and user-friendly is an essential aspect of website management. By following these steps, you can ensure that your visitors have a seamless navigation experience, leading to increased engagement and satisfaction. Remember to regularly review and update your menu to reflect any changes in your website’s content or structure. A well-organized menu is a cornerstone of a successful website, and Eduma provides the tools you need to create a truly exceptional navigation system
Read more:
How to Easily Remove the ‘Become an Instructor’ Part from Eduma?
How to Operate Countdown in Eduma Theme: A Step-by-Step Guide
How To Change Logo in Eduma Theme: Step-by-step Guide
Contact US | ThimPress:
Website: https://thimpress.com/
Fanpage: https://www.facebook.com/ThimPress
YouTube: https://www.youtube.com/c/ThimPressDesign
Twitter (X): https://x.com/thimpress_com


