For any education website, providing secure and convenient payment methods is essential for converting visitors into students. If you are using the Eduma education WordPress theme, you already have access to a powerful Learning Management System (LMS). However, integrating the right payment gateway can take your platform to the next level.
This guide will walk you through how to set up PayU in Eduma. By using the PayU add-on for LearnPress, you can process transactions securely, offering a seamless checkout experience for your learners.
Let’s get started!
Eduma – Education WordPress Theme
We provide an amazing WordPress theme with fast and responsive designs. Let’s find out!
Why Choose PayU for Your Eduma Site?
PayU is a leading payment service provider known for its high security and support for various local payment methods.
Integrating the LearnPress PayU add-on ensures that your Eduma site can handle payments efficiently.
Whether you are selling single courses or membership bundles, setting up PayU in Eduma provides a trustworthy transaction flow for your users.
Step 1: Download and Install the Plugin
Before configuring the settings, you need to install the PayU integration plugin. This is a premium add-on available from ThimPress.
- Purchase and Download: After purchasing the PayU add-on for LearnPress, download the .zip file to your computer. The file is typically named learnpress-payu.zip.
- Upload to WordPress:
- Log in to your WordPress Dashboard.
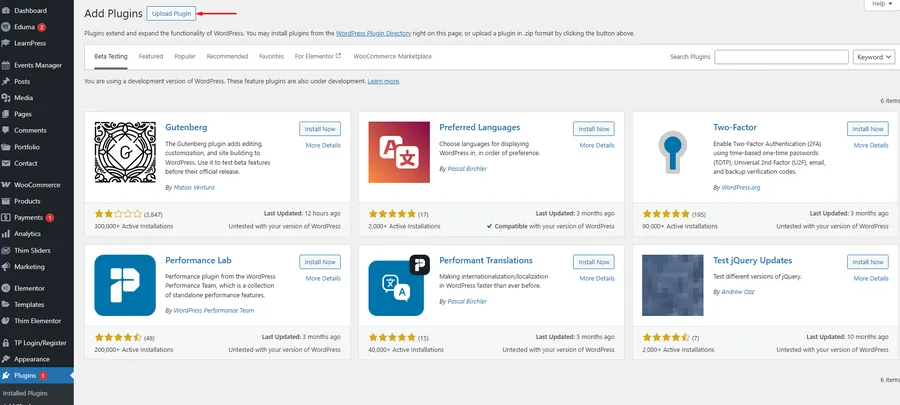
- Navigate to Plugins > Add New.
- Click the Upload Plugin button at the top of the screen.
- Install and Activate:
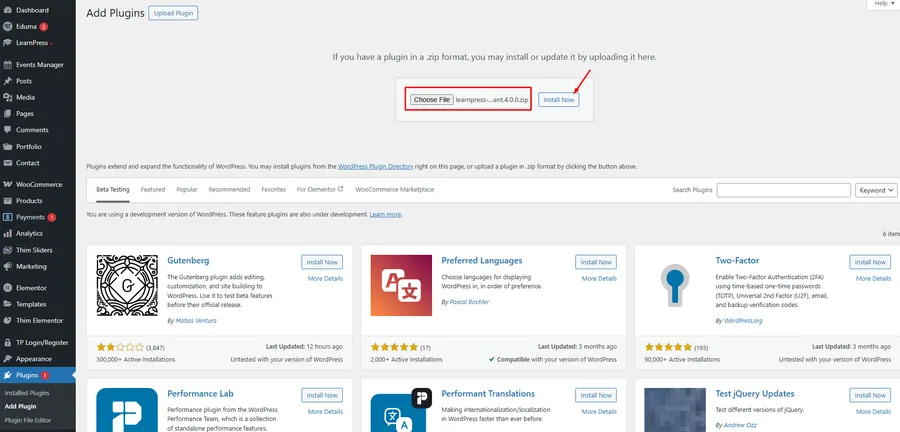
- Choose the learnpress-payu.zip file you just downloaded.
- Click Install Now.
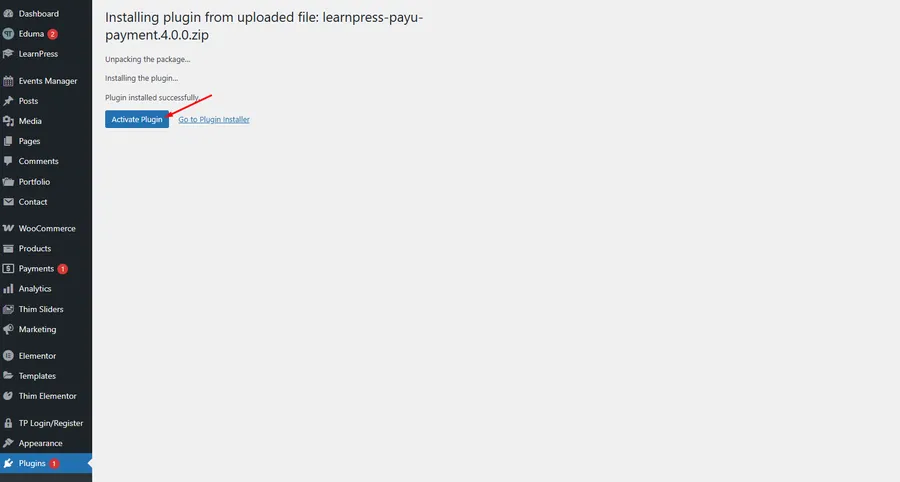
- Once the installation is complete, click Activate Plugin to enable the LearnPress PayU payment.
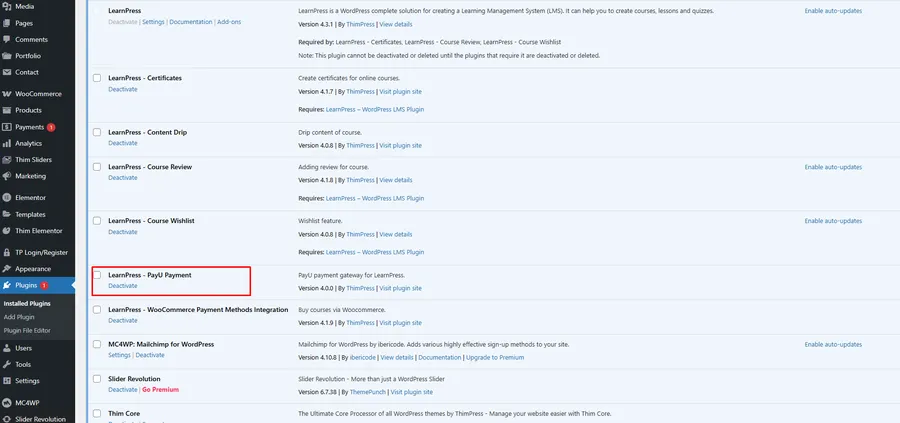
- You can verify the installation by checking your plugins list.
Step 2: Enable PayU in Eduma Settings
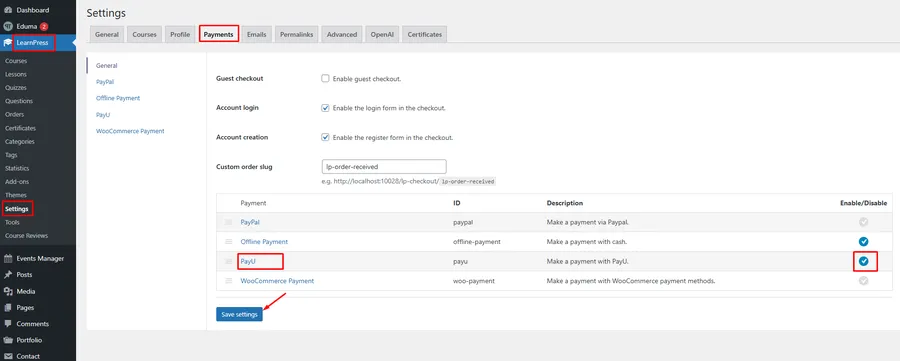
Now that the plugin is active, you need to enable it within the LearnPress settings to make it visible during checkout.
- Go to LearnPress > Settings in your Dashboard.
- Click on the Payments tab.
- In the list of payment gateways, find PayU and ensure the checkbox under the “Enable/Disable” column is ticked.
Step 3: Configure PayU Credentials
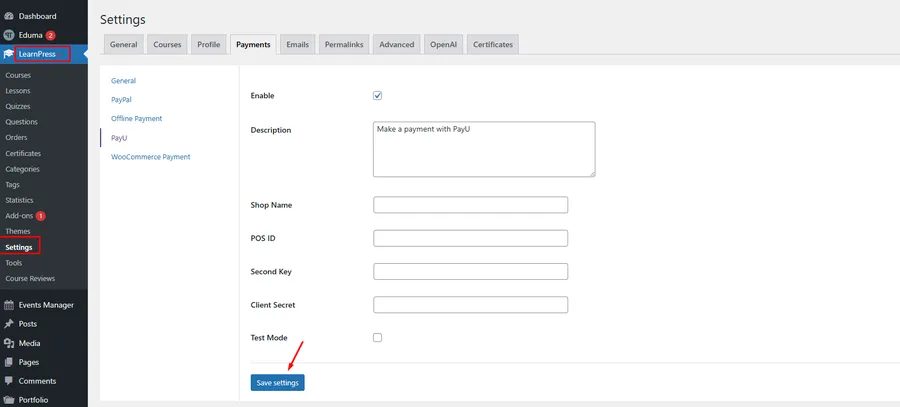
To process actual money, you must connect your specific PayU merchant account to the Eduma payment gateway settings.
- Click on the PayU link (or the Manage button) within the Payments tab to open the detailed configuration page.
- Fill in the required information based on your PayU merchant account:
- Enable: Check this box to activate the payment method on the frontend.
- Description: Enter a short description (e.g., “Make a payment with PayU”) that users will see at checkout.
- Shop Name: Enter the Shop Name registered in your PayU account.
- POS ID: Input your Point of Sale ID provided by PayU.
- Second Key: This is used to create a digital signature for verifying transactions between your website and PayU.
- Client Secret: A secret key that authenticates your website with PayU when sending or receiving payment requests.
- Test Mode: Check this box if you want to test the purchasing flow without using real money.
- Note: Remember to uncheck this when you are ready to go live.
- Once all details are entered correctly, click Save settings.
Conclusion
Integrating PayU in Eduma is a straightforward process that significantly enhances your website’s professional credibility. By following the steps above, you have successfully installed the plugin, enabled the gateway, and configured your security credentials. Your students can now purchase courses safely and easily.
FAQs About How to Use PayU in Eduma
Q1: Where can I find my PayU Client Secret and Second Key?
A: You can find these credentials by logging into your PayU Merchant Dashboard. Navigate to the “My Shop” or “Settings” section where API keys are listed.
Q2: Can I use PayU in Eduma for recurring subscriptions?
A: The standard LearnPress PayU add-on handles one-time payments for courses. If you require recurring billing, check if you have the LearnPress Paid Memberships integration and if PayU supports recurring billing in your region.
Q3: Why is the PayU option not showing on my checkout page?
A: Ensure that you have ticked the “Enable” box in LearnPress > Settings > Payments > PayU. Also, verify that your course price is not set to “Free”.
Q4: Is an SSL certificate required to use PayU?A:
Yes. For security and to meet WordPress LMS payment standards, your site should have an SSL certificate (HTTPS) installed to protect customer data during the transaction process.
Read more: Eduma Yoga Coaching Demo: A Beautiful New Coaching Experience
Contact US | ThimPress:
Website: https://thimpress.com/
Fanpage: https://www.facebook.com/ThimPress
YouTube: https://www.youtube.com/c/ThimPressDesign
Twitter (X): https://x.com/thimpress_com


