Do you want to sell your digital or physical products to customers around the world? If so, you found the right place to learn how to Create an Online Store with Shopify.
Shopify is a famous eCommerce Platform, that allows you to build your online store quickly and easily without using any code or hiring experienced web developers. Customers can manage shipping requirements or track inventory easily using Shopify. Of course, you have full control of the admin panel once you Create an Online Store with Shopify, checking the products you have, writing product descriptions, order processing, and more. In this guide, we show you simple steps to launch your online shop using CLASSY – Shopify Theme as soon as possible. Are you ready to get started?.
Shopify Pricing – How Much Does Shopify Cost?
If it’s your first time using Shopify, you can try 14 days of a Free Trial Shopify Plan. After the free trial is expired, you can choose the most suitable plan for your eCommerce business.
Here is the Shopify pricing for each plan you can refer to Create an Online Store with Shopify:
- Basic Shopify Plan: It costs $29/ month and you will have up to 2 staff members with 4 locations. Moreover, transaction fees for entire payment providers: 2.0%
- Shopify Plan: It costs $79/ month and you will have up to 5 staff members, 5 locations, fraud analysis, and professional reports. In addition, transaction fees for all payment providers: 1.0% and USPS Priority Mail Cubic® pricing.
- Advanced Shopify Plan: It costs $299/ month and you will have up to 15 staff members, 8 locations, fraud analysis, professional reports, and an advanced report builder. In addition, transaction fees for all payment providers: 0.5 %, USPS Priority Mail Cubic® pricing, and 3rd-party calculated shipping rates.
How to Create an Online Store with Shopify?
If you look at the past, it took hours to Create an Online Store with Shopify but it has changed now. You don’t have to spend hours, just a few minutes with a few clicks is enough to set up your online shop.
Step 1: Sign Up With Shopify to Create an Online Store
The first step everyone has to do when you Create an Online Store with Shopify is to sign up for an account. It’s the easiest stage for all levels.
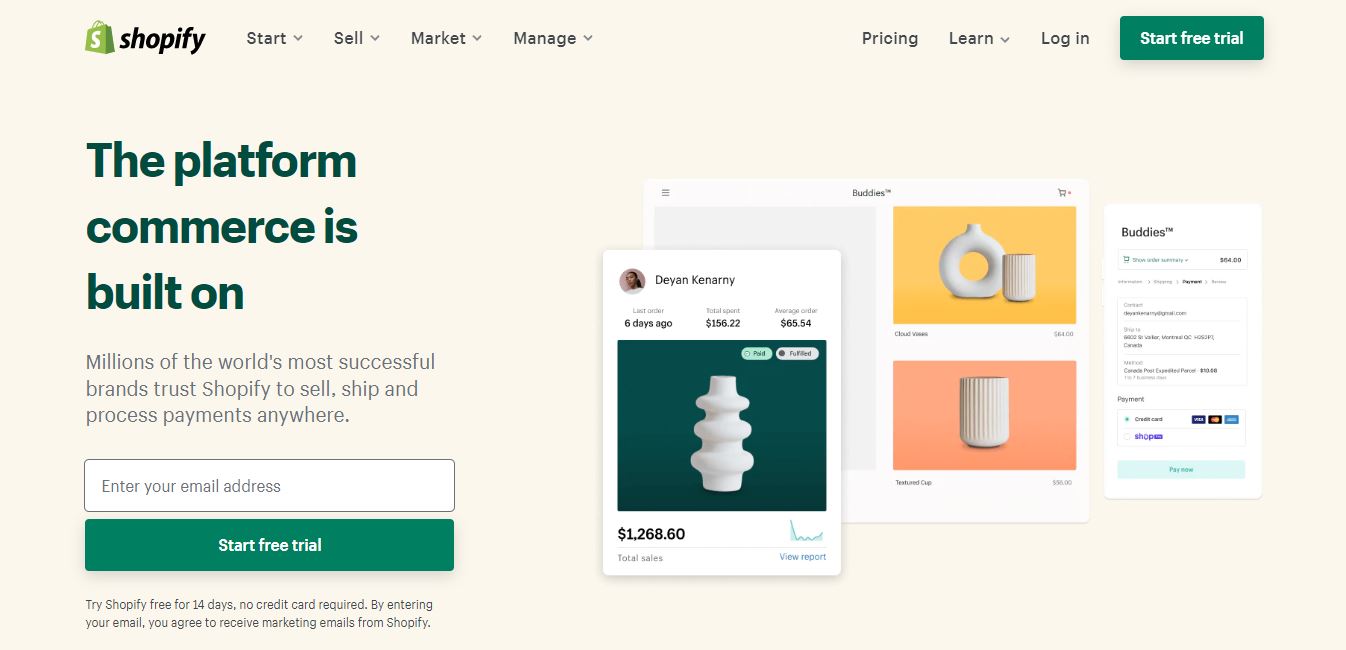
Simply go to Shopify and click Start Free Trial.
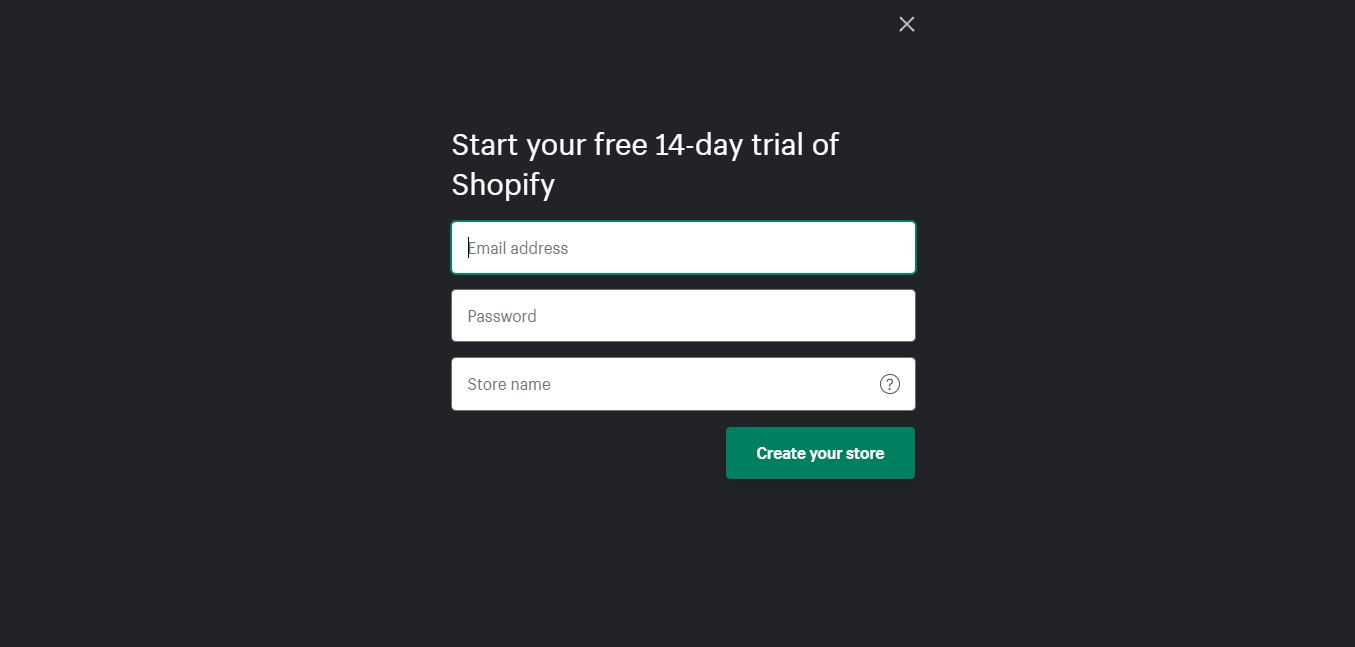
Next, there is a popup window to fill in your information like your email address, your password, and your specific store name. Then click the Create your store button to Create an Online Store with Shopify. Please remember to find a unique name for your online shop. If not, Shopify won’t let you purchase the domain. Besides, you can create pages specifically for customers to increase their experience on your website.
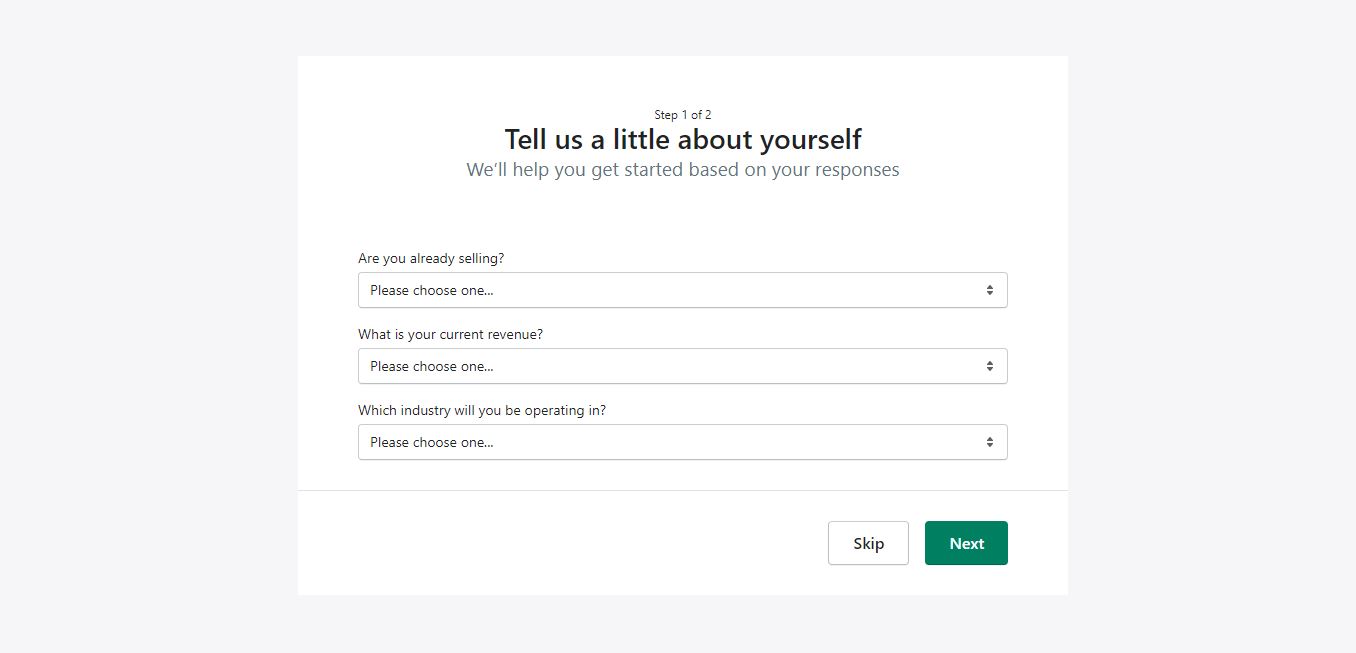
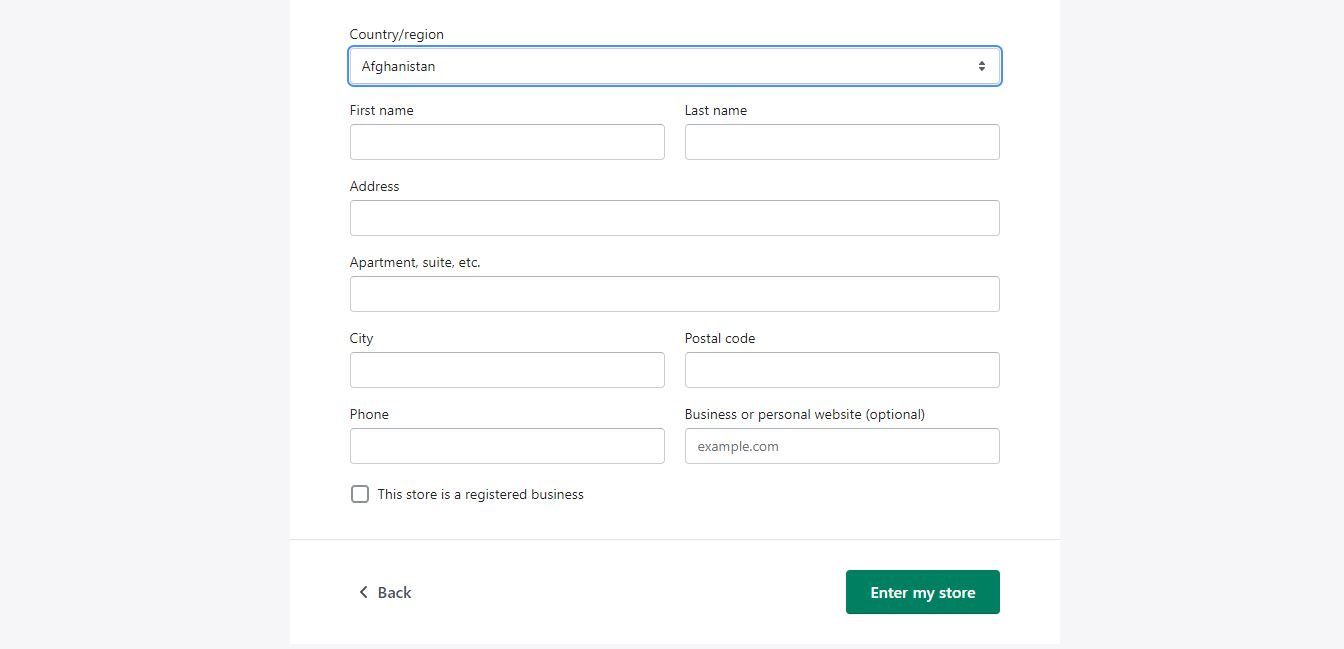
After that, you have to tell Shopify about yourself like your industry & your current revenue, and add an address so you can get paid.
Don’t forget to click the Enter My Store button once you completed all things.
Step 2: Choose a Theme for Your store
Similarly, you need to choose a theme to Create an Online Store with Shopify website looking awesome within a few minutes. No code is required at all. In particular, Shopify comes with its official theme store. There are free and paid Shopify themes to choose from to Create an Online Store with Shopify.
To choose a theme, you need to go to Online Store -> Themes and you can see the default theme called Dawn. If you like this theme, you can go ahead and click the Customize button.
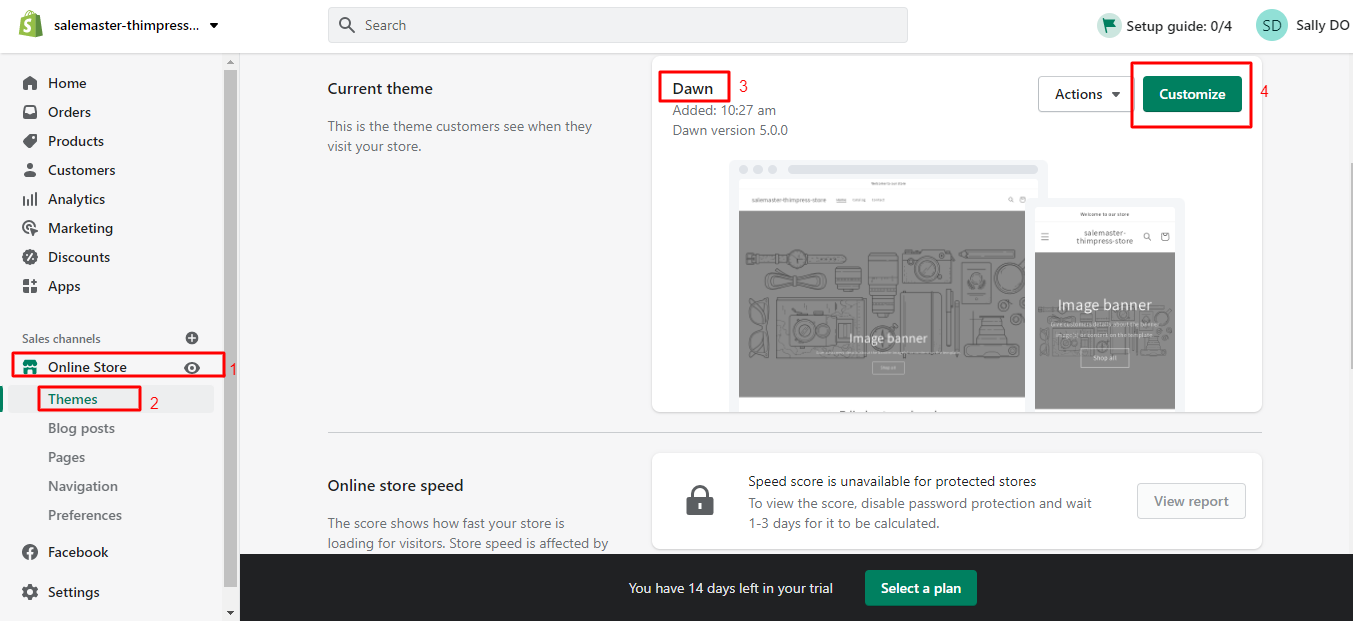
If not, you can scroll down to the Theme library to explore free and paid themes.
- Add a Free Theme from the Admin Dashboard
You’ll find several free themes after clicking the Explore free themes button. Simply select the theme you like and Add it to the theme library. Then your free theme is ready in your admin.
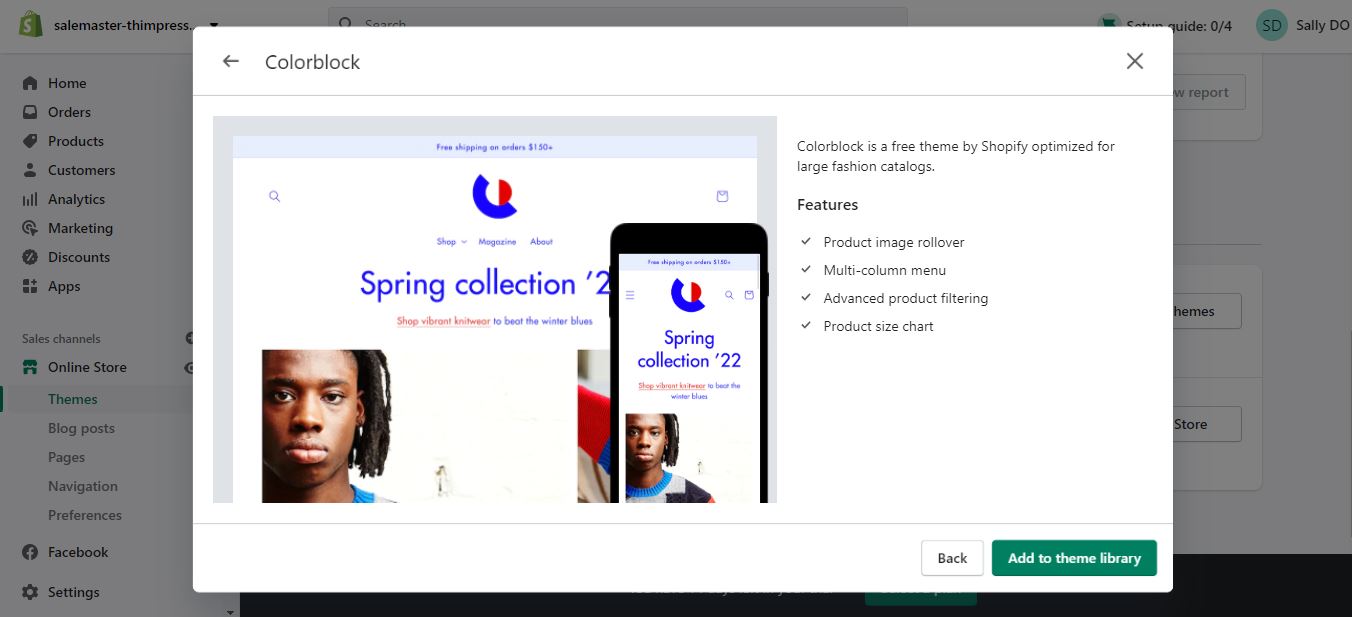
- Try a Paid Theme from the Shopify Theme Store
If you need advanced features, just click the Visit Theme Store button to see paid themes to purchase it. So now you can click All themes and pick the theme that is suitable for your business based on Industry, Catalog size, Layout, or Design.
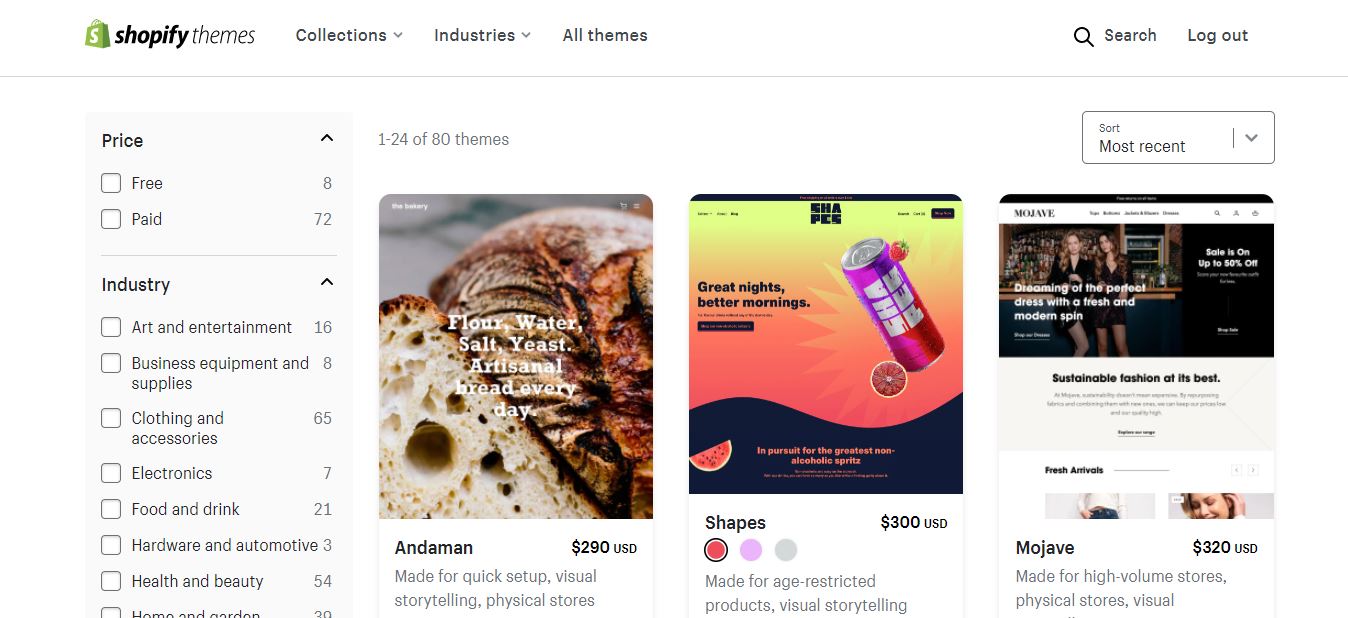
For example, I like Tailor, and I can hit Try theme and the system will add this theme to my online store themes and then purchase it to Create an Online Store with Shopify.

- Upload a Theme File from your Computer
Another way to add a Shopify theme is to purchase, you can pick one from 20+ Best Shopify Themes in 2022 (Continue Updating).
One of my favorite themes we highly recommend you purchase is CLASSY – Minimal Multipurpose Shopify Theme. After purchasing Storepify successfully, you should extract all files from Storepify downloaded package and you’ll find a storepify.zip file.

Next, back to your Shopify admin and click Add Theme to select Upload zip file.
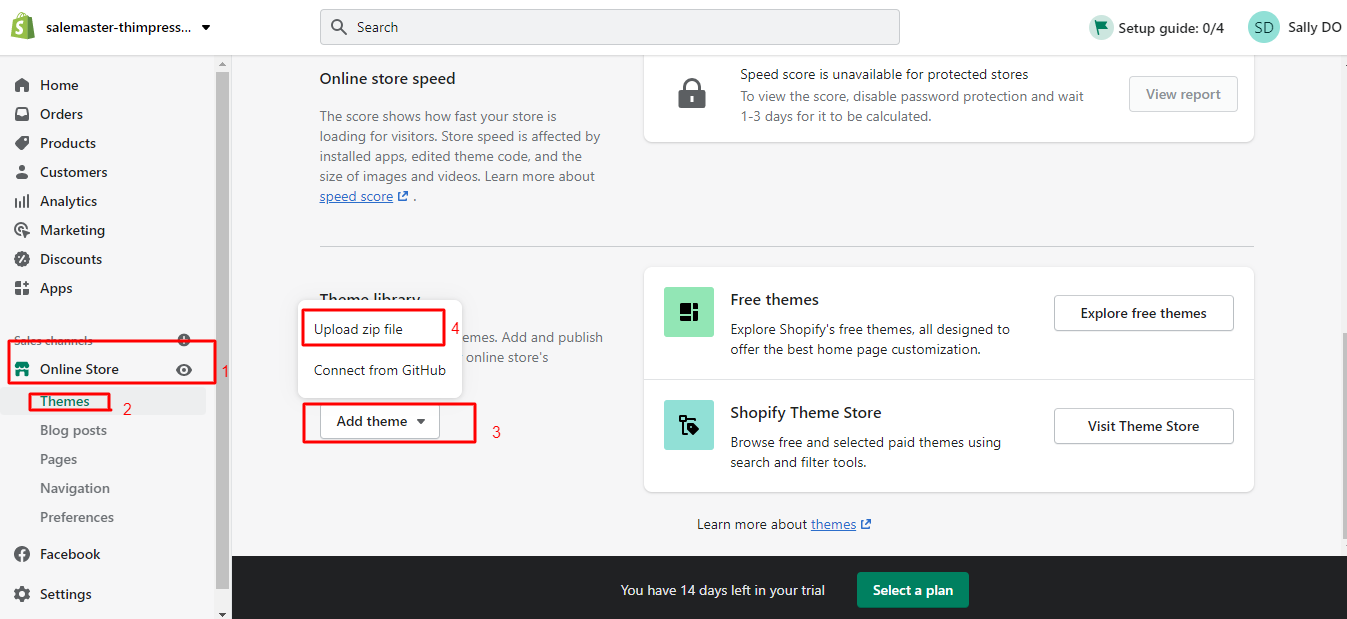
After that, you need to click the Add file -> Upload file.

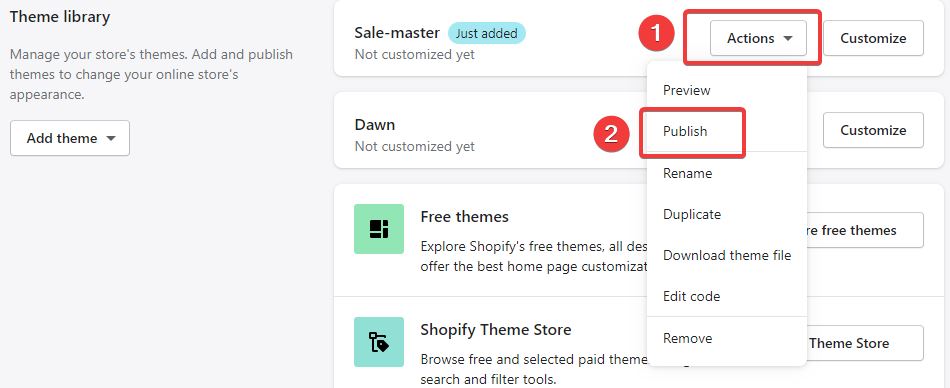
So now you can see the Sale-master theme in your admin dashboard. Go ahead to click the Action -> select Publish to start your online store
Step 4: Add a Product to Your Shopify Store – Create Online Store Shopify
The next important step of our guide on how to Create an Online Store with Shopify you should do is to add products for your customers to browse through.
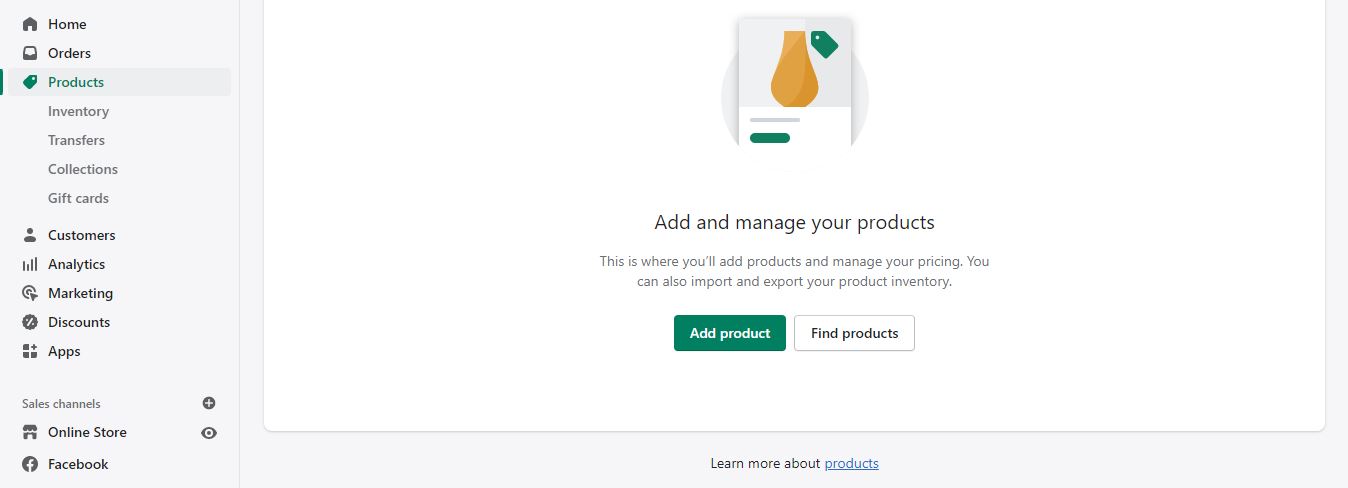
Navigate to Products on your Shopify admin -> click the Add product button.
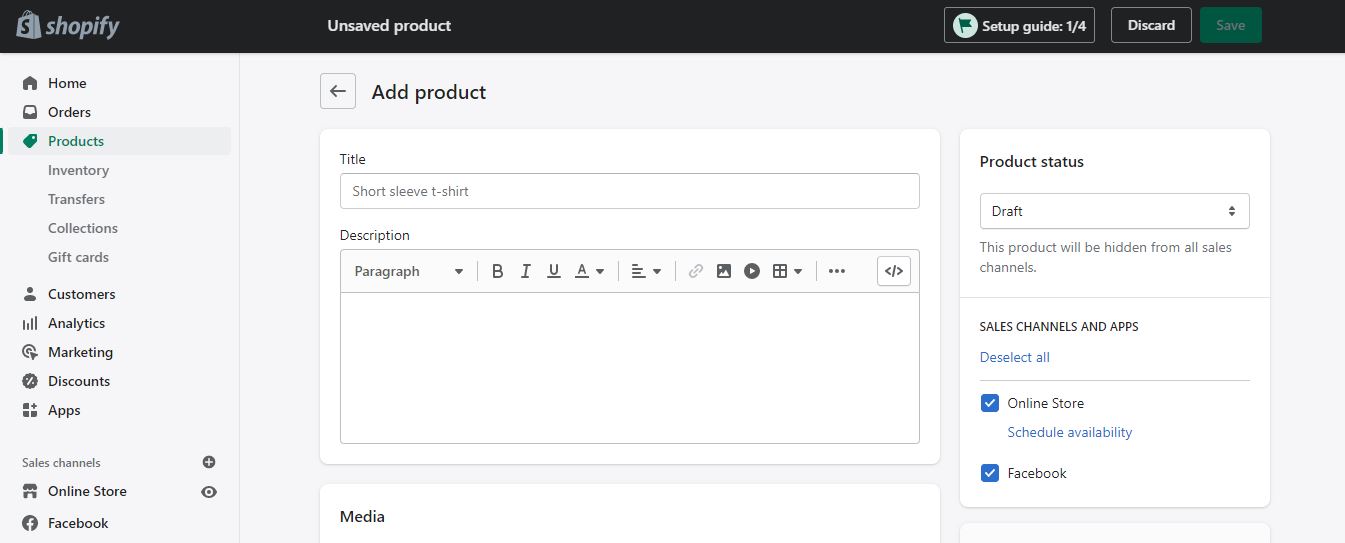
On this Add Product page, you need to fill in your product details like Title, Description, Media, Pricing, Cost per item, Inventory, Quantity, Shipping, Weight, Customs information, etc. After completing, make sure to click the Save button.
Then click the Preview button to see how your product looks on your store.

You should choose your product images carefully because they can make or break your opportunities for a sale. So you need to choose product images that appeal to your target customers.
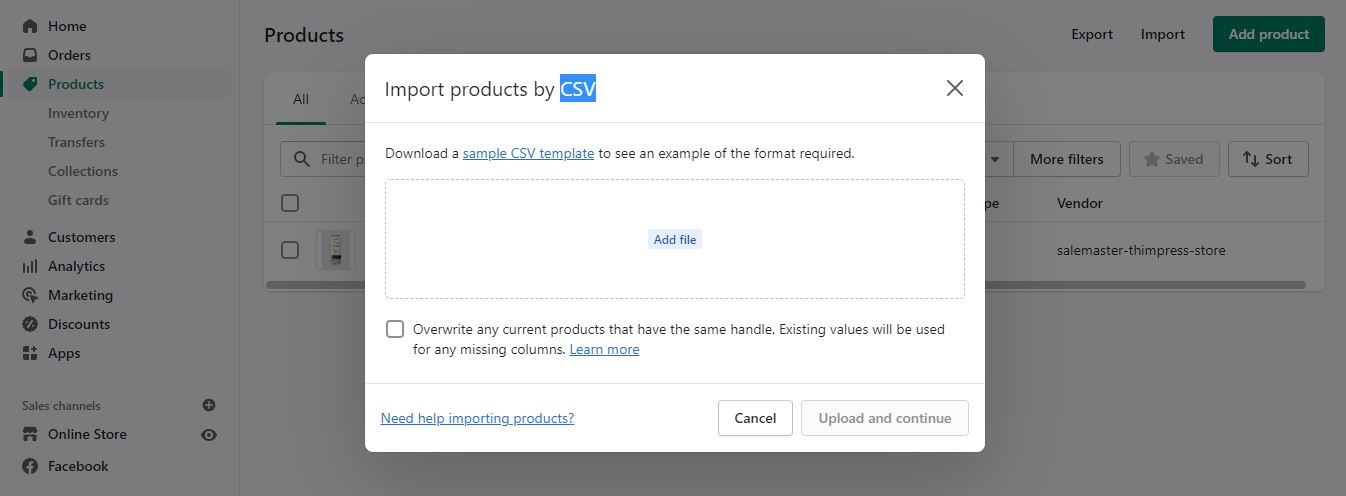
Another key point is that you can add a group of products as well by clicking the Import button using the CSV file.
Step 5: Customize the Look of Your Shopify Website – Create Online Store Shopify
To customize the look of your store, open your Shopify dashboard and click the Customize button of your theme. Then you’ll be taken to the page that allowing to control all the basic aspects of your store like header, footer, items, etc. Just play around with all the features to find the most suitable ones for your site.
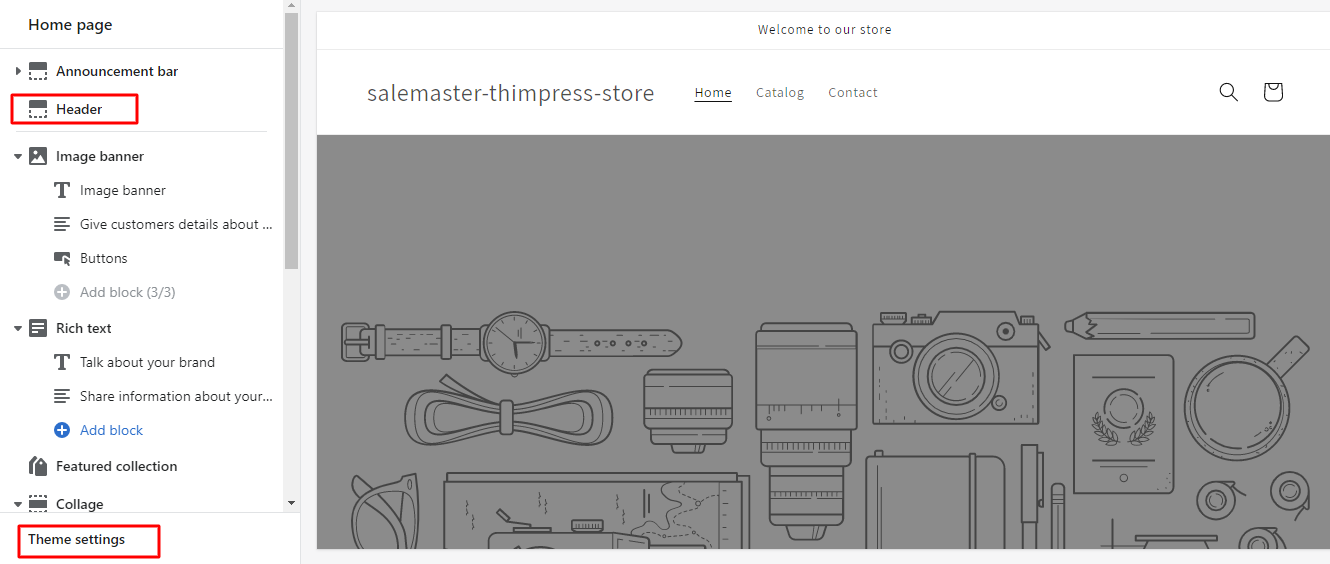
If you look at this editor page, there is a Theme Settings tab and simply click it to change fonts, colors, logos, typography, favicon, and more. Surely, it helps you to Create an Awesome Shopify Online Store.
Step 6: Adding a Domain Name – Create Online Store Shopify
After choosing your design to Create an Online Store with Shopify, you need to have a domain to make your site live and official. There are 2 options to choose from: Buy a domain directly from Shopify or a third-party company like GoDaddy.
So in this beginner guide, we will instruct you the way to buy new domain from Shopify and have it added directly to your store since the second choice is a bit daunting at first.
Back to your main Shopify admin -> click the Settings on the left sidebar -> select Domains.
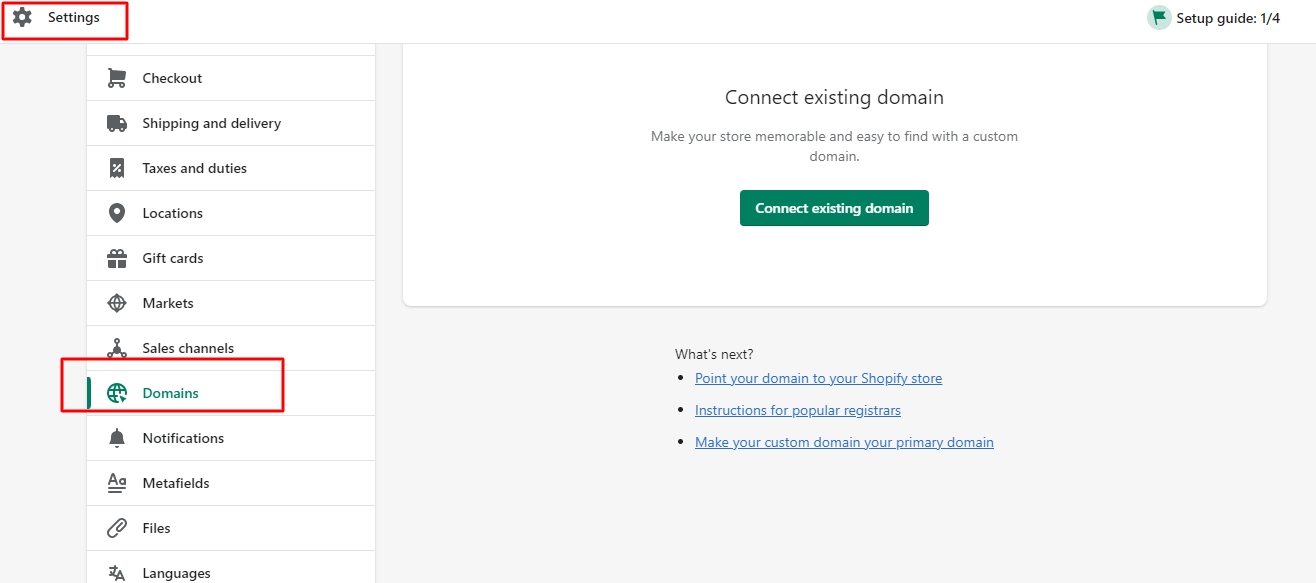
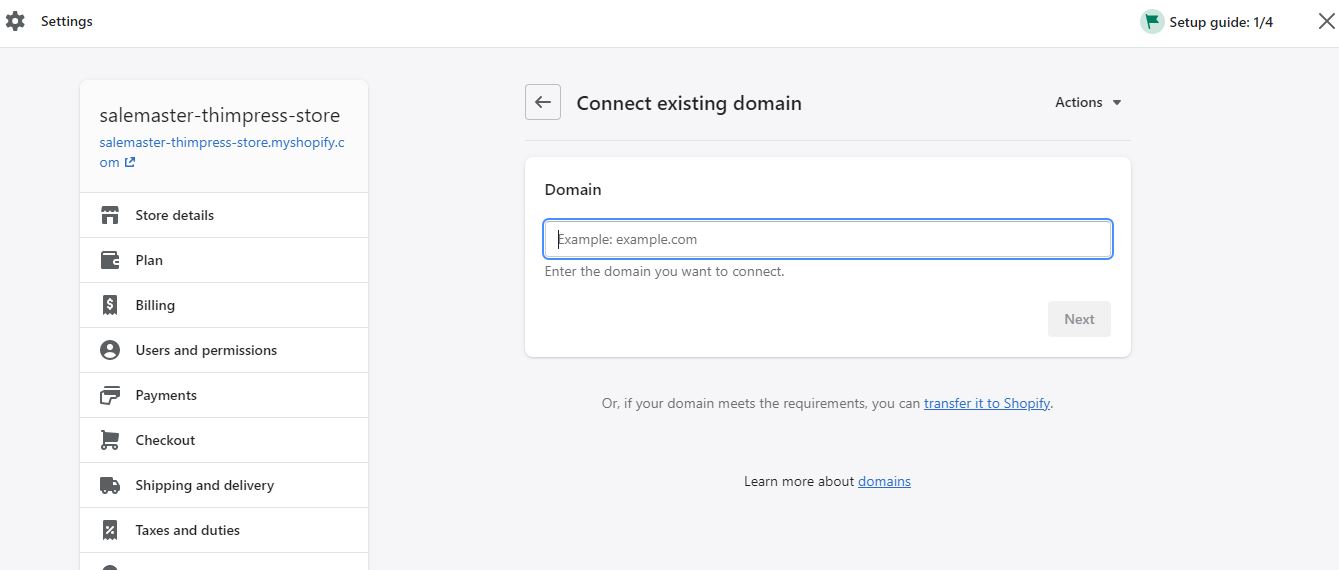
If you already have a domain from somewhere else, you should let Shopify know by clicking Connect existing domain and entering the domain you want to connect. Then hit the Next button and follow the instructions to complete the process.
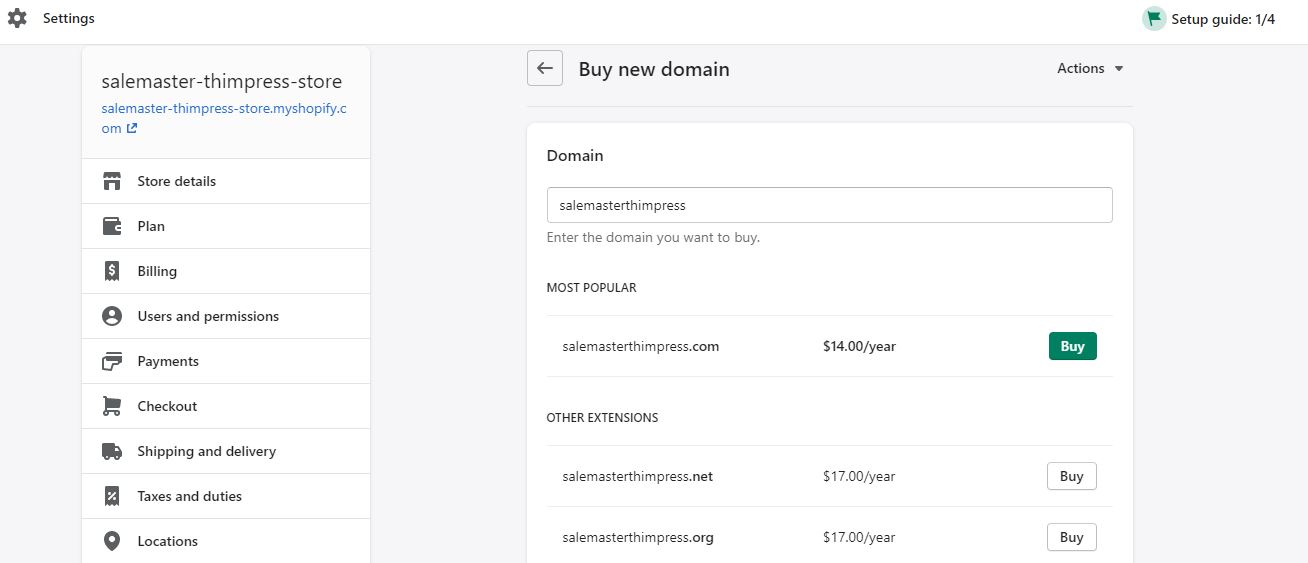
If you are new and don’t have an existing domain, simply hit Buy new domain and type the domain name you want.
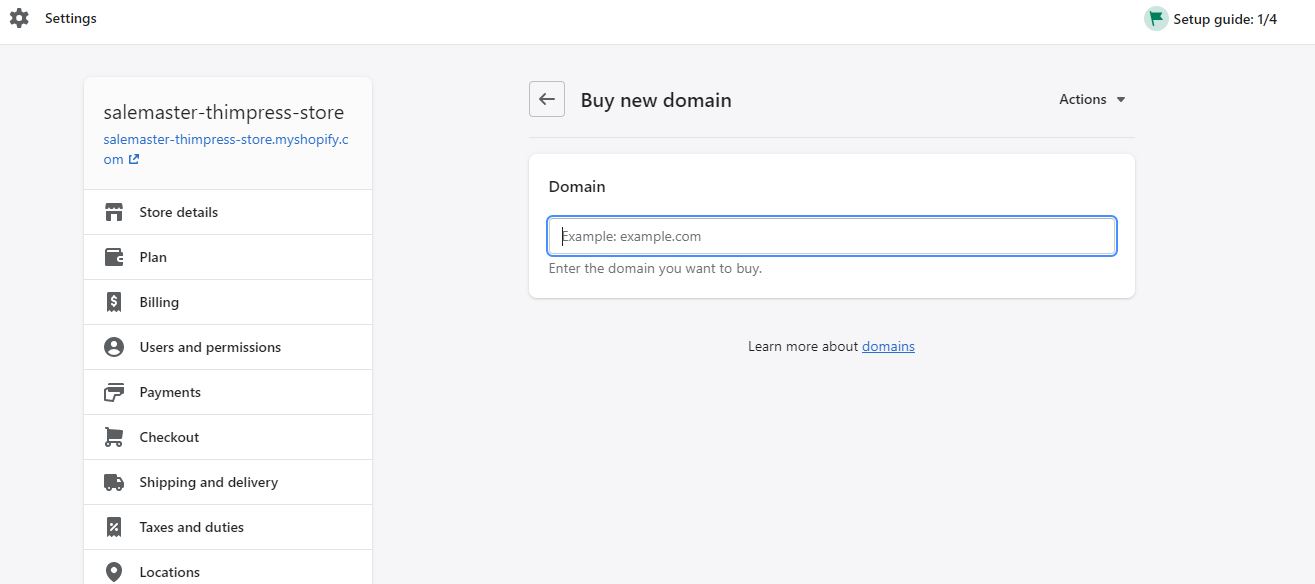
Then the system will tell you what is available with the price. Pick one of them and click Buy. After that, you should enter your information to complete the payment. Once you purchase that domain successfully, Shopify will automatically sync it for you.
Step 7: Adding Payment Gateways
Choosing the right payment methods for your store is the last step you need to do. It has some of the important things to consider when setting a payment gateway like transaction fees, card types, and offsite checkout.
Firstly, you need to set up your payment providers. Simply open your dashboard admin -> Settings -> Payments -> Payment providers
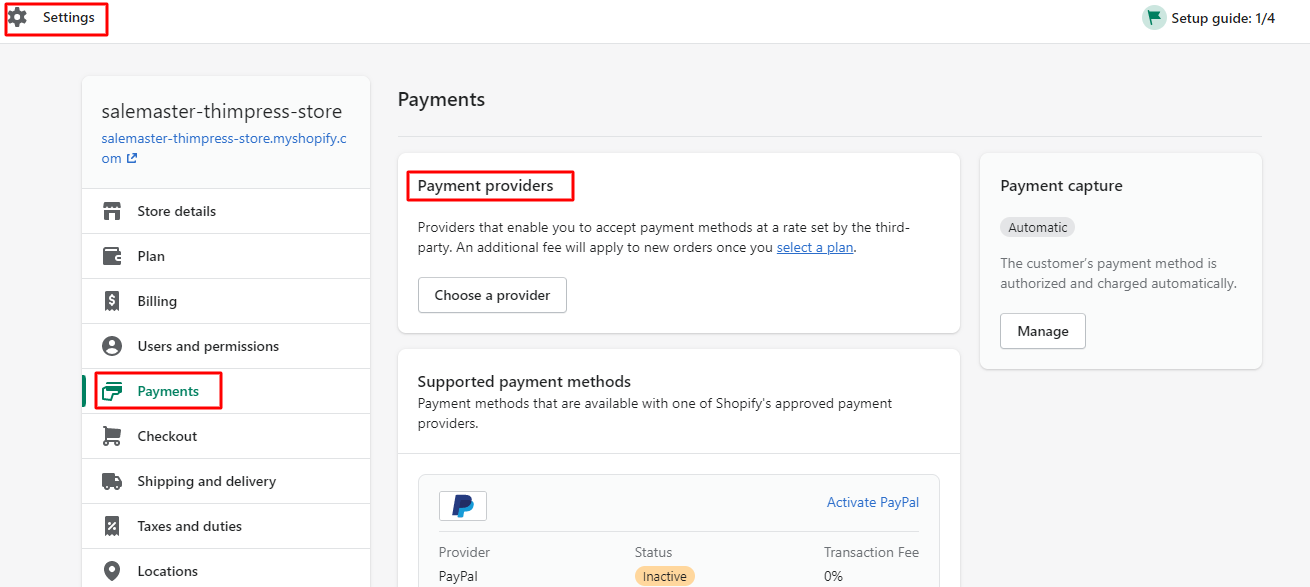
In addition, if your business is to Create an Online Store with Shopify in the supported payment countries and isn’t an illegal business, it’s easy to activate payments with a simple click with zero percent of transaction fees. Moreover, there are +100 third-party payment providers available for you to choose from. You can even add payment methods such as PayPal.
Besides, you can change the currency you want easily by clicking Settings -> Store detail -> Store currency and selecting the currency you want.
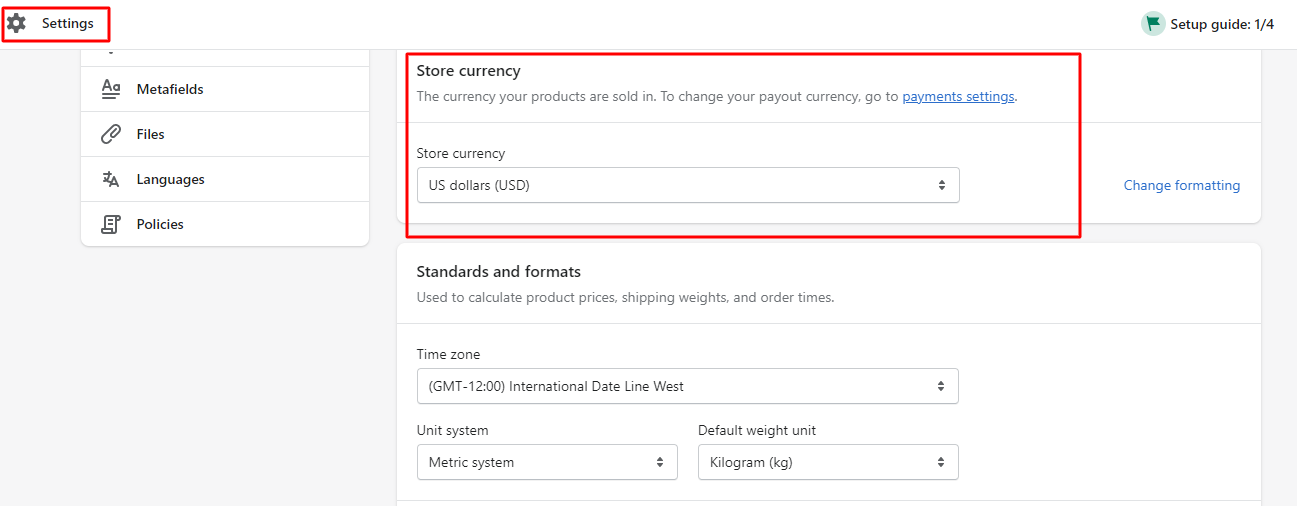
Finally, you can launch your online store now with the fully functional you need. That should be all steps you should take to Create an Online Store with Shopify.
Create an Online Store with Shopify: Conclusion
Overall, it’s easy to create and sell anything you want online nowadays, including courses, kitchen utensils, handmade products, graphic design services, and more. So you can just follow our steps above to Create an Online Store with Shopify with ease. Shopify comes at a low cost and even helps you start your eCommerce Business in no time.
Contact US | ThimPress:
Website: https://thimpress.com/
Fanpage: https://www.facebook.com/ThimPress
YouTube: https://www.youtube.com/c/ThimPressDesign
Twitter (X): https://x.com/thimpress_com


