Integrating a secure and reliable payment gateway is essential for any successful online course website. For users of the popular Eduma education WordPress theme, which is powered by the LearnPress, accepting payments smoothly is a top priority. Authorize.Net is a leading payment processor that allows you to accept credit card payments directly on your site.
This guide will provide a clear, step-by-step walkthrough on how to install, activate, and configure the Authorize.net in Eduma theme, ensuring you can start selling your courses securely.
Eduma – Education WordPress Theme
We provide an amazing WordPress theme with fast and responsive designs. Let’s find out!
What is the Authorize.Net Add-on for LearnPress?
The Authorize.Net Add-on for LearnPress is a plugin that connects your LearnPress-powered website (like one using the Eduma theme) directly to your Authorize.Net payment gateway account. This allows students to enter their credit card information on your site during checkout, and the payment is processed securely by Authorize.Net.
How to Set Up Authorize.net in Eduma (Step-by-Step)
Follow these three simple stages to get the payment gateway up and running on your e-learning website.
Step 1: Install and Activate the Authorize.Net Add-on
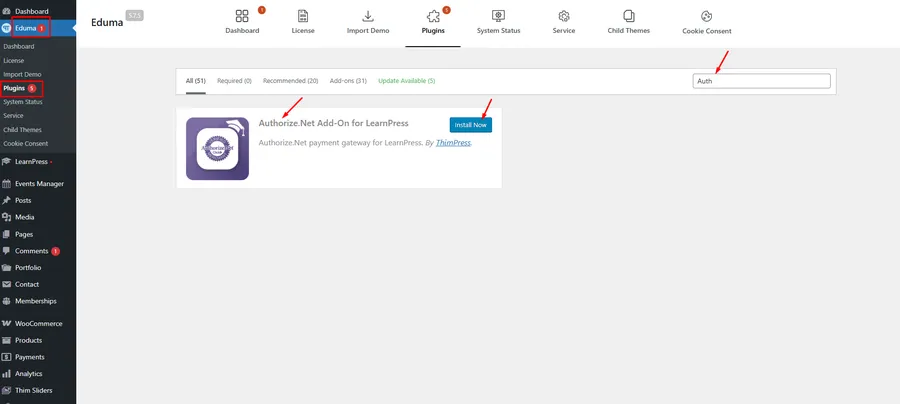
First, you need to add the plugin to your site. The Eduma theme typically bundles this add-on.
- Navigate to your WordPress Dashboard.
- On the left-hand menu, go to Eduma → Plugins.
- In the search bar, type “Authorize.Net”.
- You will see the “Authorize.Net Add-On for LearnPress”. Click the Install Now button.
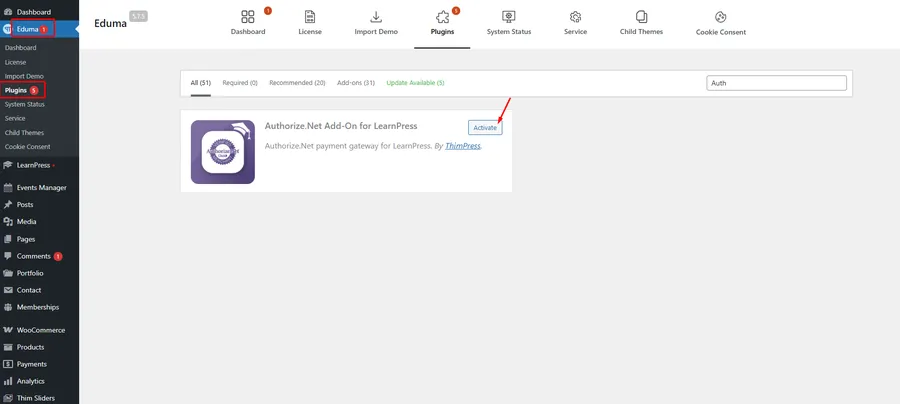
- After the installation is complete, click the Activate button.
You can verify its activation by going to the main Plugins page in your WordPress dashboard.
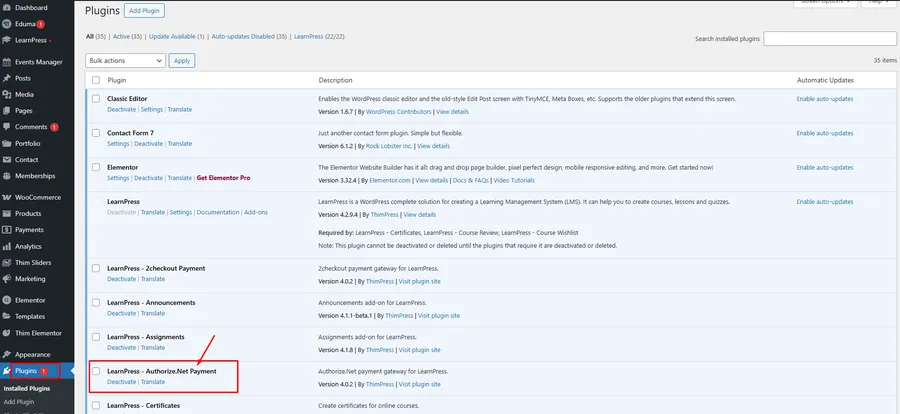
Step 2: Enable the Authorize.Net Payment Gateway
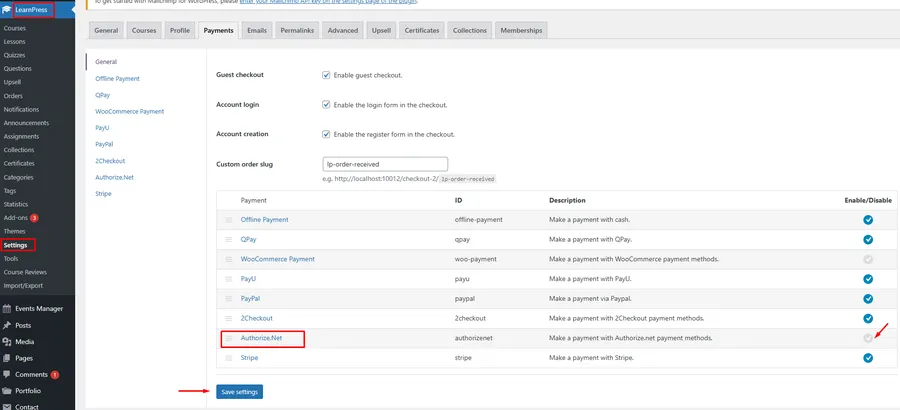
Once activated, you must enable the gateway within the LearnPress settings.
- From your dashboard, navigate to LearnPress → Settings.
- Click on the Payments tab.
- You will see a list of available payment methods. Find Authorize.Net in the list.
- In the “Enable/Disable” column, check the blue checkbox corresponding to Authorize.Net.
- Scroll to the bottom and click the Save settings button.
Step 3: Configure Your Authorize.Net API Credentials
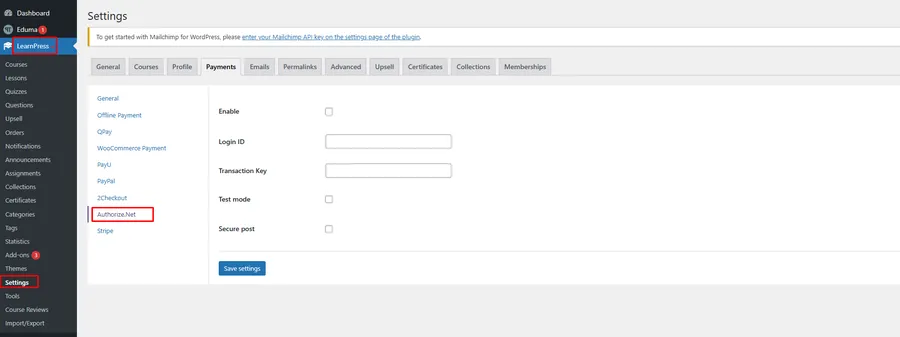
The final step is to link your specific Authorize.Net merchant account to your website.
- While still on the LearnPress → Settings → Payments page, you will now see an Authorize.Net sub-tab at the top (next to General, PayPal, etc.). Click on it.
- On this screen, you will need to fill in the following details:
- Enable: Check this box to make the payment method live.
- Login ID: Enter your API Login ID from your Authorize.Net account.
- Transaction Key: Enter your Transaction Key.
- Test mode: Check this box if you want to run test transactions using the Authorize.Net Sandbox environment. Important: You must uncheck this box when you are ready to accept real payments.
- After entering your valid credentials, click the Save settings button one last time.
FAQs About Authorize.net in Eduma
Where do I find my Authorize.Net Login ID and Transaction Key?
You can generate these credentials by logging into your Authorize.Net Merchant Interface. They are typically located under Account → Settings → API Credentials & Keys.
Is the Authorize.Net Add-on free with the Eduma theme?
The Authorize.Net Add-On for LearnPress is a premium add-on that is often included for free with your purchase of the Eduma theme. You can find it in the Eduma → Plugins section of your dashboard, as shown in this guide.
Why are my payments failing after setup?
There are a few common reasons:
Test Mode: You may have “Test mode” enabled in the settings but are using a real credit card, or vice-versa.
Incorrect Credentials: Double-check that your Login ID and Transaction Key are copied correctly, with no extra spaces.
Account Status: Ensure your Authorize.Net merchant account is active, fully approved, and not set to “Test Mode” on the Authorize.Net website.
Conclusion
Integrating Authorize.net in Eduma is a straightforward process that significantly enhances the professionalism and functionality of your online school. By following the steps to install, activate, and configure the LearnPress add-on, you can provide a secure and seamless checkout experience for your students, allowing you to accept credit card payments directly on your site. Always remember to test your configuration before going live.
Read more: How to Use 2Checkout in Eduma: A Simple Guide
Contact US | ThimPress:
Website: https://thimpress.com/
Fanpage: https://www.facebook.com/ThimPress
YouTube: https://www.youtube.com/c/ThimPressDesign
Twitter (X): https://x.com/thimpress_com


