The Eduma theme, powered by LearnPress, is a popular choice for creating online learning platforms. To sell your courses, you need a reliable payment gateway. Razorpay is one of India’s leading payment solutions, offering a seamless checkout experience with multiple payment options like UPI, credit/debit cards, net banking, and wallets.
Integrating Razorpay in Eduma allows you to securely and efficiently accept payments from your students. This guide will walk you through the entire process, from installation to configuration, using the add-on built directly into Eduma.
Eduma – Education WordPress Theme
We provide an amazing WordPress theme with fast and responsive designs. Let’s find out!
How to Install and Activate the Razorpay Add-on in Eduma
Eduma simplifies this process by including the necessary plugin. You don’t need to search for an external file; you can install it directly from your WordPress dashboard.
Step-by-Step Installation Guide
- Navigate to your WordPress Dashboard.
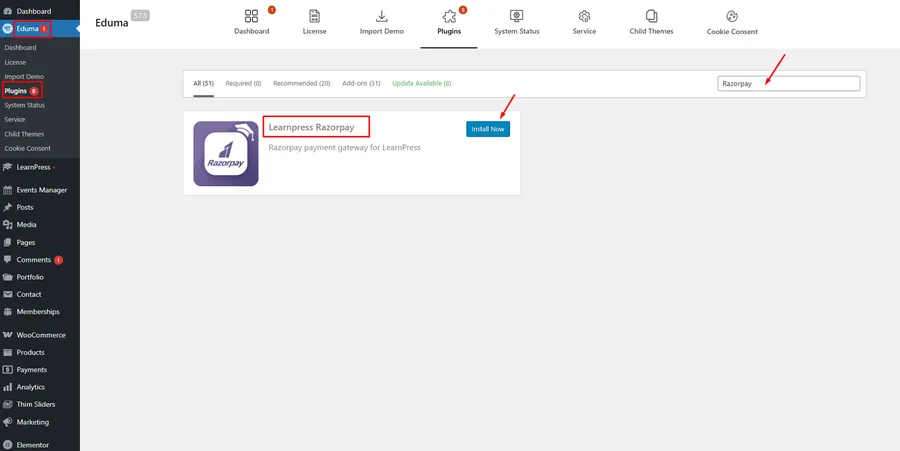
- On the left-hand menu, go to Eduma → Plugins.
- In the ‘Search Plugins’ field provided, type “Razorpay”.
- The ‘LearnPress Razorpay’ plugin will appear in the search results.
- Click the ‘Install Now’ button to begin the installation.
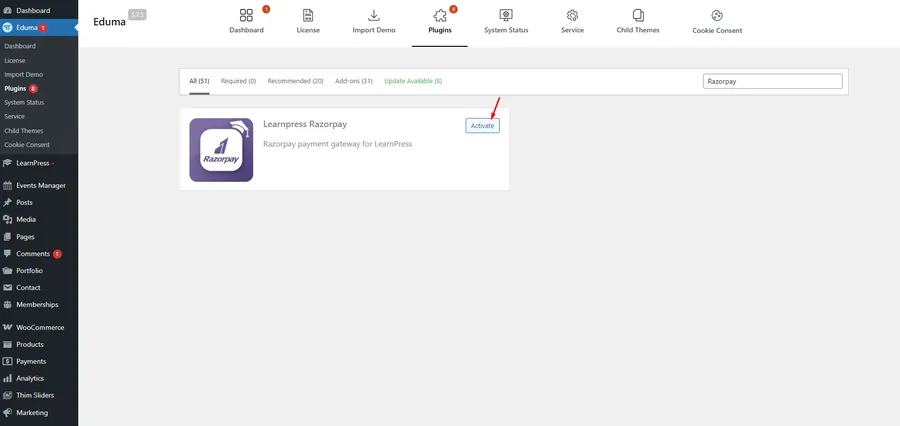
- After the installation is complete, the button will change to ‘Activate’. Click it to activate the plugin.
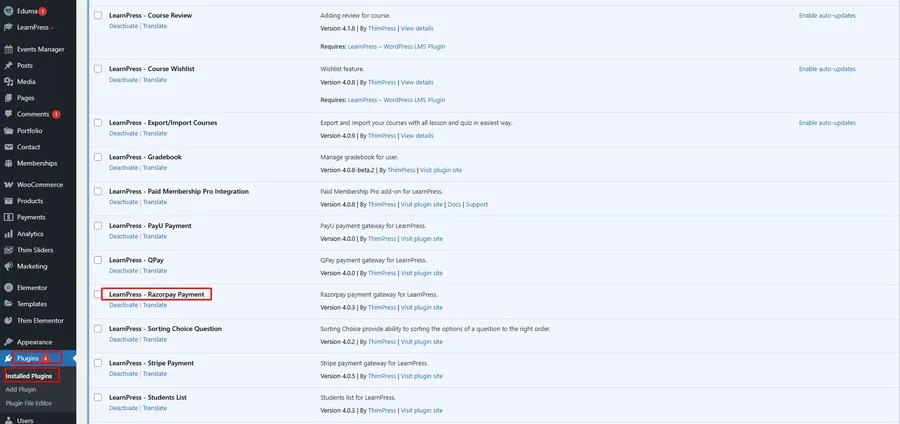
- You can confirm the plugin is active by visiting the main Plugins page on your dashboard.
How to Configure Razorpay in LearnPress
Once the plugin is active, you must configure it within LearnPress to connect it to your Razorpay account.
Enabling the Payment Method
First, you need to tell LearnPress to use Razorpay as a payment option.
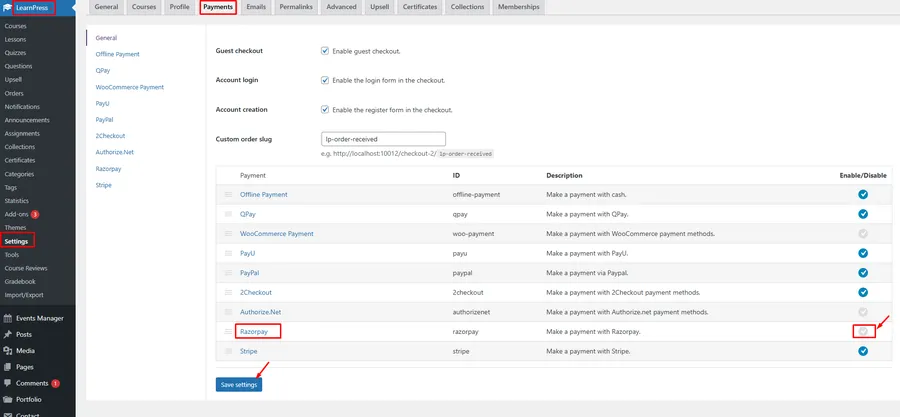
- From your WordPress Dashboard, navigate to LearnPress → Settings.
- Click on the Payments tab at the top of the page.
- You will see a list of available payment gateways. Find and click on Razorpay.
- Check the ‘Enable Razorpay’ box.
- Click the ‘Save settings’ button at the bottom of the page.
Adding Your Razorpay API Keys
This is the most crucial step. You need to link your website to your Razorpay account using unique API keys.
- While still in the Razorpay settings (
LearnPress→Settings→Payments), you will see fields for Key ID and Key Secret. - To find these keys, log in to your Razorpay Dashboard.
- In your Razorpay Dashboard, navigate to Settings → API Keys.
- Click the ‘Generate Key’ button to create a new set of keys (if you haven’t already).
- Razorpay will provide you with a ‘Key ID’ and a ‘Key Secret’.
[Image: Razorpay Dashboard showing API Key ID and Key Secret]
Understanding Your Keys
- Key ID: This is the public identifier for your Razorpay account. Copy this value from your Razorpay dashboard and paste it into the ‘Key ID’ field in your LearnPress settings.
- Key Secret: This is a private, confidential key used for authentication. You will only see this key one time when you generate it. Be sure to copy it and save it in a secure location. Paste this value into the ‘Key Secret’ field in your LearnPress settings.
Finalizing Configuration
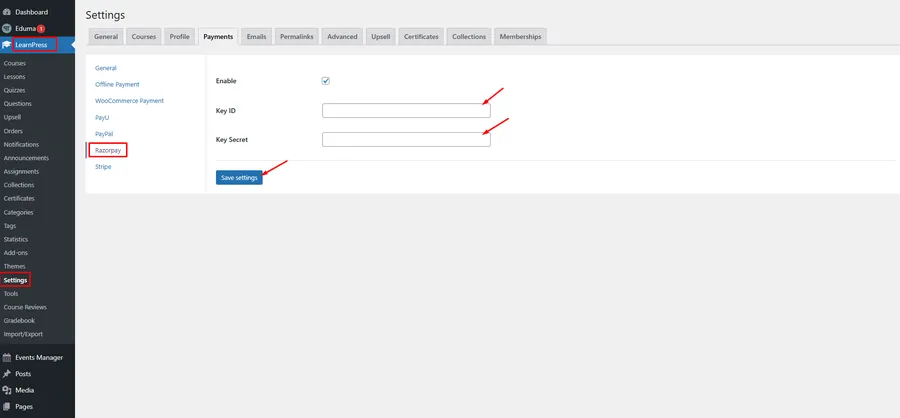
After you have pasted both your Key ID and Key Secret into the correct fields, scroll down.
Don’t forget to click the “Save settings” button to save all your changes.
Your integration of Razorpay in Eduma is now complete. You can perform a test transaction to ensure everything is working correctly.
FAQs About Razorpay in Eduma
Q1: Is the LearnPress Razorpay plugin free?
A: Yes, the ‘LearnPress Razorpay’ add-on is typically included with the Eduma theme as a bundled plugin, making it free for Eduma users. However, Razorpay itself will charge transaction fees for processed payments.
Q2: What should I do if I lose my Key Secret?
A: If you lose or forget your Key Secret, you cannot recover it. You must log in to your Razorpay dashboard, generate a new API key pair (which will deactivate the old one), and then update both the new Key ID and new Key Secret in your LearnPress settings.
Q3: Why are payments failing after setup?
A: This can happen for a few reasons. First, ensure you are using ‘Live’ keys, not ‘Test’ keys, if you want to accept real payments. Second, double-check that you copied and pasted the keys correctly, with no extra spaces. Finally, ensure your Razorpay account is fully activated and verified.
Q4: Can I test the payment process first?
A: Yes. Razorpay provides separate ‘Test Mode’ and ‘Live Mode’ API keys. You can use the ‘Test’ keys in your LearnPress settings to make test purchases without any real money being charged.
Conclusion
Integrating a secure payment gateway is essential for any e-learning website. By following this simple guide, you can successfully set up Razorpay in Eduma and provide your students with a fast, reliable, and familiar payment option. The built-in LearnPress Razorpay add-on makes this process straightforward, allowing you to focus on what matters most: creating and selling your online courses.
Read more: How to Use 2Checkout in Eduma: A Simple Guide
Contact US | ThimPress:
Website: https://thimpress.com/
Fanpage: https://www.facebook.com/ThimPress
YouTube: https://www.youtube.com/c/ThimPressDesign
Twitter (X): https://x.com/thimpress_com


