The graphics card is one of the most important components of a computer because it determines how well your computer will perform certain tasks. Furthermore, computers come preloaded with a variety of graphics cards, giving them functional differences.
Have you ever asked yourself “What graphics card do I have?”
You may be in a situation when you need to use your computer for a specific purpose, such as gaming or overclocking, and you must therefore be aware of what graphics card do I have that the PC is equipped with. Understanding this will assist you in determining your computer’s capability in relation to the preloaded graphics card.
The GPU in your computer can be tested using a variety of methods, so you don’t need to remove the case to find out. Below, we’ll go over the four best ways to test a computer’s graphics card, along with instructions on how to use each one.m
Check What Graphics Card Has in Task Manager
The Windows Task Manager includes a feature that displays your computer’s GPU performance. With that option, you can easily see the name of your computer’s graphics card.
To check what graphics card I have in Task Manager, follow the steps below:
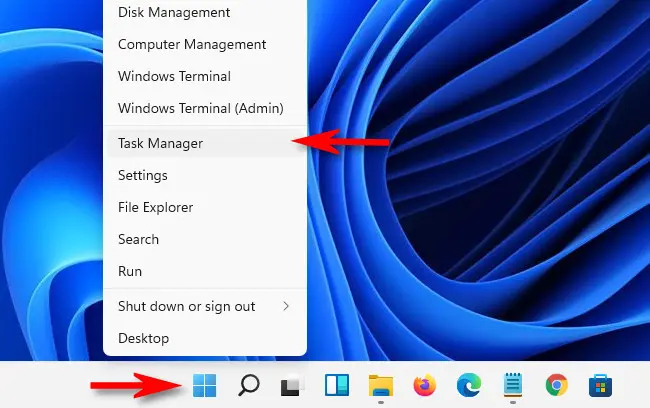
Step 1: Right-click the Start button and select Task Manager. You can also open the top result by pressing Windows + S and typing Task Manager.
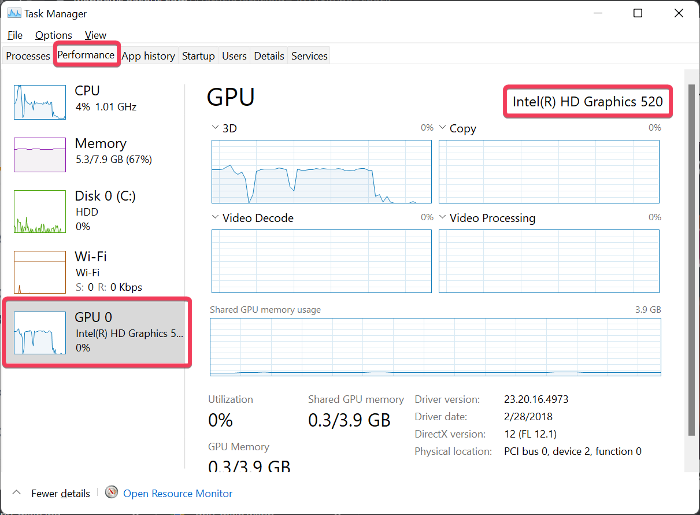
Step 2: Navigate to the Performance Tab in the Task Manager window. If you can’t see the tabs, select More Details to view the full Task Manager page.
Step 3: Select GPU from the left-hand side pane to see the GPU running on your computer in the top-right corner of the page.
Check What Graphics Card Has in Device Manager
The Device Manager displays the names of all the hardware on your computer, including the GPU. So, if you want to test the graphics cards on your computer, you can use the Device. Keeping your drivers up-to-date ensures optimal performance. Learn how to update your graphics driver across various Windows versions.
Here’s how to check your graphics card using Device Manager:
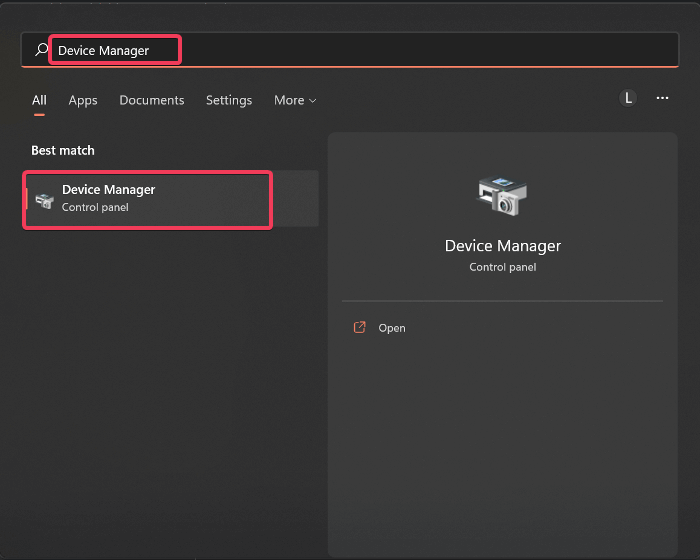
Step 1: Press Windows + S, type Device Manager, and select the top result.
Step 2: In the Device Manager window, double-click the Display adapters option.
Step 3: After expanding the Display Adapter, you’ll see the name of the GPU(s) installed on your computer.
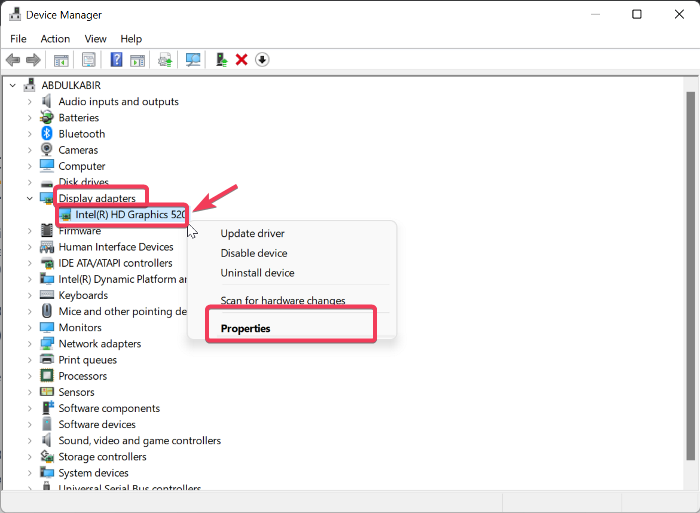
Step 4: To see more information about the GPU, right-click it and select Properties. And then you will find out what graphics card I have.
Check What Graphics Card Has in DxDiag
The Microsoft-created DirectX Diagnostic, also known as DxDiag, allows you to view information about your system, sound card, and graphics card. The tool is preinstalled on all Windows computers and is used to troubleshoot problems with your computer’s hardware components.
To use DxDiag to check your computer’s graphics card:
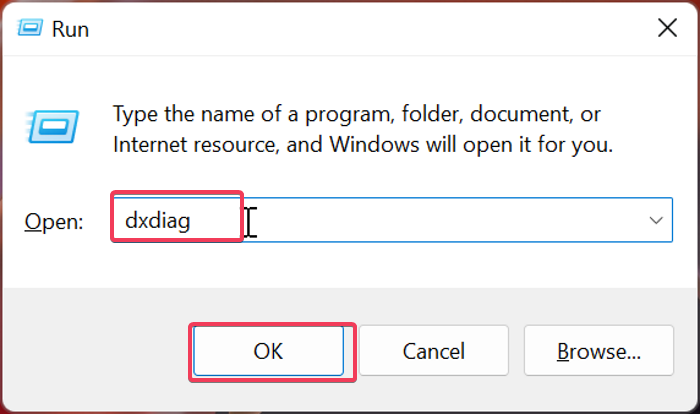
Step 1: To open the Run Command box, press Windows + R.
Step 2: Type dxdiag into the box and press Enter.
Step 3: After the DirectX Diagnostic Tool has opened, navigate to the Display tab and look for the Device Name section to see the name of the computer’s GPU.
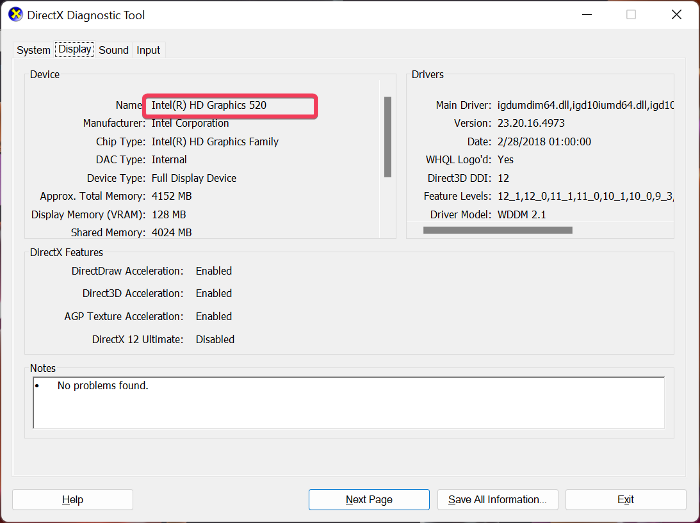
The page also contains information about what graphics card I have and its driver.
If you’re experiencing issues with your GPU, you might consider resetting your graphics driver to resolve potential software conflicts
Use CPU-Z And GPU-Z To Check What Graphics Card Has
If you don’t want to use the methods described above, you can get your graphics card information from third-party applications such as CPU-Z or GPU-Z.
CPU-Z
CPU-Z is a free piece of software that gathers information on some of your computer’s most important hardware. This tool gives you access to information about your GPU and CPU. Because the software is lightweight, it runs smoothly on computers. Here’s how to use CPU-Z on a Windows computer to check for what graphics card I have:
Step 1: Navigate to the CPU-Z download page and save the program to your computer.
Step 2: After downloading the setup file, install and run the program.
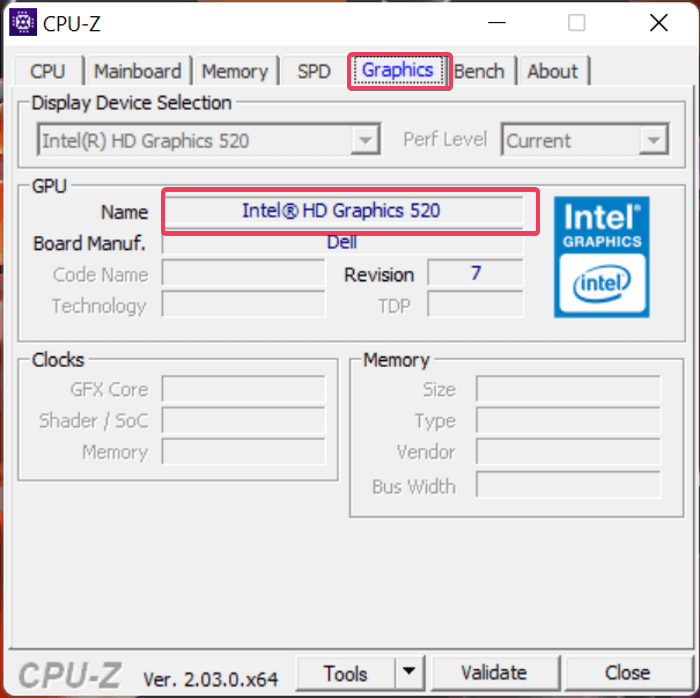
Step 3: Navigate to the Graphics tab at the top of the CPU-Z window to find the name of your graphics card on your computer.
GPU-Z
GPU-Z is yet another system utility designed to provide vital information about your video card and graphics processor. It provides a comprehensive list of information about your graphics card because it was designed specifically for that purpose. GPU is also supported by various Windows versions and graphics devices such as NVIDIA, AMD, ATI, and Intel.
The steps below show how to use GPU-Z to get information about what graphics card do I have.
Step 1: Download and install the GPU-Z program on your computer.
Step 2: After installing the program, launch it, and you will see information about your graphics card under the Graphics Card tab.
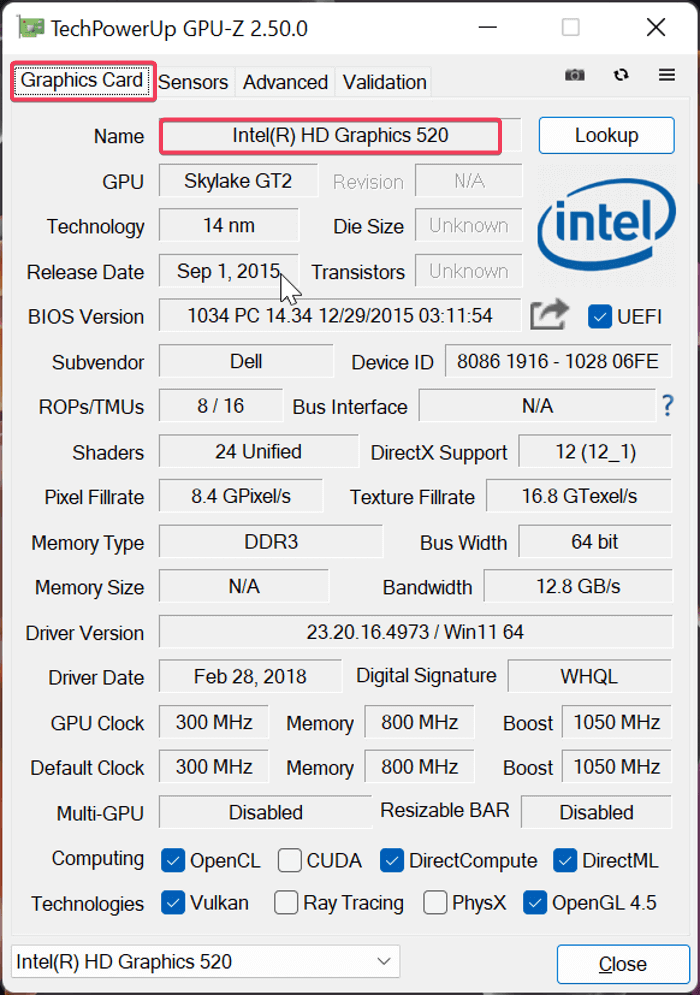
You can also use GPU-Z to look up information about your graphics card by clicking on the Lookup button next to its name.
Conclusion
In some cases, you will be required to inspect your computer’s graphics card. If you find yourself in this situation, there are several alternatives to opening up your computer case.
Using Windows Task Manager, Device Manager, DxDiag, and external software such as CPU-Z and GPU-Z is one of the best ways to test your computer’s graphics card. We’ve gone over the steps for each of these methods so you can easily find the GPU on your computer.
If you’re considering an upgrade, explore our curated list of the best graphics cards for gaming to find the perfect match for your needs.
FAQs:
1. How do I check what graphics card I have on Windows 11?
You can check it using Task Manager, Device Manager, or DxDiag. Just right-click the Start button, open Task Manager, go to the Performance tab, and click GPU to see your graphics card name.
2. How to find GPU model on a Windows laptop?
Press Windows + R, type dxdiag, and hit Enter. Go to the Display tab — you’ll see the exact GPU model under “Device Name.”
3. What is the easiest way to check my graphics card?
The easiest way is using Task Manager or Device Manager. You don’t need to download anything. For more details, tools like GPU-Z also work well.
4. Can I check my graphics card without opening the computer?
Yes, you don’t have to open your PC. Windows provides built-in tools like Task Manager, DxDiag, and System Information to check GPU details easily.
5. What’s the difference between integrated and dedicated graphics?
Integrated graphics are built into your CPU and share memory with it. Dedicated graphics cards are separate hardware with their own memory and are better for gaming, video editing, and heavy tasks.
6. How to check if my graphics card is working properly?
Use Task Manager to monitor GPU usage. You can also run DxDiag or tools like GPU-Z to see performance data and check for errors or overheating.
7. Can I find my graphics card details in Windows settings?
Yes. Go to Settings > System > Display > Advanced display settings. You’ll see which GPU is being used for your display.
Read More: How To Reset Graphics Driver? 4 Easiest Ways for Anyone to Solve
Contact US | ThimPress:
Website: https://thimpress.com/
Fanpage: https://www.facebook.com/ThimPress
YouTube: https://www.youtube.com/c/ThimPressDesign
Twitter (X): https://x.com/thimpress_com


