A well-organized menu is essential for any website, especially for an educational platform built with the Eduma theme. It acts as a roadmap, guiding your students and visitors to important sections like courses, blog posts, and contact pages. A clear navigation structure not only improves user experience but also contributes to better SEO.
Fortunately, the process to create menu in Eduma is straightforward within the WordPress dashboard. This guide will walk you through each step, from creating your first menu to organizing it with sub-items.
Eduma – Education WordPress Theme
We provide an amazing WordPress theme with fast and responsive designs. Let’s find out!
A Step-by-Step Guide to Create Menu in Eduma
Follow these simple instructions to build and display a professional-looking menu on your Eduma-powered website.
Step 1: Access the Menu Section
First, you need to navigate to the menu management area in your WordPress dashboard.
- Log in to your WordPress admin area.
- From the left-hand sidebar, hover over Appearance.
- Click on Menus.
Step 2: Create a New Menu
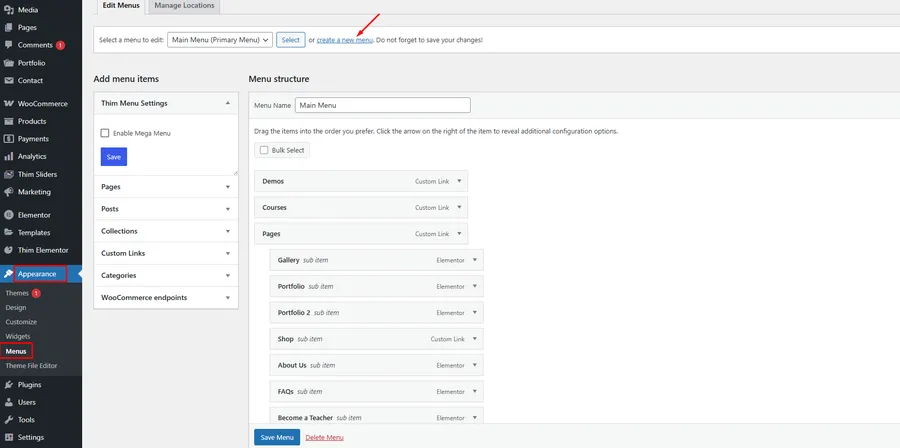
If you are setting up your website for the first time, you will need to create a menu.
- Click the “create a new menu” link.
- In the Menu Name field, give your menu a descriptive name. For example, “Main Menu” is a common choice for the primary navigation.
- Click the Create Menu button to proceed.
Step 3: Add Items to Your Menu
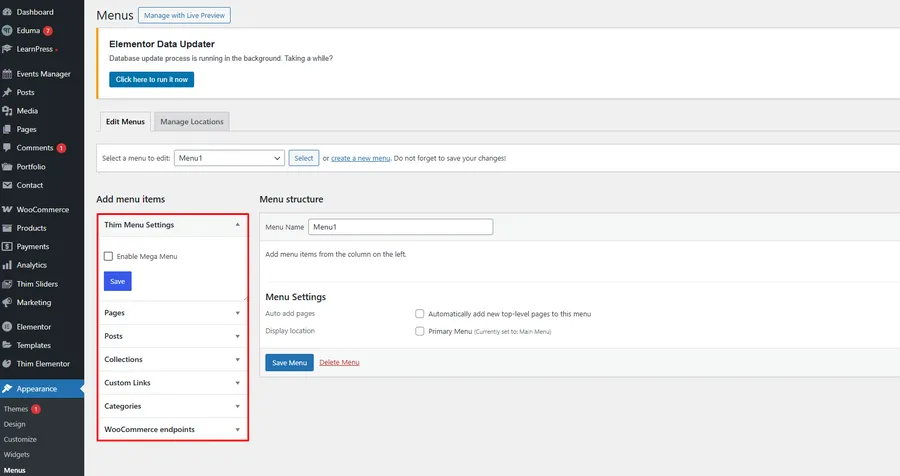
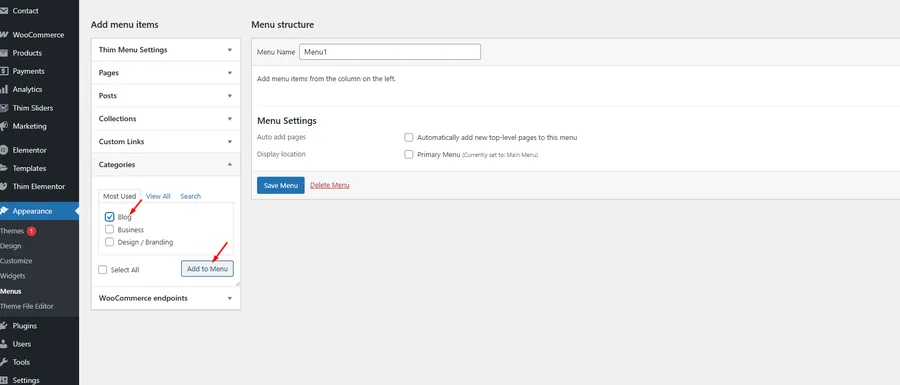
Once your menu is created, it’s time to add links to it. The column on the left, “Add menu items,” lists all the content you can add. This includes:
- Pages: Add links to your key pages like “Home,” “About Us,” or “Contact.”
- Posts: Link directly to individual blog posts.
- Custom Links: Add any URL, such as a link to an external site.
- Categories: Display a collection of posts from a specific category, like “Blog” or “News.”
- Courses: A specific feature from the LearnPress plugin, allowing you to add your courses directly to the menu.
To add an item, simply tick the checkbox next to it and click the Add to Menu button.
Step 4: Organize and Structure Your Menu
After adding items, you can arrange them in the “Menu structure” section.
- To reorder items: Click and drag any menu item up or down to change its position.
- To create a sub-menu (dropdown): Click and drag an item slightly to the right, placing it underneath a parent item. This will make it a “sub item,” which will appear in a dropdown on your website’s front end.
Step 5: Assign the Menu Location
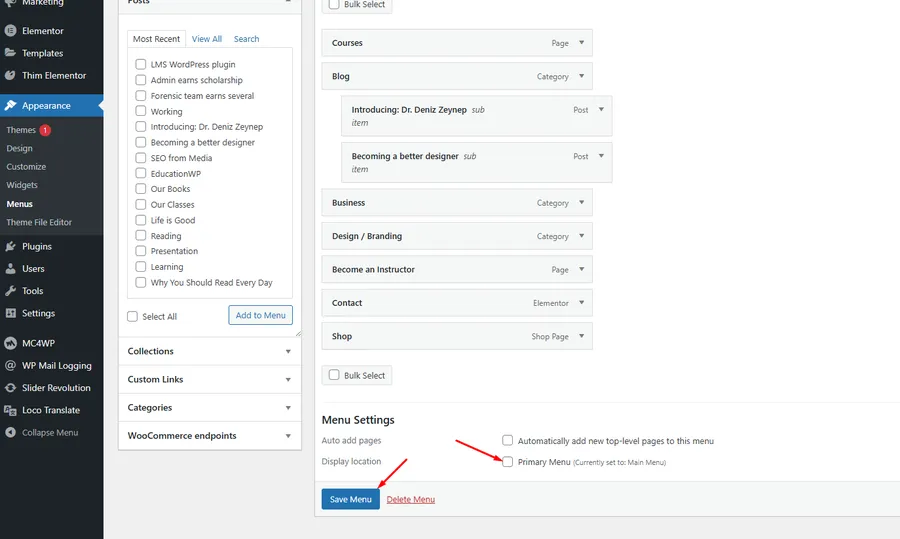
To make your menu visible on the site, you must assign it to a display location.
- Scroll down to the Menu Settings section.
- Under Display location, you will see a list of available locations defined by the Eduma theme.
- To make it your main navigation, tick the checkbox for Primary Menu. This will display the menu you just configured in the header of your website.
Step 6: Save and Verify
This is the final and most important step.
- Click the blue Save Menu button.
- Open your website in a new tab to see your newly created menu live! Check that all the links work and the dropdowns function as expected.
FAQs about Eduma
Q1: How do I create a mega menu in the Eduma theme?
In the menu editor (Appearance > Menus), you may see a "Thim Menu Settings" box. If you enable the "Enable Mega Menu" option for a top-level menu item, you can build a more complex, multi-column dropdown, which is great for large sites with many courses or categories.
Q2: Can I add a link to an external website in my menu?
Yes. In the "Add menu items" column, select the "Custom Links" section. Enter the full URL of the external site and the "Link Text" you want to display, then click "Add to Menu."
Q3: My LearnPress courses are not showing up as an option to add to the menu. What should I do?
If the "Courses" post type is not visible, click "Screen Options" at the top right of the Menus page. In the panel that appears, make sure the "Courses" checkbox is ticked. This will make it appear in the "Add menu items" list.
Q4: I saved my menu, but it’s not appearing on my website. Why?
The most common reason is that you forgot to assign a "Display location" (Step 5). Go back to Appearance > Menus, select your menu, and make sure to tick the Primary Menu checkbox under Menu Settings before saving.
Conclusion
A well-organized navigation menu is a fundamental part of a professional and user-friendly website. By following the steps outlined in this guide, you can now confidently create menu in Eduma that is perfectly tailored to your site’s content and structure, ensuring your visitors can easily navigate your offerings.
Read more: 8+ Best Responsive Shopify Themes for Mobile & High Conversions
Contact US | ThimPress:
Website: https://thimpress.com/
Fanpage: https://www.facebook.com/ThimPress
YouTube: https://www.youtube.com/c/ThimPressDesign
Twitter (X): https://twitter.com/thimpress
