Are you a beginner and looking for a guide on How to Change Font in WordPress theme? If so, you landed in the right place.
Having a website is easy, but using it effectively is the most important thing, especially the typography part. Choosing the right typography for your brand can help increase user engagement and keep visitors on your website longer.
There are several ways to change fonts, and the most common ways are to use plugins or to change the WordPress customizer.
So in this article today, we will help you update and change your font in your WordPress theme via built-in options. In case your theme does not have your preferred fonts, you can add fonts by using one of the free, famous WordPress plugins, such as Easy Google Fonts or Fonts Plugin.
Let’s dive in!
Change Font in WordPress Theme Via WordPress Customizer
As shown above, you can do WordPress Change Font easily using its customizer for customizing the style and the design.
To help you understand clearly, we have used one of the famous themes as an example. Please take note that you can see some different things when accessing some font choices on each theme, but you can still do it by following our guide carefully.
Open the WordPress Customizer to Change Font in WordPress
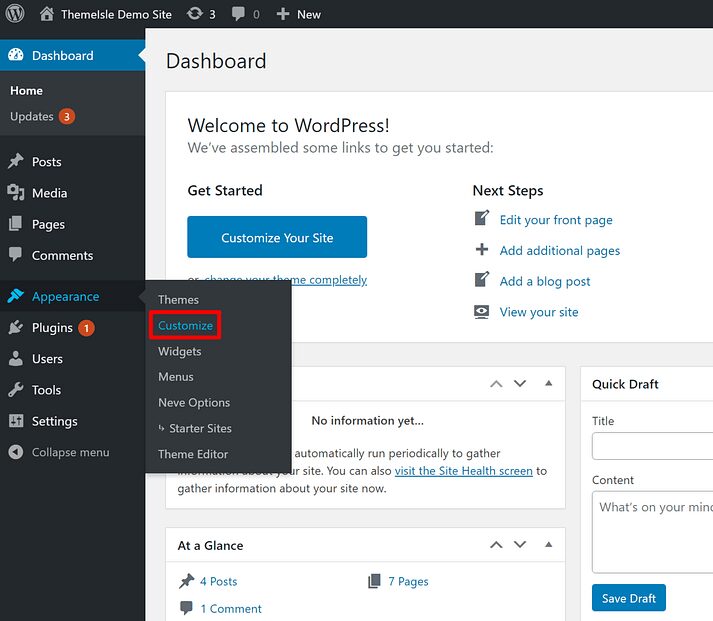
First of all, you have to open your WordPress dashboard and find Appearance on the left sidebar -> Select Customize. So now you can see your WordPress Customizer.
Locate Font/Typography Settings
After opening the WordPress customizer, the next step in How to Change Font in WordPress Theme is to locate your theme’s font or your theme’s typography settings.
However, some themes let you find typography or font easily but some themes show these in a different place. Hence, you have to check around your theme-setting areas.
For example, you’ll find Typography easily right on the demo site, go ahead and click on it.

Choose Fonts and Save Changes
Now is the time for you to choose the font you want. Each theme will offer a different section and Neve lets you change the theme’s headings, blog, etc.
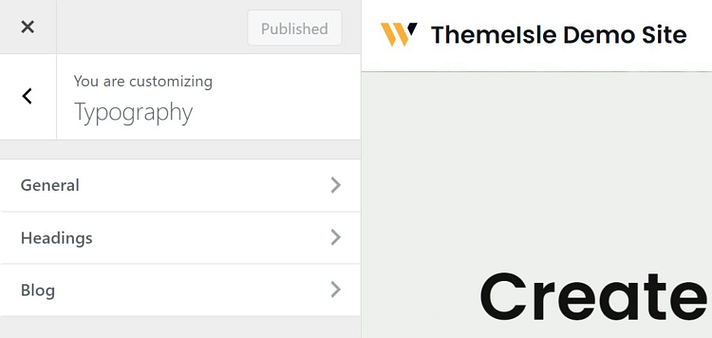
For instance, you can change the font of your post title or your page title by clicking on Headings. After that, you’ll find many fonts to choose from in Font Family with the Neve theme. But you can not find the font you like sometimes if you need a ton of choices. So in this case, try to use a plugin. You’ll see our guide in the next section.
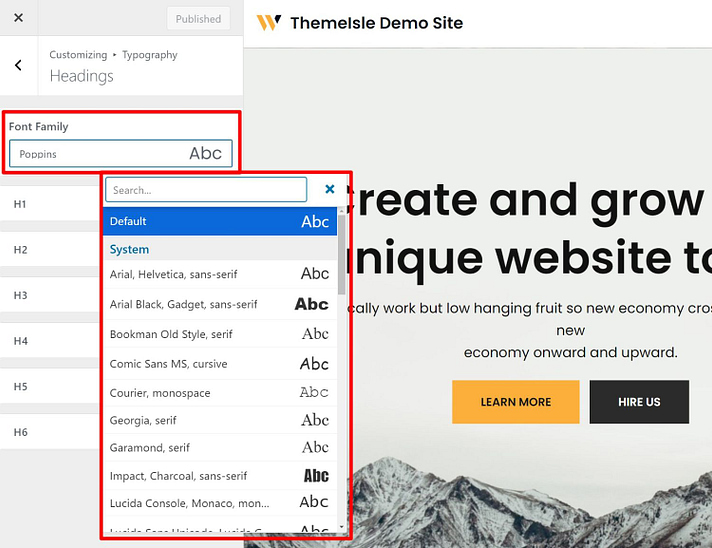
Select the one you like and you can see that font update automatically without leaving your default in the theme’s live preview.
Lastly, you can click Publish once you are satisfied with your new font choice.
Add Google Fonts to Any WordPress Theme
To put it another way, you can use a plugin to get thousands of font options when you can not find the font you want in WordPress Customizer.
So which plugin is the best for changing fonts? Of course, you can try the Easy Google Fonts plugin. It is the perfect deal for you. It’s famous and keeps standing out from the crowd from year to year. Plus, you can download these Easy Google Fonts for free right on WordPress.org.

One great thing about Easy Google Fonts is it works well with most WordPress themes. You don’t need to know the code but still have full control to Change Font WordPress with ease. Apart from that, there are +600 Google Fonts and font variants to choose from. In addition, the plugin lets you make unlimited custom font controls and see your font changes in real time.
In this section, let’s switch from Neve to another theme, Twenty Twenty One, to help you understand how it works easily because it has basic typography controls. After installing the plugin, you definitely can add many font choices too.
Install & Activate The Plugin
How to Change Fonts in WordPress by using the free plugin – Easy Google Fonts? Of course, you need to download it first. You can get this plugin for free from WordPress.org then install & activate it. If you have no idea how to install WordPress plugins, you can refer to our guide.
Choose Which Google Fonts to Use and Change Font WordPress
In this step, we will show you How to Change Font in WordPress theme using Google Fonts most simply.
After installing Google Fonts successfully, it’s time for you to pick the fonts you’d like to use. There is a full list from Google Fonts’ settings and it’ll be better off if you find your options at the plugin website. The reason is to preview immediately the look of each font.
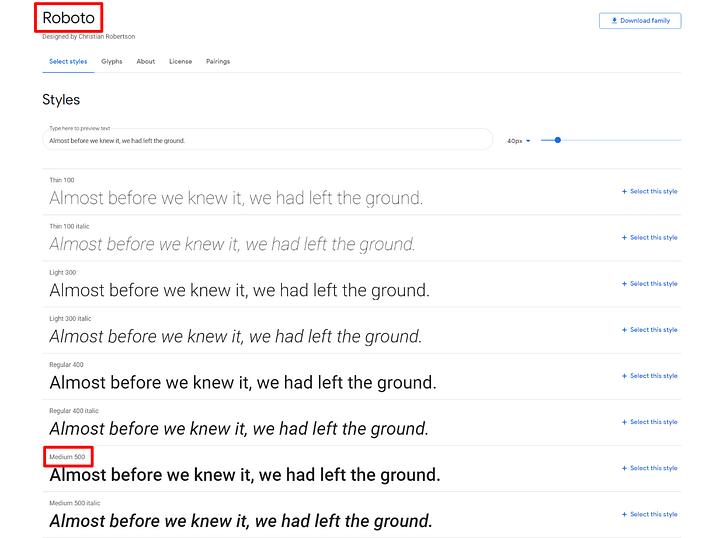
Even though the plugin offers a hundred Google Fonts options, you’ll find some of the most common ones that people usually use such as Roboto, Merriweather, Lobster, Indie Flower, Open Sans, Slabo, Mukta, and so on.
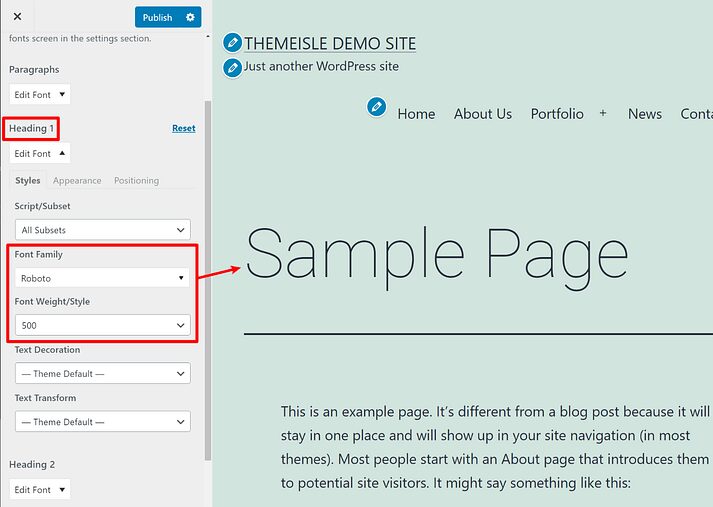
When you find a font you want, do not forget to copy and paste its name and also note down the specific styles as well. For example, you choose Roboto and Medium 500 so just remember these to use later.
Open WordPress Customizer and Edit Fonts
In the same way, open your admin dashboard and find Appearance -> select Customize and you’ll see your WordPress Customizer.
The Typography is located at the first place of your sidebar menu. Unlike the above guide, these settings are not from your theme, they’re from the plugin you have installed – Easy Google Fonts.
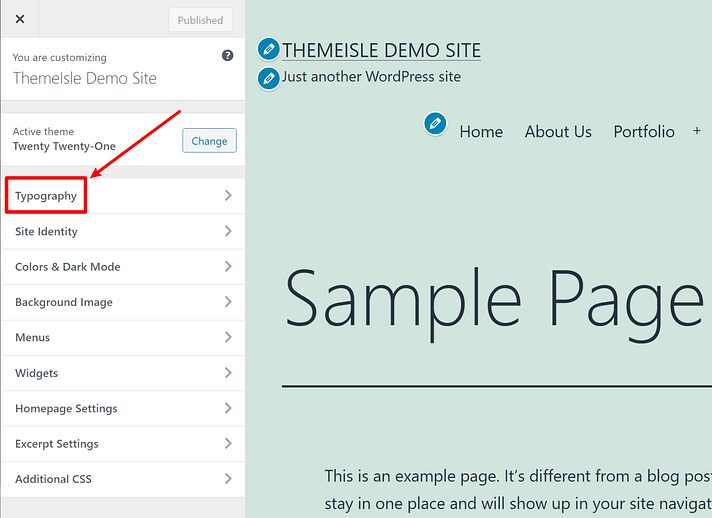
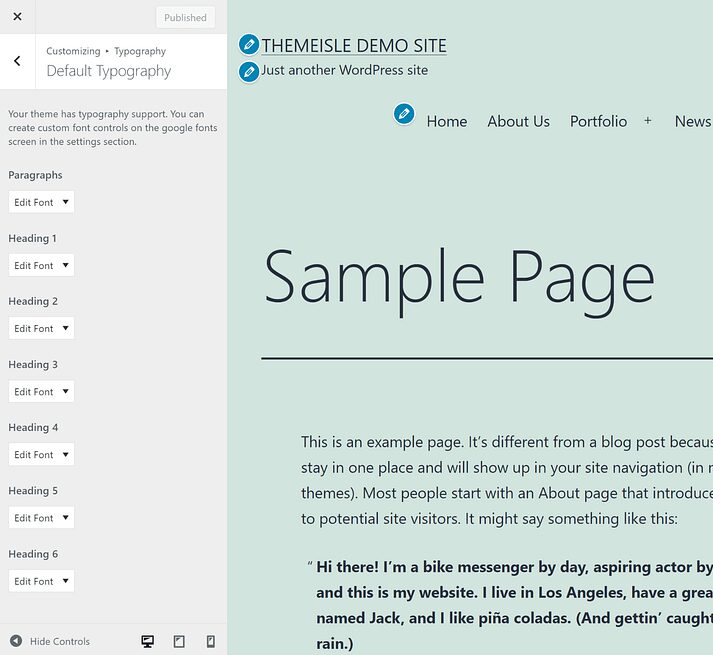
Next, select Default Typography to Change Font in WordPress for paragraphs, heading 1, heading 2, heading 3, and so on. To clarify, you can change text inside your pages or your posts if you edit fonts in paragraphs.
For heading 1, it means you can change the font title of your post or your page. Heading 2 allows you to change the top-level heading inside each post or page.
After clicking Edit Font from the content you intend to customize, you choose the font name in Front Family and Front Style quickly since you noted down these things. You’ll see the live preview while selecting the font too.
Lastly, you can click Publish once you’re done with your choices.
Change Font in WordPress for a Particular Piece of Content in the Editor
As you might have noticed, you can change fonts for your entire website and also update all new fonts for your paragraphs as well. So what if you plan to change only fonts for a particular text or content? How to Change Font in WordPress Theme in the Editor?
In this case, you can go to WordPress.org and download the Fonts Plugin for free.

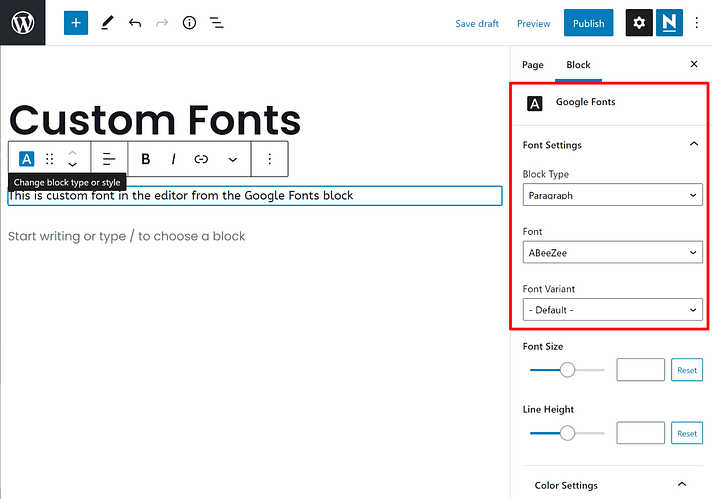
Similarly, you have to install and activate this plugin. After installing it successfully, you can see Google Fonts in the Block tab. It allows you to use fonts from Google Fonts to add text. There are paragraph text or headings to choose and apply to change fonts for each content you want. Try it now!
NOW You Know How to Change Font in WordPress!
We hope that you understand our guide about the guide to change font in WordPress theme today and can choose the best method to apply for your website. You can directly choose fonts from your themes in WordPress Customizer or install an Easy Google Fonts Plugin or Fonts Plugin to get many font options and features.
Read more: 12 Best Platforms to Sell Digital Products
Contact US | ThimPress:
Website: https://thimpress.com/
Fanpage: https://www.facebook.com/ThimPress
YouTube: https://www.youtube.com/c/ThimPressDesign
Twitter (X): https://x.com/thimpress_com


