E-learning is becoming more popular in today’s digital age. LearnPress is at the forefront of this trend, providing an innovative and effective learning management system for instructors and students. One crucial aspect of any eLearning platform is the ability to seamlessly process payments.
LearnPress offers various payment gateway options, including the widely used Authorize.net.
In this comprehensive guide, we will dive into the process of LearnPress Authorize.net Integration so you can effortlessly handle transactions on your e-learning website.
What is LearnPress?
Before exploring the LearnPress Authorize.net add-on, let’s briefly dig into what LearnPress is all about.
LearnPress is a popular learning management system plugin for WordPress sites. It enables website owners to easily create, sell, and manage their online courses.
LearnPress provides a user-friendly and feature-rich solution for professional educators and businesses looking to provide employee training.
Why Choose Authorize.net for LearnPress Payment Processing?
Authorize.net is a leading payment gateway that facilitates secure and efficient online transactions.
While LearnPress supports multiple payment gateways, choosing Authorize.net has its own advantages.
Here are a few reasons why LearnPress Authorize.net Integration can be the best choice for your e-learning website:
- Independent Payment Processing: By using the LearnPress Authorize.net integration, you can process payments directly without the need to install additional plugins like WooCommerce. This means a streamlined payment process without the heavy overhead of a full-fledged e-commerce system.
- Secure Transactions: Authorize.net is renowned for its robust security measures, ensuring that your customer’s sensitive payment information is protected.
- Reliable and Scalable: With Authorize.net, you can handle a large volume of transactions seamlessly, making it an ideal choice for growing e-learning platforms.
Now that you understand the benefits of the LearnPress Authorize.net integration, let’s walk through the process of setting up the Authorize.net payment gateway guide today.
Step 1: Download the LearnPress Authorize.net Add-on
Firstly, you need to download the LearnPress Authorize.net Integration. Follow these steps:
- After purchasing the LearnPress Authorize.net Add-on, visit ThimPress and navigate to My Account > Orders.
- Click on the Download or Select Version option to download the LearnPress Authorize.net add-on.

Step 2: Install the LearnPress Authorize.net Integration
Once you have downloaded the add-on to your computer, you should:
- Navigate to your WordPress dashboard.
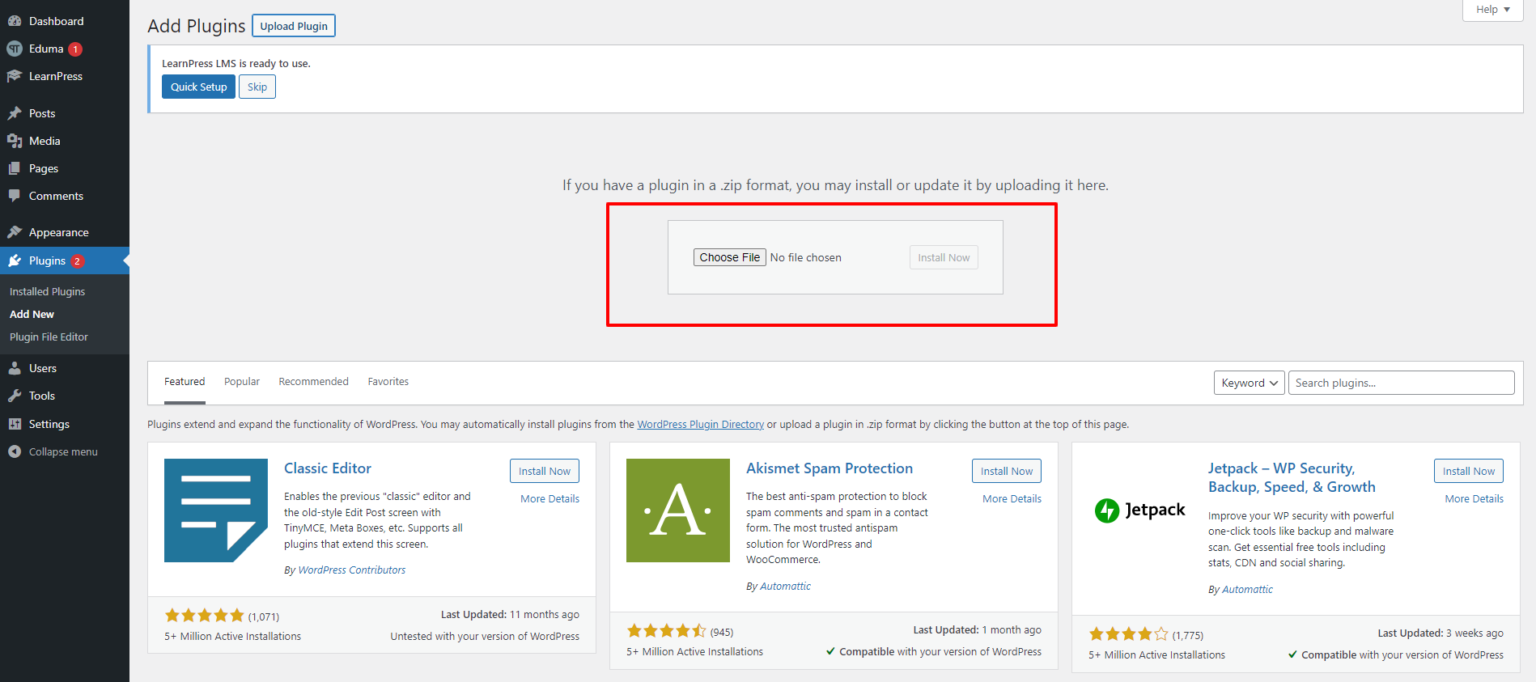
- Go to Plugins > Add New.
- Click on the Upload Plugin button, choose the.zip file that you downloaded earlier, and press Install Now
- After a few seconds, click Activate Plugin once it’s installed successfully.

- LearnPress Authorize.net Add-on is now ready to use.
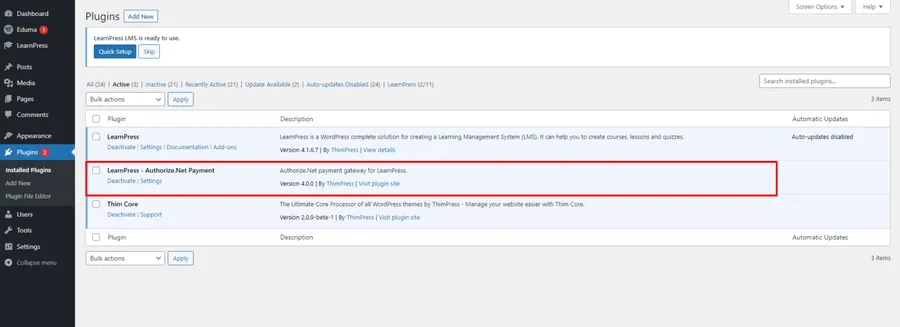
Note: If you have trouble activating LearnPress add-ons, please refer to our tutorial article on Activate LearnPress Add-ons on WordPress.
Step 3: Create an Authorize.net Account
Before you can start accepting payments through Authorize.net, you need to have an account. If you don’t have one already, follow these steps:
- Visit the Authorize.net website and sign up for a new account.
- Provide the necessary information and complete the registration process.
Step 4: Configure LearnPress Settings
After you have the LearnPress Authorize.net add-on and set up your Authorize.net account, it’s time to configure the LearnPress settings to enable the Authorize.net payment gateway:
- Log in to your WordPress admin dashboard.
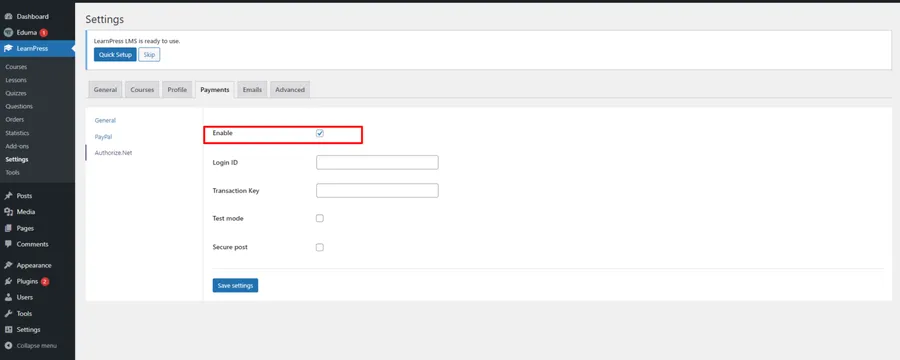
- Navigate to LearnPress > Settings.
- Under the Payments tab > select Authorize.net.
- Check the Enable box to activate the Authorize.net payment gateway.
- Remember to click the Save settings button to keep all your changes.
Step 4: Enter Authorize.net Credentials
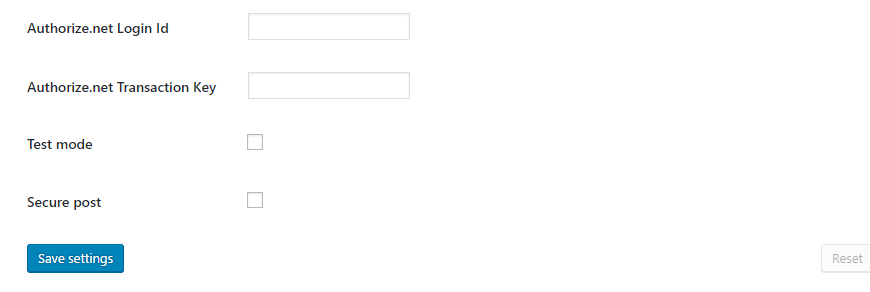
To ensure smooth payment processing, you need to enter your Authorize.net login ID and transaction key:
- Retrieve your Authorize.net login ID and transaction key from your Authorize.net account.
- Enter the login ID and transaction key in the respective fields in the LearnPress settings.
Step 5: Enable Authorize.net Payment Option
With the LearnPress Authorize.net integration and the necessary credentials in place, you can now make the Authorize.net payment option available to your students during the checkout process. Here’s how:
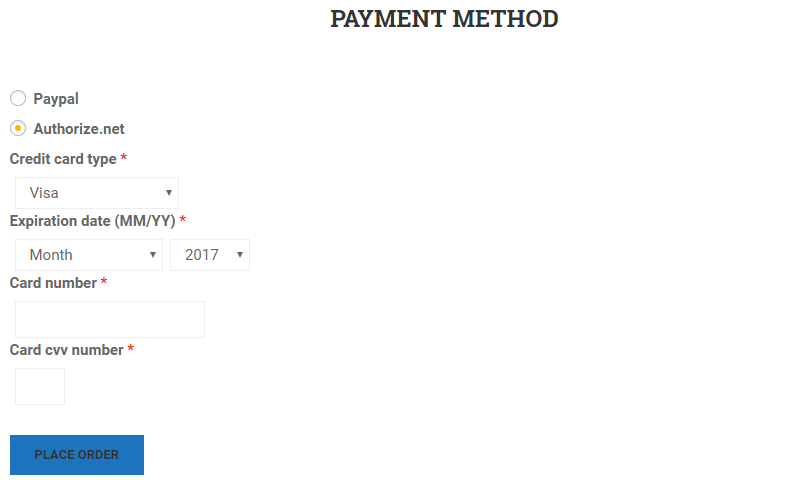
- When students proceed to checkout, they will see the Authorize.net payment option among the available choices.
- Students can select Authorize.net and complete the payment process securely.
Get the Authorize.net Add-on from the LearnPress PRO Bundle
LearnPress PRO Bundle is a remarkable product that combines the most potent add-ons and gives you great value for your money. You can enhance your LMS website with these add-ons and provide a superior learning experience for your students.
This package offers everything you need, from advanced reporting and certificates to content drips.
Conclusion
LearnPress Authorize.net Integration lets you accept payments easily and safely on your e-learning website. You can follow the steps in this article to use the Authorize.net payment gateway and help your students pay quickly. Hopefully, you enjoy it!
Should you encounter any issues during installation or while using LearnPress, please feel free to reach out to us or consult the comprehensive LearnPress Tutorial & Guide articles provided by ThimPress.
Read More: LearnPress Commission Integration: How to Use It?
Contact US | ThimPress:
Website: https://thimpress.com/
Fanpage: https://www.facebook.com/ThimPress
YouTube: https://www.youtube.com/c/ThimPressDesign
Twitter (X): https://twitter.com/thimpress
