Let’s be honest: website compliance is a total nightmare.
The thought of million-dollar GDPR fines is terrifying, but trying to actually understand cookie consent, script blocking, and data privacy laws feels impossible for most of us. Are you really sure your WordPress site is fully covered?
The WPLP Compliance Platform claims to be the simple, all-in-one fix for this exact headache. It’s designed to automatically generate all your legal pages and manage your cookie consent, promising to give you total peace of mind.
But is it really that simple? I got my hands on it to find out if this is the affordable solution every WordPress owner has been waiting for.
What Is the WPLP Compliance Platform?
The WPLP Compliance Platform is a suite of plugins that combines two core products: WP Legal Pages and WP Cookie Consent. Together, they offer a comprehensive solution for website compliance.
Here are some of the standout features:
- A Fully Customizable Cookie Banner: You can tweak it to match your site’s branding while staying compliant.
- Global Compliance: It’s pre-configured for GDPR (EU), CCPA (California), LGPD (Brazil), and more.
- Google Consent Mode v2: This is a critical feature. It ensures your Google Analytics and Ads tags run correctly based on user consent, so you don’t lose valuable data.
- Automatic Script Blocker: This is the magic. It stops third-party scripts (like a Facebook Pixel or tracking cookies) from loading before a user gives permission.
- Legal Page Generator: This is the core of WP Legal Pages. It includes over 25 legal templates (written by attorneys) for your Privacy Policy, Terms & Conditions, etc.
- Central Dashboard: You get one hub to monitor consent logs, track cookie scans, and manage everything.
Hands-On Review: Installation and Initial Setup
Getting started with the platform involves a straightforward, wizard-driven process. From my Pro account dashboard, I downloaded the two required .zip files: WP Legal Pages and WP Cookie Consent.
The installation is standard for any WordPress plugin:
- Navigate to Plugins > Add New > Upload Plugin.
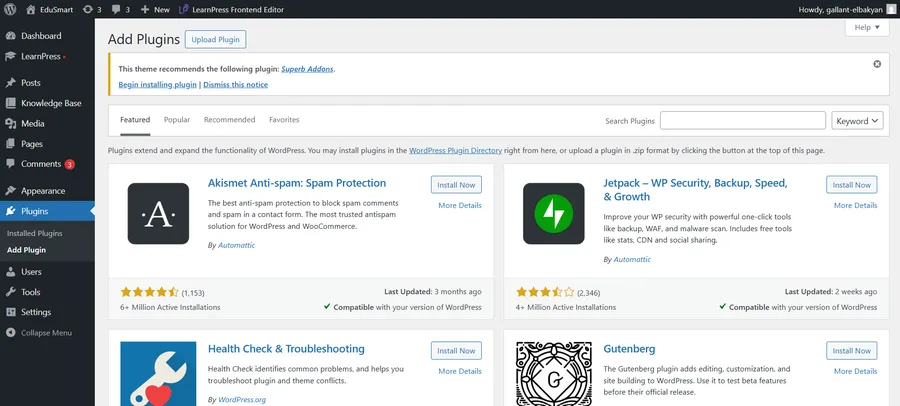
- Upload and activate each of the two .zip files.
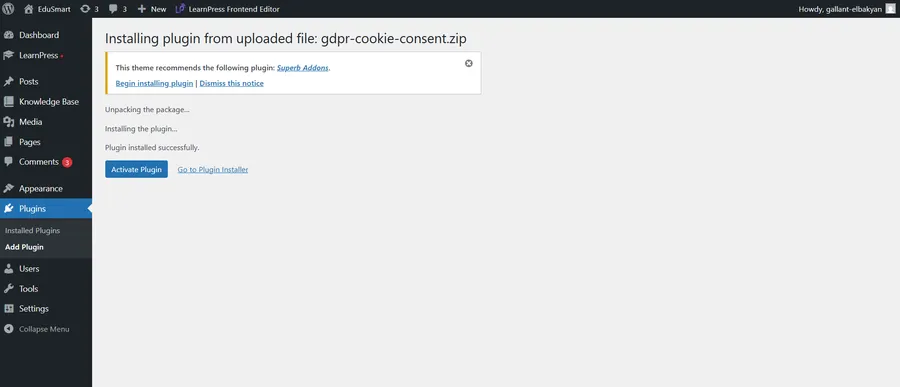
- Once activated, a new “WPLP” menu appears in the WordPress dashboard.
After installation, the plugin automatically launches a setup wizard, which is incredibly helpful for getting the basics right.
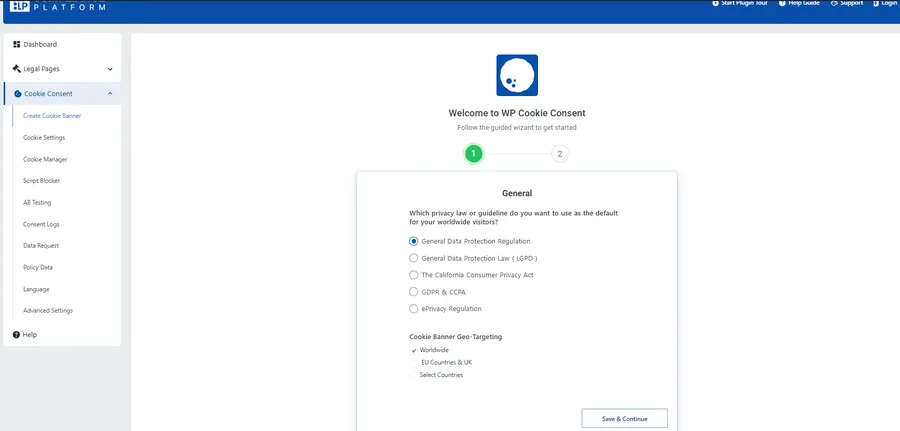
Step 1: Choose Your Default Privacy Law
The wizard first asks which privacy law you primarily want to comply with. The options include GDPR, CCPA, LGPD, and a combination of GDPR & CCPA. For this test, I selected GDPR, as it is the most comprehensive and widely applicable standard.
Step 2: Configure Geo-Targeting
Next, you can decide where the cookie banner should appear. You can show it worldwide or target specific regions (like only for EU visitors). For a review, selecting “Worldwide” is best, as it ensures the banner is always visible for testing and screenshots. After making your selections, click Save & Continue to move to the detailed configuration step.
Step 3: Detailed Configuration
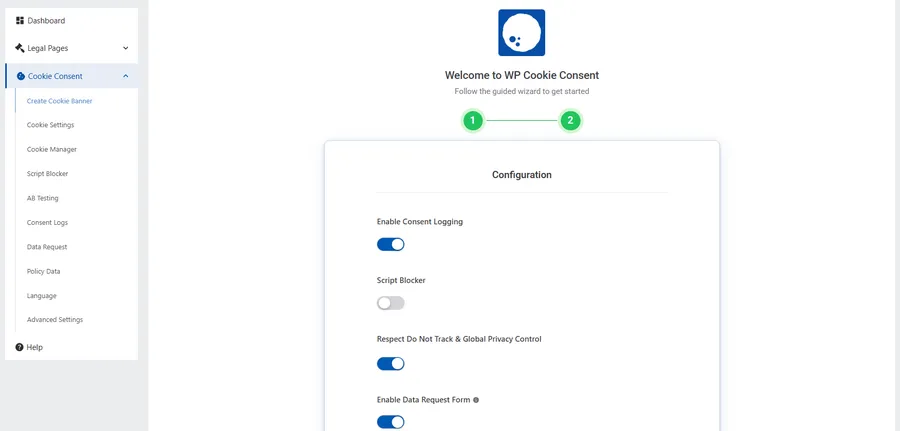
This is the Configuration stage—the most important part to ensure the plugin operates in compliance with GDPR. Here is a breakdown of the key settings:
1. Enable Consent Logging: Turn ON — this allows the plugin to record user choices (accepting or rejecting cookies). This feature is crucial for meeting GDPR requirements.
2. Script Blocker: Temporarily turn OFF during basic testing. Once you are familiar with how it works, you can turn it back on to see the plugin automatically block scripts based on cookie categories—a highly commendable feature for a detailed review.
3. Respect Do Not Track & Global Privacy Control: You can turn this ON if you want to simulate a browser with high privacy settings. When enabled, the plugin will respect the user’s “Do Not Track” setting—demonstrating compliance and transparency.
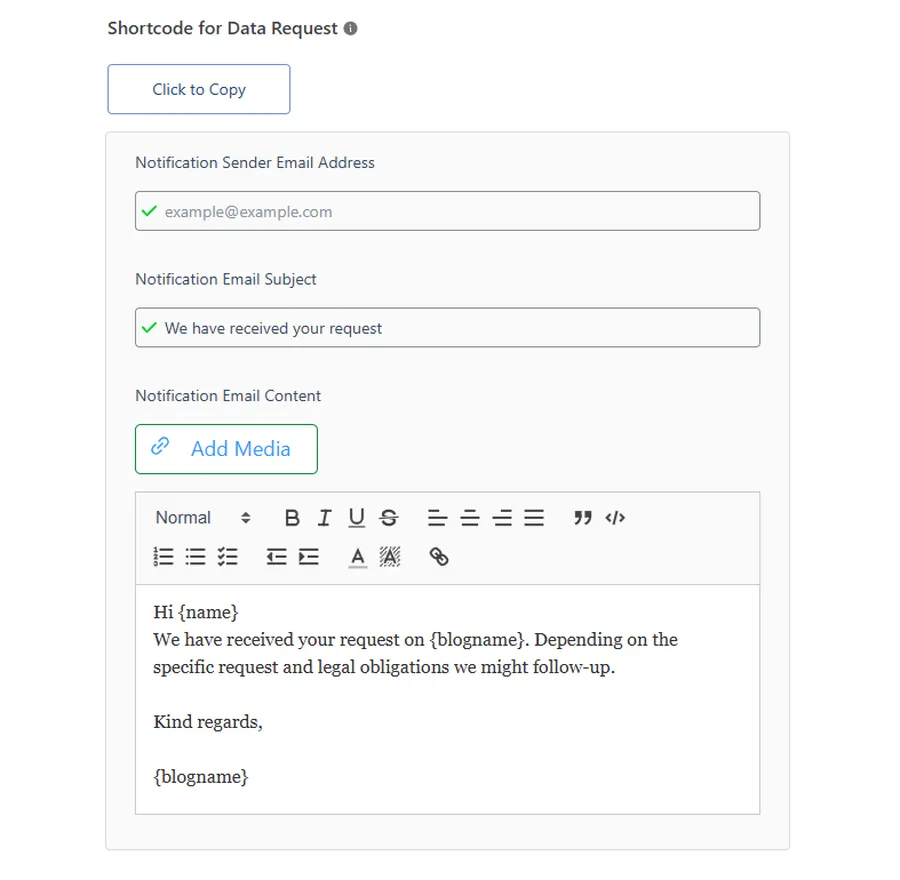
4. Enable Data Request Form: Turn ON if you want to test the personal data request form feature, per GDPR standards. When enabled, the plugin will provide a shortcode: [wplp_data_request_form]. You can insert this shortcode onto a separate page for testing.
5. Notification Email Settings:
(Only needed if you enable the Data Request Form)
- Notification Sender Email: enter the admin email (e.g., [email protected])
- Email Subject: “We have received your request”
- Email Content: you can keep the default content or edit it to be more natural.
6. Show Cookie Notice as:
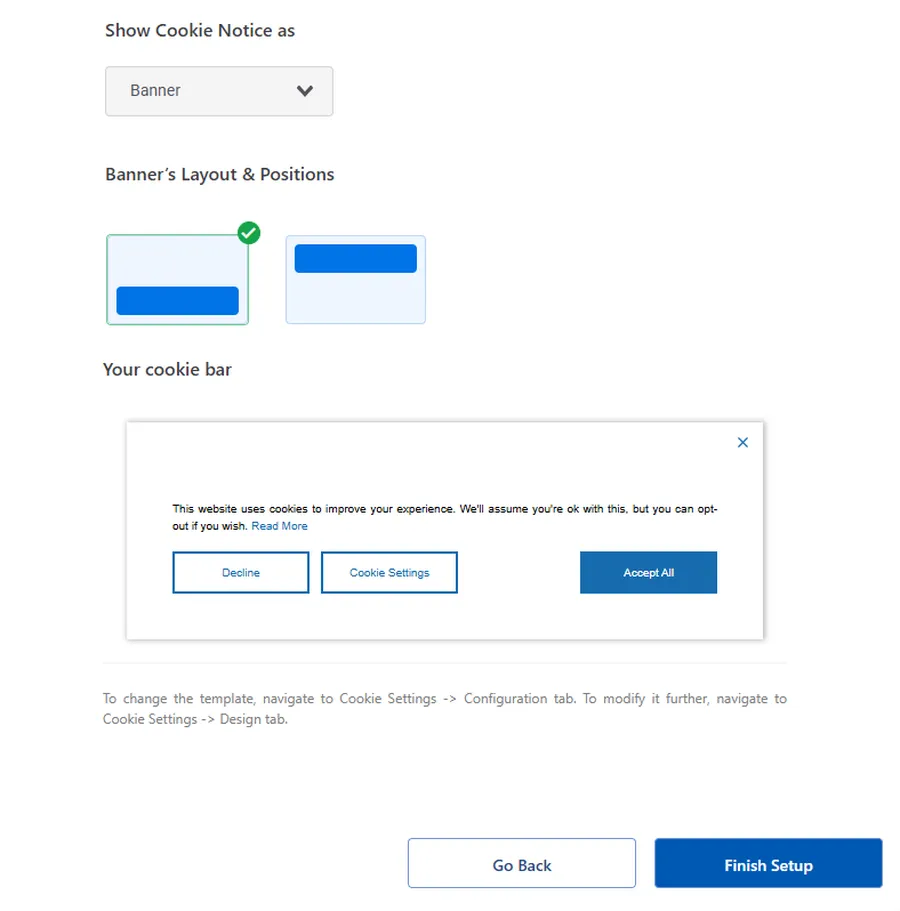
Select Banner (default). The plugin also supports Pop-up or Widget, but a banner is the most common format and is easy to observe for a review.
7. Banner’s Layout & Position:
Choose the banner’s display position—bottom center is the most balanced and easy-to-see option. You can also choose bottom left/right if you want to try a different layout.
8. Your Cookie Bar (Preview):
This is the preview section for the actual cookie banner. After completing the setup, you can click Customize to change the color, text, and the Accept/Reject buttons to match your website’s style.
Step 4: Finish and Check
Press Finish Setup → the plugin will save the entire configuration. After completing the settings, the system will display a notification:
“Congratulations! Your Banner Is Live Now.”
Here, you can press Live Preview to check, or visit your website’s homepage → refresh the page. The cookie banner will then be displayed (usually at the bottom of the page). Try pressing Accept, and you will see the banner disappear and the cookies activate–meaning the plugin is working correctly.
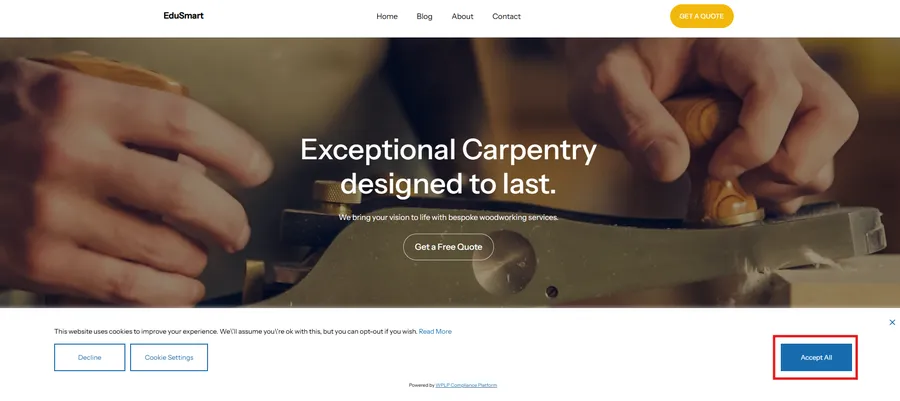
After you accept, the plugin will usually display a small “Cookie Settings” icon or button in a corner of the screen. This is where users can change their choices at any time. When you click that “Cookie Settings” button, a detailed settings pop-up will appear.
As you can see in the image below, the plugin creates a very professional banner, allowing users to have detailed control over each type of cookie:
The banner allows users to toggle different cookie categories such as:

Marketing: For ad tracking scripts.
Analytics: For analytics tools like Google Analytics.
Preferences: For cookies that store user preferences.
This ability to categorize and offer users detailed choices not only complies with GDPR but also shows the transparency and professionalism of your website.
A Deep Dive into the WPLP Pro Features
The basic setup is impressively fast, but the real power of the WPLP Compliance Platform lies in its Pro features. To give you a full picture of what you get when you upgrade, I connected my Pro account to see how these advanced tools work in a real-world scenario. Here’s a hands-on look at the key Pro features you’ll unlock.
1. Consent Log:
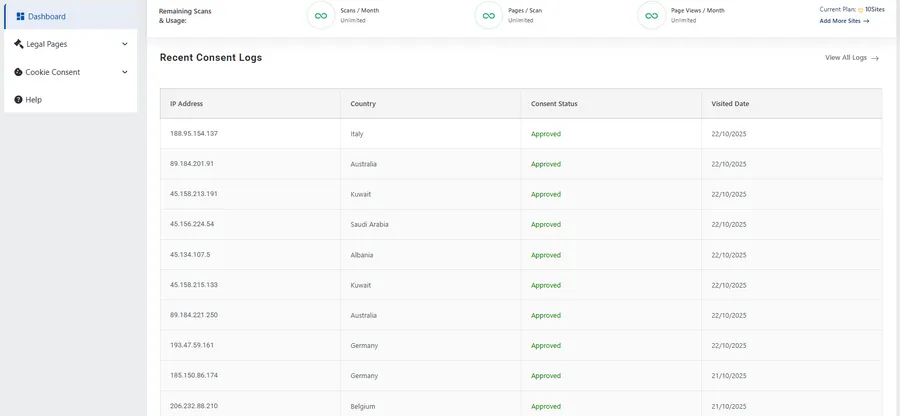
Purpose: To maintain a record of user consent choices (accept or reject), which is essential for GDPR compliance and potential audits.
How to enable and use:
- Navigate to WPLP → Consent Logs in your WordPress dashboard.
- When a visitor interacts with your cookie banner, their choice (along with IP address, time, and status) will be automatically recorded here.
- To keep records offline or for audits, use the “Export” button (usually found on the Consent Logs page) to download the log file (typically as a CSV).
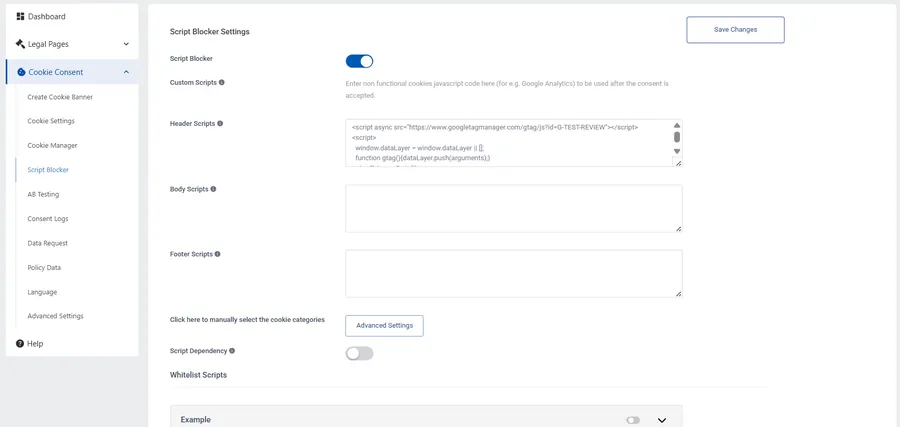
2. Script Blocker – Block scripts by cookie category
Purpose: To automatically prevent third-party scripts (like Google Analytics, Facebook Pixel) from running before a user gives their explicit consent, ensuring compliance.
How to enable and use:
- Scan for Scripts: First, go to WPLP → Cookie Manager and click “Scan Now” to allow the plugin to detect scripts on your site.
- Access Script Blocker: Navigate to WPLP → Cookie Consent → Script Blocker.
- Enable and Categorize: Toggle the Script Blocker feature ON. Review the list of discovered scripts and assign each one to its correct category (e.g., Google Analytics script goes into the “Analytics” category). The plugin will then block scripts based on the user’s consent choices for these categories.
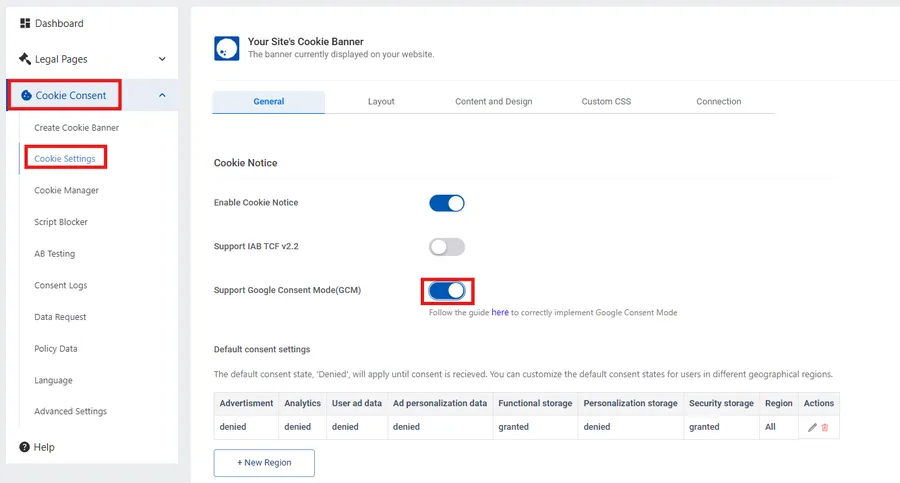
3. Google Consent Mode v2:
Purpose: To ensure your Google Ads and Analytics tags operate according to Google’s latest consent requirements, which is crucial for collecting marketing data legally.
How to enable:
- Navigate to WPLP Compliance Platform → Cookie Consent → Cookie Banner.
- Ensure you are on the “General” tab.
- Locate the option “Support Google Consent Mode(GCM)”.
- Toggle the switch next to this option ON.
4. Geo-Targeting:
Purpose: To display the cookie banner only to visitors from specific geographic regions (like the EU), improving the experience for users elsewhere.
How to configure:
- Navigate to WPLP Compliance Platform → Cookie Consent → Cookie Banner.
- On the “General” tab, scroll down to the “Cookie Banner Geo-Targeting” section.
- Select your desired targeting: “Worldwide,” “EU Countries & UK,” or “Select Countries” to choose specific locations.

5. Enabling the Revoke Consent Option
Purpose: To comply with GDPR’s requirement that users must be able to easily withdraw their consent at any time.
How it works (usually automatic): Most configurations will automatically display a small, persistent “Cookie Settings” icon or tab after initial consent is given. Clicking this allows users to reopen the banner/settings pop-up and modify their choices. Check your banner settings to ensure this option is enabled.
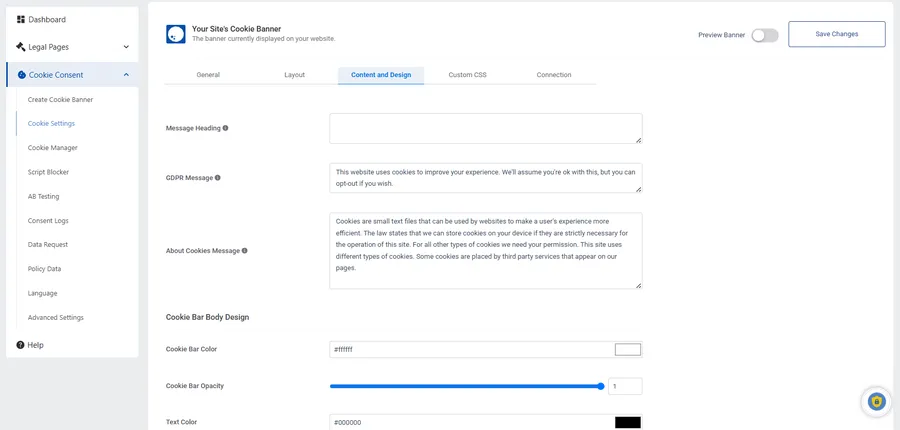
6. Customizing the Cookie Banner’s Appearance
Purpose: To style the cookie banner so it matches your website’s branding and design for a seamless user experience.
How to customize:
- Navigate to WPLP → Cookie Settings → Content and Design.
- Use the available options to adjust colors, fonts, button styles, text content, and banner position (e.g., bottom center, top bar).
- Save your changes and preview them on the front end.
7. Removing Plugin Branding
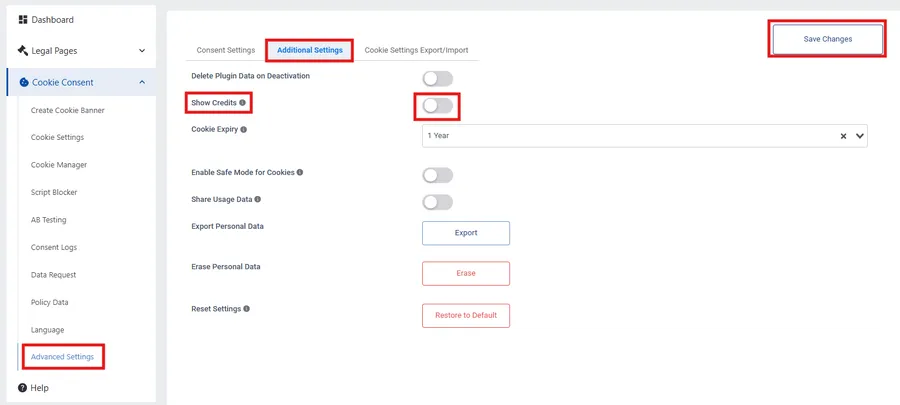
Purpose: To remove the “Powered by…” text from the cookie banner for a more professional, integrated look (a Pro feature).
How to enable:
- Navigate to Cookie Consent → Advanced Settings → Additional Settings.
- Find the “Show Credits” option and toggle it OFF.
- Save your changes and check the live banner to confirm the credits text is gone.
8. Utilizing WP Legal Pages Pro Templates & Integration
Purpose: To leverage the premium, attorney-crafted legal templates included with the Pro plan and ensure they are automatically linked from your cookie banner.
How to use:
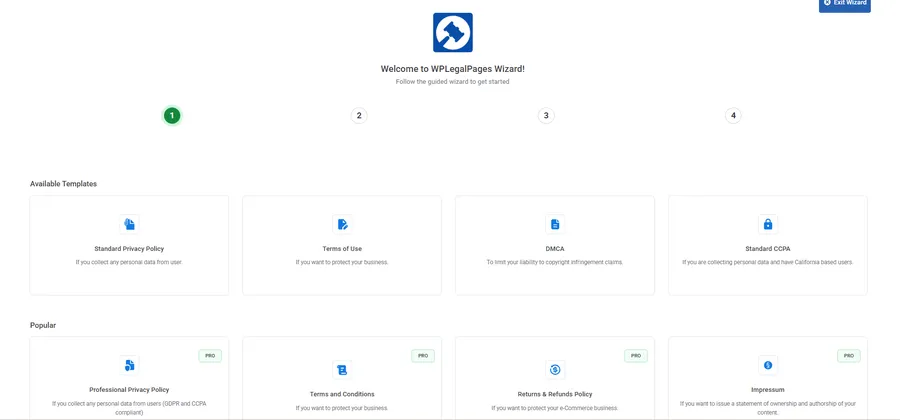
- Go to WP Legal Pages → Create Page. You should see 36 + Pro Templates available. Select one (e.g., “Professional Privacy Policy”).
- Follow the wizard to generate and publish the page.
- The WP Cookie Consent plugin should automatically detect this page and link to it from the banner (check under WPLP → Cookie Banner Settings if needed)
9. Using Export/Import Cookie Settings
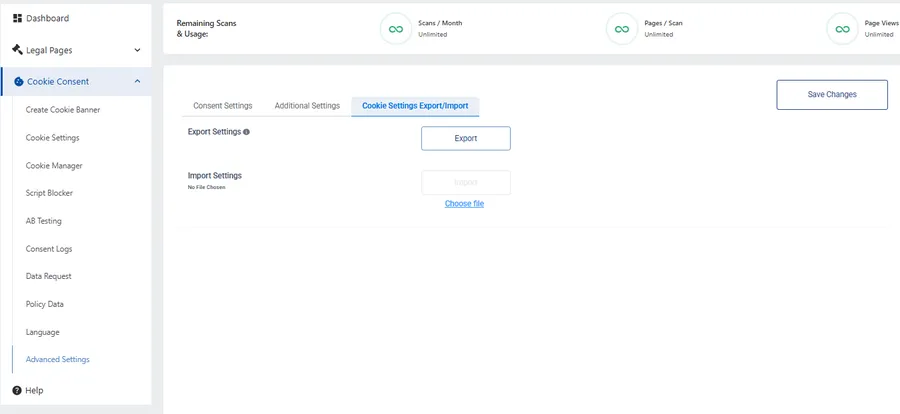
Purpose: To easily back up your WP Cookie Consent configuration or transfer settings between different websites (a Pro convenience feature).
How to use:
- Find the “Export Settings” and “Import Settings” options, likely located under WPLP → Settings or Advanced Settings.
- Click “Export Settings” to download a configuration file.
- On the same site (for backup) or another site, use the “Import Settings” option and upload the saved file.
10. Enabling IAB TCF 2.2 Support
Purpose: To comply with the advertising industry’s standard framework for managing user consent, particularly important if you run complex programmatic ads.
How to enable:
- Navigate to WPLP Compliance Platform → Cookie Consent → Cookie Banner.
- On the “General” tab, locate the option “Support IAB TCF v2.2”.
- Toggle the switch ON. Note that this may change the appearance and options presented in your cookie banner to align with the TCF standard.
11. Leveraging WP Legal Pages Pro Features
Purpose: To utilize the additional compliance tools bundled with the WP Legal Pages Pro component of the suite.
How to use:
- Age Verification: Find this setting within the WP Legal Pages menu, enable it, and set the required minimum age. Test by visiting your site incognito.
- Force Agreement: Configure this in WP Legal Pages settings to require users to accept certain policies (like Terms & Conditions) before accessing specific pages (e.g., checkout).
- One-click Affiliate Disclosure: Set up your affiliate disclosure statement in WP Legal Pages. When configured, it can automatically display the disclosure on posts or pages containing affiliate links.
Who is WPLP Compliance Platform For?
While pretty much every website needs this, I see it being a perfect fit for a few specific groups:
- eCommerce Stores: If you’re running WooCommerce, you absolutely need this. The platform automatically scans for cookies and can integrate legal checkboxes right into your checkout process.
- Content Creators & Bloggers: The ready-to-use affiliate disclosure templates (which are FTC-compliant) are a massive time-saver, and the privacy policies cover monetization.
- Digital Agencies: The Business plan is a no-brainer. It lets you professionally manage compliance for all your client sites from a single dashboard.
Pricing: Surprisingly Affordable Compliance
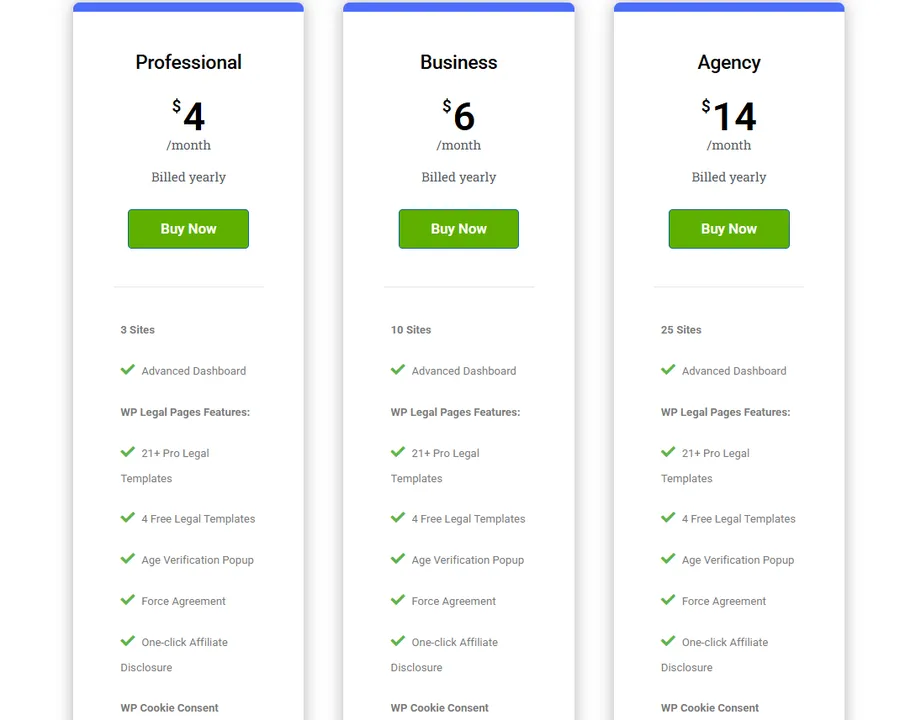
This is one of the platform’s strongest points. The pricing is extremely competitive, with three main tiers all billed annually:
- Professional: Starts at $4/month (billed yearly) for 3 sites.
- Business: The most popular plan at $6/month (billed yearly) for 10 sites.
- Agency: Scales to $14/month (billed yearly) for 25 sites.
The main difference is that the Professional plan has limited cookie scans (50/month) and does not include “Auto-Updated Policies.” To get unlimited scans and the upcoming auto-update feature, you’ll need the Business or Agency plan. Given the features, the “Business” plan offers remarkable value for most serious website owners.
Final Verdict: Is WPLP Compliance Platform Worth It?
After a thorough hands-on review, it’s clear that the WPLP Compliance Platform is a powerful and user-friendly solution that demystifies the complex world of website privacy.
Pros:
- All-in-One Solution: It effectively combines legal page generation and cookie consent management, eliminating the need for multiple separate plugins.
- Excellent Usability: The setup wizards and clean dashboard make it one of the easiest compliance tools to use, even for beginners.
- Highly Affordable: The pricing is extremely competitive, offering enterprise-level features at a fraction of the cost of many competitors.
- Powerful Pro Features: Tools like the Script Blocker, Google Consent Mode v2 support, and detailed consent logging provide real, robust compliance.
Cons:
- Steep Learning Curve for Advanced Features: While the basics are simple, mastering the advanced tools like Removing Plugin Branding or granular cookie categorization isn’t for complete beginners. This is where deeper documentation would be helpful.
- Potential for Conflicts: Like any plugin that actively blocks scripts and adds banners, there’s a risk of it conflicting with specific themes, page builders, or caching plugins, which might require some troubleshooting.
Ultimately, the WPLP Compliance Platform is an outstanding choice for any WordPress site owner who is serious about privacy compliance but doesn’t have the time or budget for complex legal consultations. It delivers a comprehensive, easy-to-manage, and affordable solution that I can highly recommend.
Read more: Shopify vs Etsy: Which Platform is Best?
Contact US | ThimPress:
Website: https://thimpress.com/
Fanpage: https://www.facebook.com/ThimPress
YouTube: https://www.youtube.com/c/ThimPressDesign
Twitter (X): https://x.com/thimpress_com
