For education websites using the Eduma theme, offering diverse payment methods is crucial for increasing course sales. If you are targeting markets that utilize QPay, integrating this payment gateway is a must.
In this article, we will guide you through the process of how to use QPay in Eduma. By following these simple steps, you can successfully install and configure the LearnPress QPay Add-on to accept secure payments from your students.
Eduma – Education WordPress Theme
We provide an amazing WordPress theme with fast and responsive designs. Let’s find out!
Step 1: Download the LearnPress QPay Add-on
Before configuring the settings on your website, you must acquire the necessary software.
- Visit the ThimPress product page to purchase the QPay Add-on for LearnPress.
- Once purchased, download the plugin file. You will receive a file named
learnpress-qpay.zip. Save this file to your computer, as you will need it for the installation phase.
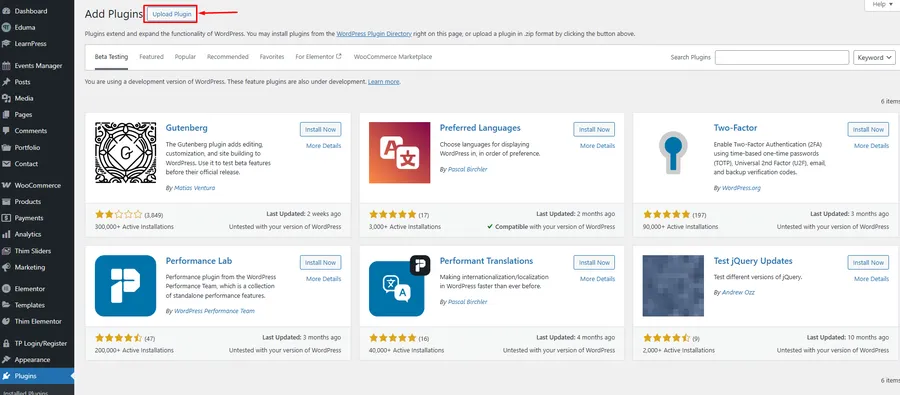
Step 2: Install and Activate the Plugin
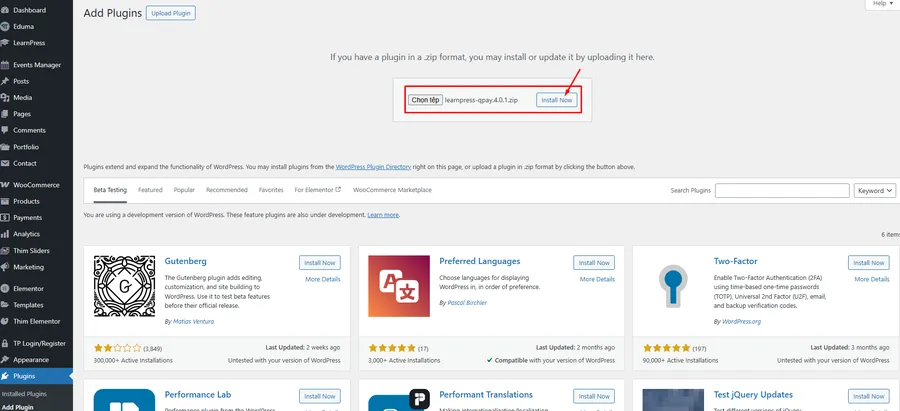
The installation process follows the standard WordPress procedure. Ensure your site is running the Eduma theme and has LearnPress installed.
- Log in to your WordPress Dashboard.
- Navigate to Plugins > Add New.
- Click the Upload Plugin button at the top of the page.
- Click Choose File and select the
learnpress-qpay.zipfile you downloaded earlier. - Click Install Now.
- Once the installation is complete, click Activate Plugin to enable the QPay functionality on your site.
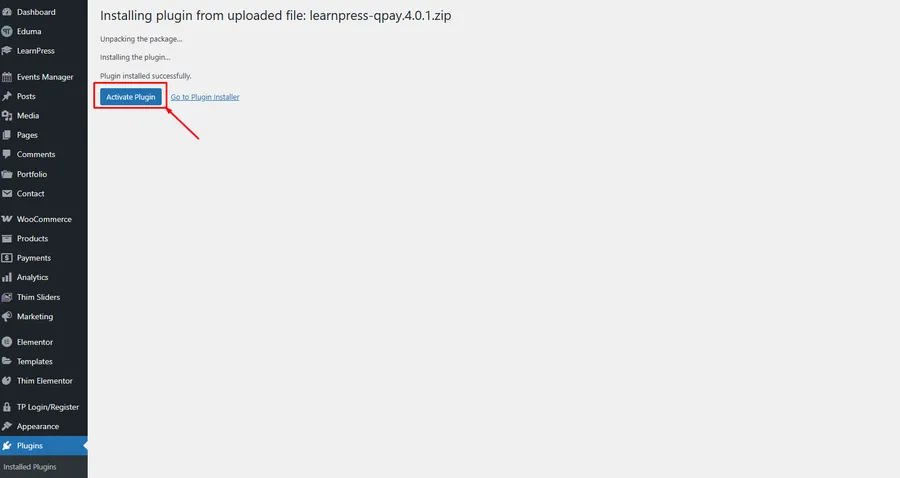
Step 3: Enable QPay in LearnPress Settings
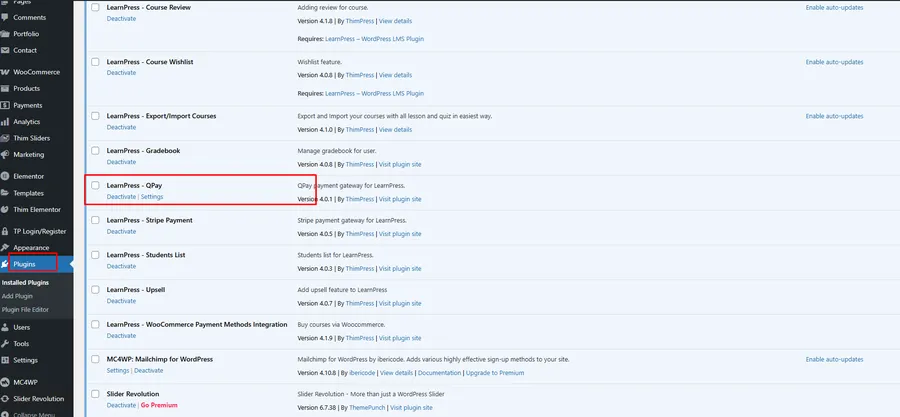
Now that the plugin is active, you need to enable it within the LearnPress payment settings.
- Go to LearnPress > Settings in your dashboard sidebar.
- Click on the Payments tab.
- You will see a list of available payment gateways. Locate QPay in the list.
- Click the checkbox (or the circle icon) under the “Enable/Disable” column to activate QPay. Alternatively, click the QPay link to enter the detailed configuration screen.
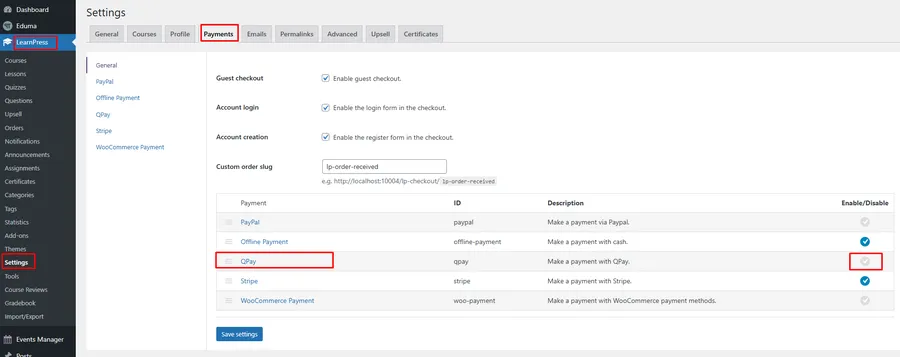
Step 4: Configure QPay Credentials
This is the most critical step in learning how to use QPay in Eduma. You must connect your website to your specific QPay merchant account.
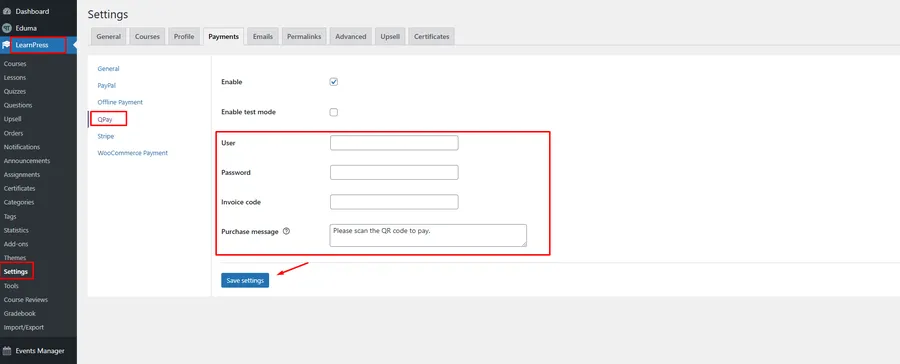
After clicking on QPay in the Payments tab, fill in the following information:
- Enable: Check this box to ensure the payment gateway is live on your checkout page.
- Enable test mode: Only check this if you are a developer testing the system. For live sales, leave this unchecked.
- User: Enter your QPay Merchant login account name. This is provided to you by QPay.
- Password: Enter the password corresponding to your QPay merchant account.
- Invoice code: Enter your Store Code, Invoice Code, or Partner Code. This unique identifier is issued to you by QPay.
- Purchase message: Customize the message displayed to customers when they select this payment method (e.g., “Please scan the QR code to pay”).
Once you have entered all the details, click the Save settings button at the bottom of the page.
Conclusion
Integrating local and secure payment gateways is essential for any LMS website. By following this guide on how to use QPay in Eduma, you have expanded your payment options, making it easier for students to purchase your courses.
If you encounter any issues during the setup, please verify your credentials with QPay support or contact ThimPress for assistance.
FAQs About QPay in Eduma
1. Is the QPay Add-on compatible with the Eduma theme?
Yes, the QPay Add-on is built specifically for LearnPress, which is the core LMS plugin used by the Eduma theme. They are fully compatible.
2. Where do I find my User and Invoice Code?
These credentials are provided by QPay when you register for a Merchant account. You must contact QPay directly if you have lost this information.
3. Can I use QPay alongside other payment gateways like PayPal?
Absolutely. LearnPress allows you to enable multiple payment gateways simultaneously, giving your students the freedom to choose their preferred method.
Read more: How to Use the Paystack Gateway in Eduma?
Contact US | ThimPress:
Website: https://thimpress.com/
Fanpage: https://www.facebook.com/ThimPress
YouTube: https://www.youtube.com/c/ThimPressDesign
Twitter (X): https://twitter.com/thimpress


