When launching an educational website, the Eduma WordPress theme stands out for its robust features and user-friendly design. A crucial step in setting up your eLearning platform is importing a demo, which provides a pre-built structure and design to accelerate your development process.
Understanding the time required to import demo in Eduma is crucial for efficient project planning and execution.
This guide provides a detailed breakdown of the demo import process, the typical duration, and expert tips to ensure a seamless installation, enhancing your website’s functionality and user experience.
Eduma – Education WordPress Theme
We provide an amazing WordPress theme with fast and responsive designs. Let’s find out!
Understanding the Importance of Demo Import
A visually appealing and functional website is paramount for educators and institutions seeking to establish a strong online presence.
Eduma offers a range of professionally designed demos tailored to various educational niches, from online courses and learning management systems (LMS) to universities and schools.
Importing a demo allows users to replicate these designs quickly, saving significant time and effort in website development. This process not only provides a solid foundation but also showcases the theme’s capabilities, enabling users to customize and personalize their sites effectively.
Steps to Install Eduma WordPress Theme:
Before diving into the demo import, it’s essential to install and activate the Eduma theme correctly. This ensures compatibility and unlocks all the features necessary for a successful demo import.
Step 1: Download the Eduma Theme
Upon purchasing Eduma, you’ll receive a zip file containing the theme package. This file is crucial for the installation process and should be stored safely on your computer.
Step 2: Upload and Install Eduma

- Log in to your WordPress Admin Dashboard.
- Navigate to Appearance > Themes on the sidebar.
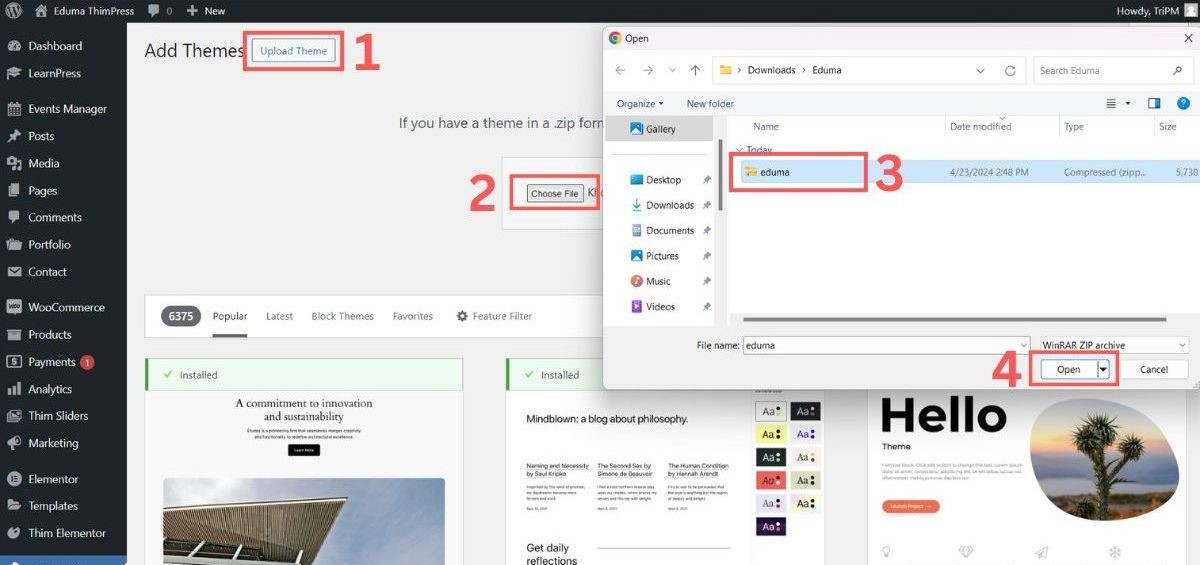
- Click on Add New and then Upload Theme.
- Select the
eduma.zipfile from your computer. - Click Install Now and wait for WordPress to upload and install the theme.
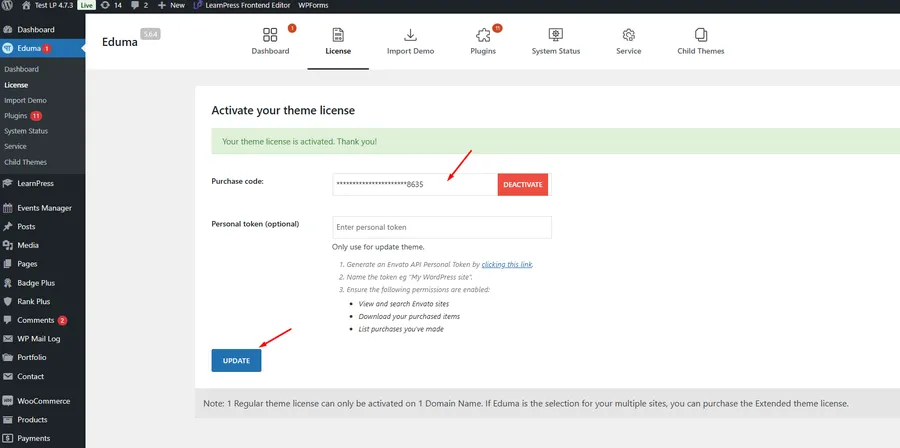
Step 3: Activate the Theme License

After installation, activate the theme using the purchase code provided. This step is vital for accessing all premium features, including the demo import functionality.
Without activation, you may encounter limitations or errors during the import process.
How Much Time Required to Import Demo in Eduma?
One of the most appealing aspects of Eduma is its efficiency. Typically, the time required to import demo in Eduma ranges from 3 to 5 minutes. This swift process allows users to quickly replicate a fully functional website, minimizing downtime and accelerating the launch of their online platform.
Here are the steps to import a demo in Eduma within 3-5 minutes:

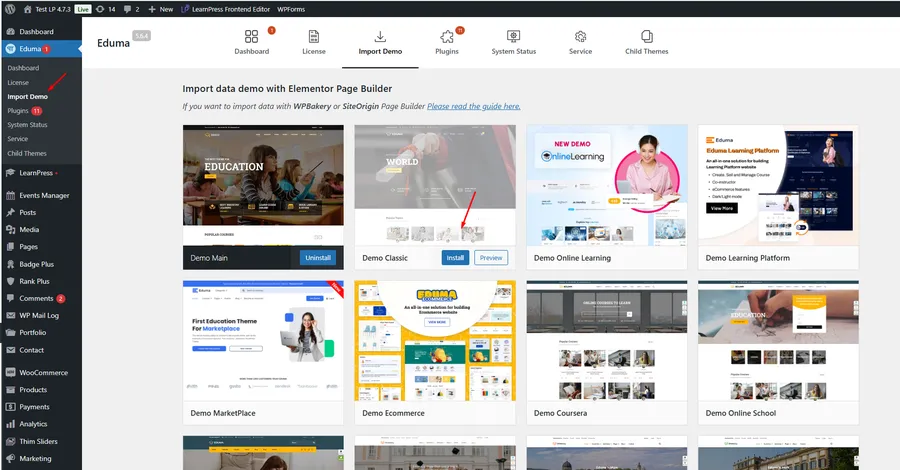
- Access the WordPress Dashboard: Log in to your WordPress Admin Dashboard.
- Navigate to Eduma: Locate the “Eduma” option on the left sidebar.
- Select Import Demo: Click on the “Import Demo” option.
- Choose a Demo: Browse through the available demos and select the one that best suits your needs.
- Initiate Installation: Click the “Install” button and wait for the process to complete.
After the 3-5 minute timeframe, your website should mirror the selected demo, including the homepage, inner pages, and design elements.
Factors Affecting the Time Required to Import Demo in Eduma
While the average import time is relatively short, several factors can influence the duration:
- Hosting Speed: The performance of your web hosting service significantly impacts the import speed. Faster hosting servers with ample resources can drastically reduce the import time. Conversely, shared hosting with limited resources may lead to longer import times.
- Internet Connection: A stable and high-speed internet connection is essential for a smooth import process. Slow or intermittent connections can cause delays and interruptions.
- Demo Size: The complexity and size of the demo can affect the import duration. Demos with extensive content, high-resolution images, and numerous WordPress plugins may take slightly longer to import.
- Server Limits: Hosting server limitations, such as PHP memory limits, max execution time, and upload file size restrictions, can hinder the import process. Ensure your server meets the recommended requirements for Eduma.
- Plugin Conflicts: Pre-existing plugins on your WordPress site might conflict with the demo import process, causing delays or errors. Deactivating unnecessary plugins before importing can mitigate this risk.
- Server Location: The physical location of your server relative to your location can also affect download speeds. A server that is closer to your location may result in faster download and import speeds.
Final Thoughts for The Time Required to Import Demo in Eduma
The time required to import demo in Eduma is generally a quick and efficient process, typically taking only 3 to 5 minutes. Hopefully, you can swiftly launch your educational website with Eduma’s powerful pre-built demos. This streamlined process empowers educators and institutions to focus on creating engaging online learning experiences rather than grappling with complex website setup.
Read more:
How To Add Review Section in Eduma Theme: Step-by-step Guide
How to Easily Remove the ‘Become an Instructor’ Part from Eduma?
How to Operate Countdown in Eduma Theme: A Step-by-Step Guide
Contact US | ThimPress:
Website: https://thimpress.com/
Fanpage: https://www.facebook.com/ThimPress
YouTube: https://www.youtube.com/c/ThimPressDesign
Twitter (X): https://x.com/thimpress_com


