Are you afraid of losing your data and downtime when you Migrate WordPress Site to another host or a new server?
The main reason that makes you move your site is when you are not satisfied anymore with your hosting provider and you found a new one with better quality of service and level. However, it’s possible for you to think that the migrating process is difficult or complex and you can not do it by yourself, especially if this is the first time.
Stop thinking and worrying now. In this instruction, we’ll share the safe steps to transfer your site to a new or another host without any problem. So ensure that you find a new good host to get better performance and more features from it. Let’s dive in!
How to Migrate WordPress Site to Another Host
There are some famous hosting companies that you can try such as Bluehost, SiteGround, HostGator, DreamHost, or Hostinger that have the Migrate WordPress Site service. However, you can not find this service on their site, we recommend you to ask their support team. It can be free or a small charge, depending on each provider and your site.
Step 1: Choose a New WordPress Host to Migrate WordPress Site
If your host is so slow and you tried to optimize your site speed and performance but it does not change much, then you need to find another hosting provider to Move WordPress Site to a New Host. A good provider can help your site traffic grow and better rankings in the search engines. Choosing a good hosting company that fits your needs is the most important step to avoid moving your site again in the future.
As I have said earlier, you can pick one of these providers: Bluehost, SiteGround, HostGator, DreamHost, or Hostinger. To explain, if you need reliable shared hosting, you can try Bluehost or Hostinger. However, if you need cloud hosting or even location-specific hosting companies, you can try Siteground. HostGator and DreamHost are also a perfect choice as well.
After purchasing your new hosting successfully, your account should not have any files or even folders in the main directory. It means you can not download anything, even WordPress at this step.
Step 2: Setup a Migrate WordPress Plugin for Easy Migration
At this point, you need to have a migration plugin on your WordPress site and Duplicator is the first plugin we think of. It’s free and you can download it right on WordPress.org. Moreover, Duplicator can transfer or Migrate WordPress Site to another domain and still maintain your SEO. To install WordPress plugins, you don’t need to know any code, just simply follow our guide.
After activating Duplicator successfully, it is time to set up the plugin on your site. Firstly, go to your WP admin then find Duplicator on your sidebar -> select Packages -> click the Create New button.
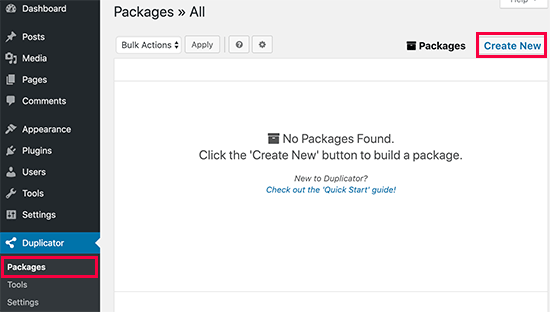
Keep going to click the Next button.
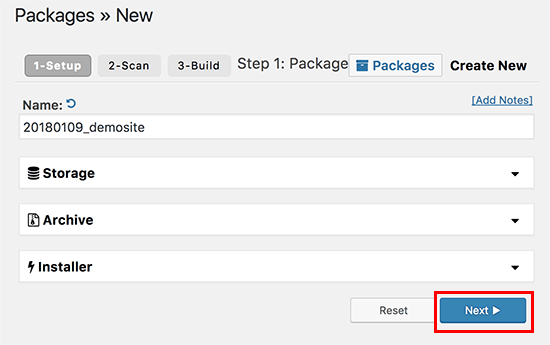
If the next window should display all the Good results as the image below, then click Build.
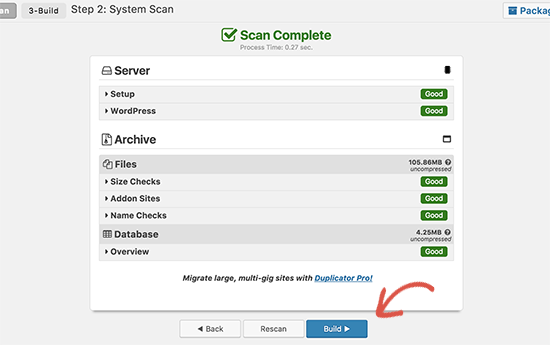
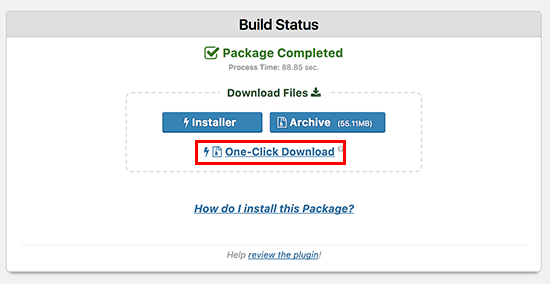
It might take a few minutes to complete this process. After that, you’ll see a phrase saying Package Completed, and go ahead and click One-Click Download to download Installer and Archive together. To clarify, the Installer file is for automating the installation procedure, and the Archive file is a copy of your entire site.
Also, you can try the best WordPress backup plugin if you’re looking for a tool that offers both features: Backup and Migration.
Step 3: Import Your WP Site to the New Host
The next step in this guide, How to Transfer WordPress Site to New Host, is to import your WP site to another host. Once you have both files above, you need to upload them to your new host via the FTP client.
Usually, you have to enter the site’s domain name like a host to connect your FTP. But your domain now is still working with the old host. So instead of entering the domain name, it’s fine to enter your server’s IP address or even your server hostname.
Simply go to your new web hosting account’s cPanel, you can get this information.
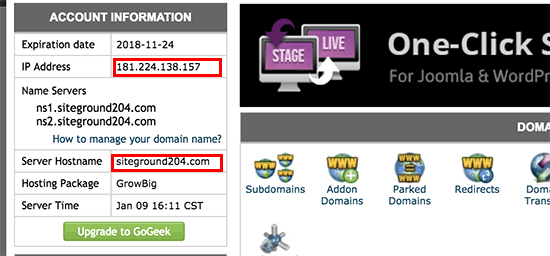
In case you can not find them, just reach out to your new hosting provider to learn more about them. Please note that your root directory should not have any file or data yet and now you can upload the installer and archive file to this root directory via FTP. You can see /username/public_html/ folder.
There are some cases where the hosting provider installs WordPress automatically once you sign up for a new account. So just delete it to make the root directory empty and upload both files.
Step 4: Change or Edit the Hosts File
The next step to Migrate WordPress Site is to change/edit the host file to avoid downtime. Once your new host has an archive together with the installer file, just access the installer file via the browser.
Usually, we use this URL link like: https://www.thimpress.com/installer.php to access. But when you use the link, you will see a 404 error because your domain name still works with the old host.
To solve this issue, you can try a host file right on your computer.
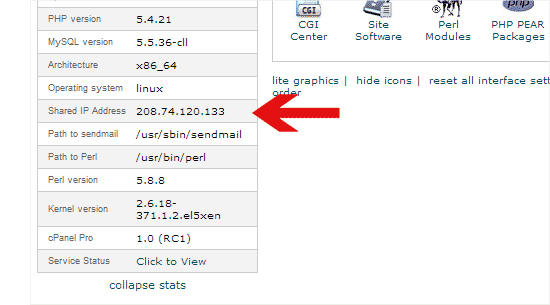
Firstly, get your IP address from your new hosting server by logging into the cPanel admin and click the expand stats link to find the Shared IP Address.
Next, you go to Programs -> select All Programs -> then choose Accessories -> click the right mouse and choose Run as Administrator. There will be a Windows UAC prompt so just click Yes.
Now you can go to File -> select Open -> find the C:\Windows\System32\drivers\etc folder on the Notepad.
Afterward, you can see the host file and just open it. At the bottom of this file, type the IP address and your domain name then don’t forget to save these changes.
For example, 192.168.1.22 www.thimpress.com Well done. You can visit your file on a new host via the domain name on the computer.
Step 5: Create a MySQL Database on Your New Host to Migrate WordPress Site
Do you have the MySQL data on your new hosting account? If not, you can follow this step. If yes, you can go directly to the next step of How to Migrate WordPress Site.
Firstly, log in to your new hosting account in the cPanel dashboard and find MySQL Database.

Then type a name for your database and click the Create Database button.

After having the MySQL database, find the MySQL Users part and add the required information like username and password then click Create a User.
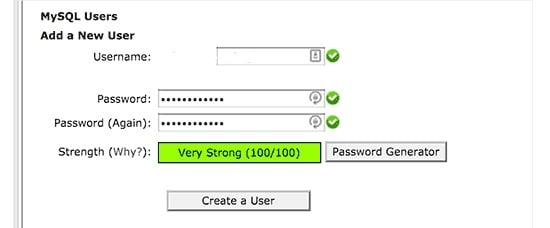
Then you can add this new user to your database to get all the permissions to access that database. What Should You Do? Just find the Add User to Database part and click the Add button.

So now you can use the database with WordPress. Please remember all information like username or password to use in the next step.
Step 6: Start With The Duplicator Migration Process
So now let’s run the installer. First, you need to change thimpress.com to your domain name in https://www.thimpress.com/installer.php.

If you see the word Pass in the Archive and Validation part, it means the installer runs successfully after testing. Then click the terms & notices link to read carefully before pressing Next.
After that, it requires your MySQL host, database name, username, and also password that you created earlier. Once you have finished, click on Test Database to check whether the information is correct or not.
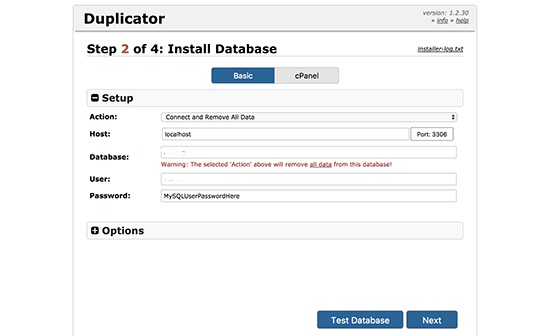
If Duplicator, the famous plugin for migrating WordPress Sites, can connect your information, you will see Pass. If it can’t, you can check the error details and fix it.
Then click the Next button to continue. This plugin will be used to import your database from the archive zip into the new database and go ahead with the Next button.
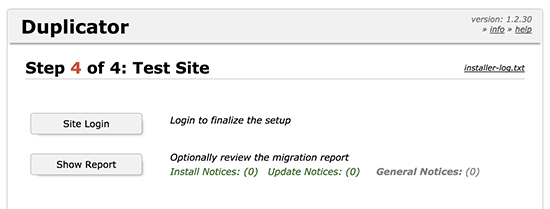
Finally, you can see a Site Login button. So just click and enter your information on the new host.
Step 7: Updating Your Domain Name Server (DNS)
After completing a copy of your database as well as files on your new hosting server. However, your domain still works with the old hosting. To update, just switch your domain name servers so your users can find your new location.
If your domain name as well as your hosting are registered with a hosting company, it’s easy to bring the domain to another new host. Otherwise, you have to update/ edit your nameservers. From the new host, you can find URLS of your DNS nameserver information like:

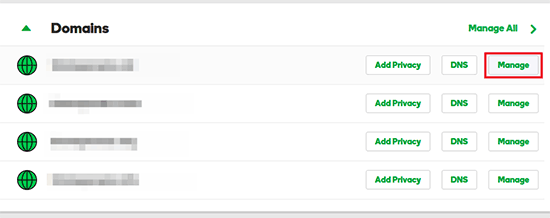
See an example, we use GoDaddy to change/edit DNS nameservers. Firstly, log in to your GoDaddy account and find Domains.
Then click whatever Manage button you like to change right next to the domain name.
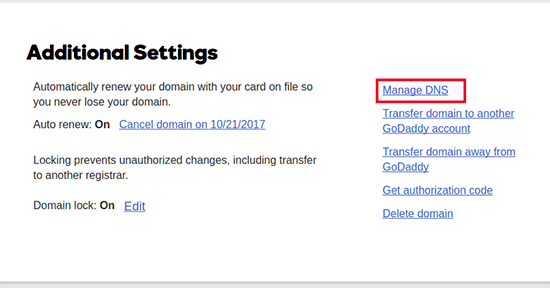
Also, you can find the Additional Settings part and then select the Manage DNS link.
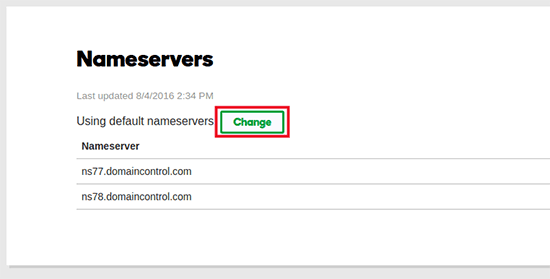
There will be a Nameservers section when you scroll down and click to Change.
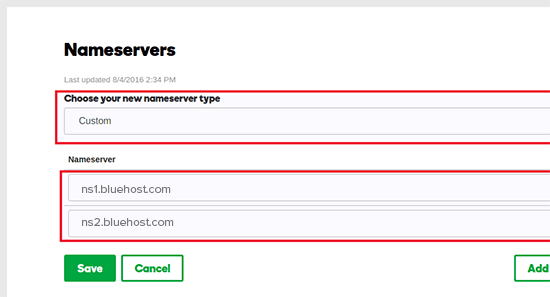
Now you can change from Default to Custom in Choose your new nameserver type and enter you nameserver information that you have copied earlier. Then click the Add button.
Lastly, you just need to wait 4-48 hrs to complete the process of how to Migrate a WordPress Site to a new host or how to move a WordPress site to a new server.
You might be curious if your users can see the difference when you use a new host with the same content. Of course, they can not recognize it. Kindly remind you to not cancel your old hosting right away. Just cancel it once your site runs smoothly, it’s good to contact their team after a week of your migration.
Final Thoughts
Hopefully, you can Migrate WordPress Site to another new host via our guide with no downtime today even if you’ve never tried to do this before. Just remember to choose the right hosting provider so you won’t need to move or transfer your site again.
Contact US | ThimPress:
Website: https://thimpress.com/
Fanpage: https://www.facebook.com/ThimPress
YouTube: https://www.youtube.com/c/ThimPressDesign
Twitter (X): https://x.com/thimpress_com

