Managing emails that were sent out through your WordPress website can often be an overwhelming task for many WordPress site owners out there.
Checking the status of these emails and ensuring that you are caught up with the progress on all of them can be manually tiring and confusing. A lot of times, there might be a need for determining the time when an email was sent in the past time or something as simple as the follow-up can trigger the need for scanning the email exchange through the WordPress site.
This is where WordPress email logging comes in handy. WordPress Email logs can be highly useful for taking a peek into the status of emails and monitoring all the emails that have been sent out. With the help of email logs, you can easily assess the time when an email was sent, its delivery status, and the receiver of the email.
Tracking the status of WordPress contact form plugin emails, user activity log, or deliverance of email notifications are some other use cases. Going through lost emails or digging through them to find an important one cannot be manually easy.
Important WordPress Email Logs
Typical emails for a password reset, new user notification, change of password, critical comments, etc. are the ones that WordPress admins have to often look for.
It is important to make sure that the intended receiver of these emails is actually getting to read these emails and that they are just not going straight away to their spam email folder. By setting up an email log for your WordPress emails.
You can easily let the system in place do its work of logging all emails sent from your server.
In this blog post, we will be helping you with the process of setting up WordPress email logs for your WordPress site. So, you don’t miss out on your workflow.
Setting Up WordPress Email Logs
Using a WordPress plugin such as WP Mail SMTP or WP Mail Logging can be helpful. If you are looking to set up the email logging system for your site.
If you are starting a new website, setting up a blog and choosing the right web host is a crucial decision as results from this Siteground review show how the right web hosting plan can boost your website performance. Setting up an email log system is as important as well.
Here is the process for you to help set up email logging through these plugins:
WordPress Email Logs: Through the WP Mail SMTP Plugin
Download and install the WP Mail SMTP plugin on your WordPress installation. You can easily go through the help page on the website to get through with the documentation, reference materials, and tutorials for the WP Mail SMTP plugin. It will help you set up the email log system in place.
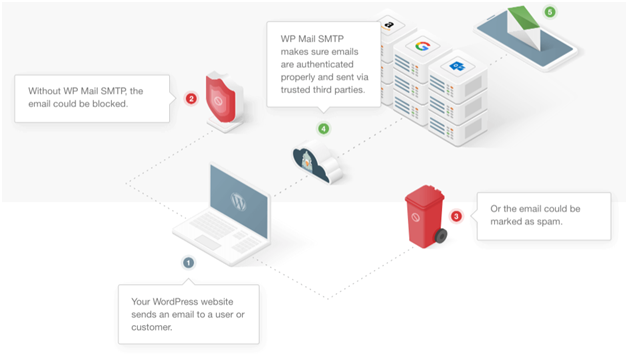
Once you have downloaded the plugin and are ready to install it, login to your WordPress site’s dashboard and visit the plugin tab. Now go the setting option for the plugin and it is time to configure the plugin for your WordPress site. Once activated, you will need to enter the license key to get started.
In case you don’t have the license key at hand. You can visit your account on the WP Mail SMTP website and retrieve the key.
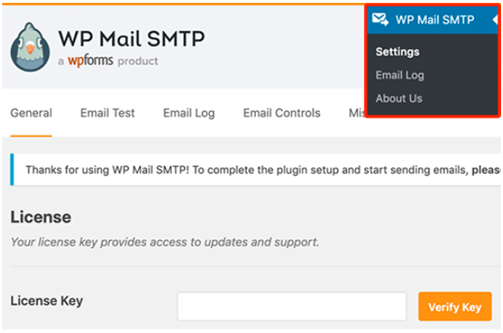
Now, simply copy and paste the key and click on the ‘Verify Key’ button. You can also choose to let the team help you set up the plugin by requesting a White Glove setup.
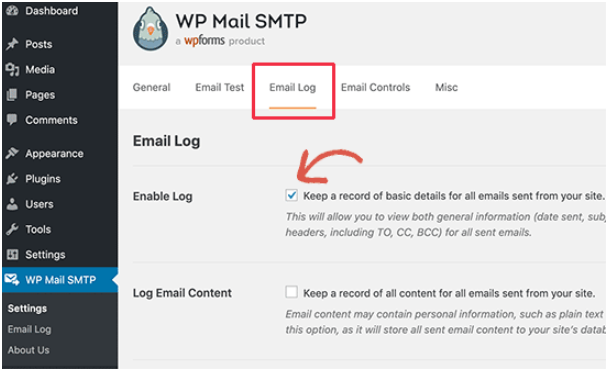
Once activated, now it is time to enable WordPress email Logs for the plugin. Go to go to WP Mail SMTP > Settings > Email Log tab.
WordPress Email Logs: Next step
Check the box that states ‘Enable Log’. Once enabled, the system will be able to keep a record of every email which will be sent from your website. Moving forward, the system will keep a record of the date and time, the subject line, the Email status, the Recipient Email Address(es) (including CC and BCC), the attachments, etc.
Below the ‘Enable Log’ option, you will also find a ‘Log Email Content’ option. This is about storing generic/troubleshooting information that has to do with each email that is being sent out. You can also choose to enable complete WordPress email logs. However, it is not recommended if you care about the privacy of the contents of the email because the log will store all sensitive information in plain text which can be easily compromised. Once you have figured out your preferences, you can hit ‘Save Changes’ to move ahead in the process.
WordPress Email Logs: Check again
Now, it is time to check and make sure that the set up that you just configured works fine. A test email will serve the purpose and can be triggered right from the plugin.
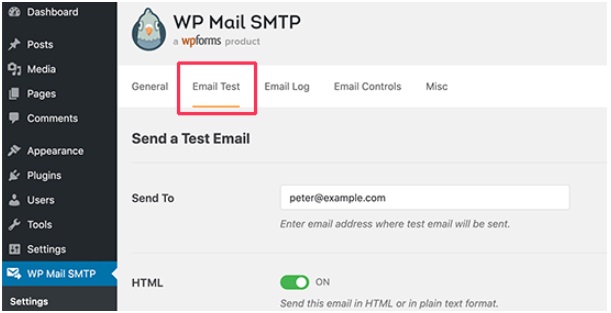
Visit the plugins section from your WordPress dashboard > SMTP > Settings > ‘Email Test’ tab. Now, simply add a recipient email address and click on the ‘Send Email’ button. Once the email is sent, the plugin will display the status of the test email.

Now, your WordPress email log system has been set up with the help of ‘WP Mail SMTP’ Plugin. Now, you will easily be able to view the email logs anytime you want.

Just log in to your site’s dashboard and go to WP Mail SMTP > Email Log page to check the entries recorded by the log system. When you hover on the ‘View Link’, you will be able to see the log details.
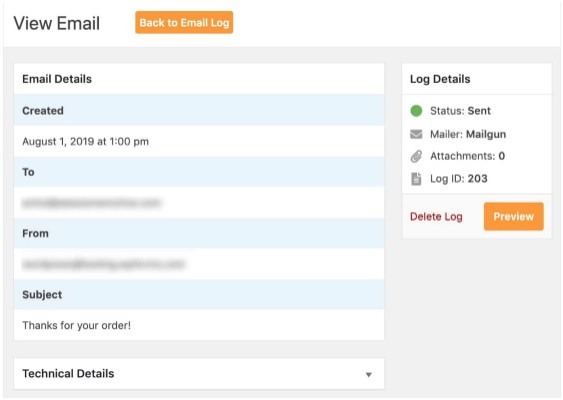
The plugin lets you search for specific email entries and delete older entries from your email log. You will also be able to carry out bulk action for deleting the entries.
WordPress Email Logs: Through the WP Mail logging from MailPoet
This one is also an efficient plugin that can help you easily set up a WordPress logging system in just a few steps. Here’s what you need to do:
- Visit the WordPress plugin repository and look for the ‘WP Mail logging’ plugin by MailPoet. Download and install this plugin.
- Now, it’s time to pull a trick. Simply log out of your WordPress site. Then, initiate a password reset so that the system sends you an email.
- Now, once you are able to log in back to your site. You will be able to see the log entries. The plugin will be able to log emails with the exception of emails sent by plugins that don’t use wp_mail.

- By clicking on the ‘View’, you will find details such as Time sent, Host, Receiver, Subject, Message body, Headers, and Attachments errors.
WordPress Email Logs: Conclusion
In conclusion, setting up email logs for WordPress is an important step in ensuring the security and reliability of your website. With email logs, you can track all email communication and troubleshoot any issues that may arise.
By following the steps outlined in this guide, you can easily configure your WordPress site to log all email activity, including sent and received messages, and keep a record of it. Additionally, with the use of plugins and third-party services, you can enhance the functionality and features of your email logs.
Overall, setting up email logs is a simple yet powerful way to improve the performance and security of your WordPress website.
Read More: How to Choose the Best WordPress Hosting Providers
Contact US | ThimPress:
Website: https://thimpress.com/
Fanpage: https://www.facebook.com/ThimPress
YouTube: https://www.youtube.com/c/ThimPressDesign
Twitter (X): https://x.com/thimpress_com


