Are you looking for a reliable and globally-recognized payment gateway for your Eduma e-learning website? Integrating a secure payment system is crucial for selling your courses and managing transactions smoothly. 2Checkout (now Verifone) offers a robust solution for accepting payments from students worldwide.
This guide will walk you through the entire process of installing, activating, and configuring the 2Checkout in Eduma theme. By following these simple steps, you can offer a seamless checkout experience for your users.
Eduma – Education WordPress Theme
We provide an amazing WordPress theme with fast and responsive designs. Let’s find out!
Installing and Activating the 2Checkout Add-on
The Eduma theme comes with the 2Checkout add-on for LearnPress readily available. You just need to install and activate it.
Step 1: Find the Plugin
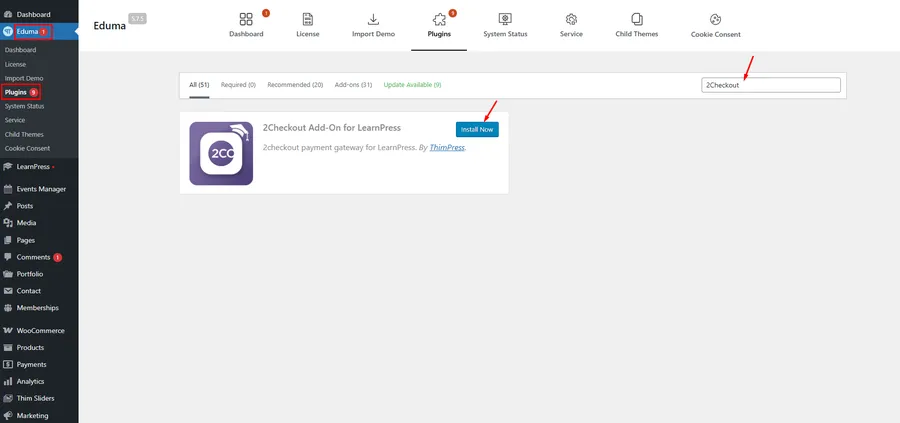
First, navigate to your WordPress dashboard. From there, go to Eduma → Plugins. In the search bar on the right, type “2Checkout” to find the add-on.
Step 2: Install the Add-on
Once the “2Checkout Add-On for LearnPress” appears in the search results, click the ‘Install Now’ button. WordPress will then download and install the plugin files for you.
Step 3: Activate the Plugin
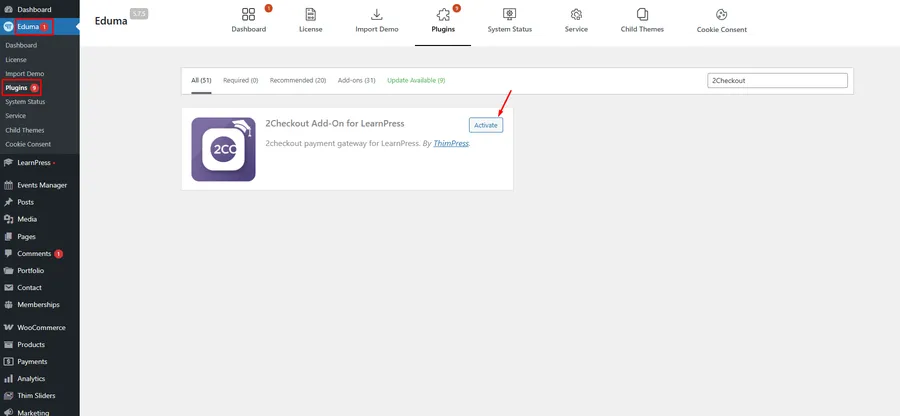
After the installation is complete, the ‘Install Now’ button will change to an ‘Activate’ button. Click it to enable the plugin on your website.
Step 4: Verify the Activation
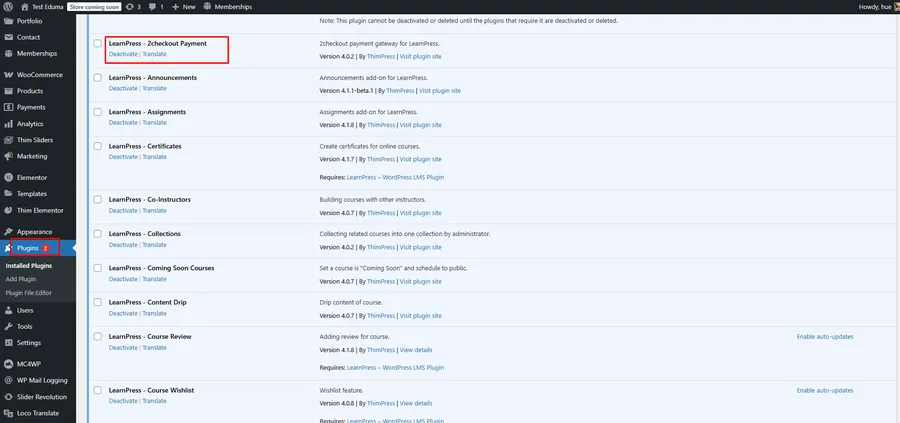
To ensure the plugin is active, you can go to the main Plugins → Installed Plugins page on your dashboard. You should see “LearnPress – 2Checkout Payment” in your list of active plugins.
How to Configure 2Checkout in Eduma
After activating the add-on, the next step is to configure its settings within LearnPress to connect it to your 2Checkout account.
Step 1: Enable the 2Checkout Payment Gateway
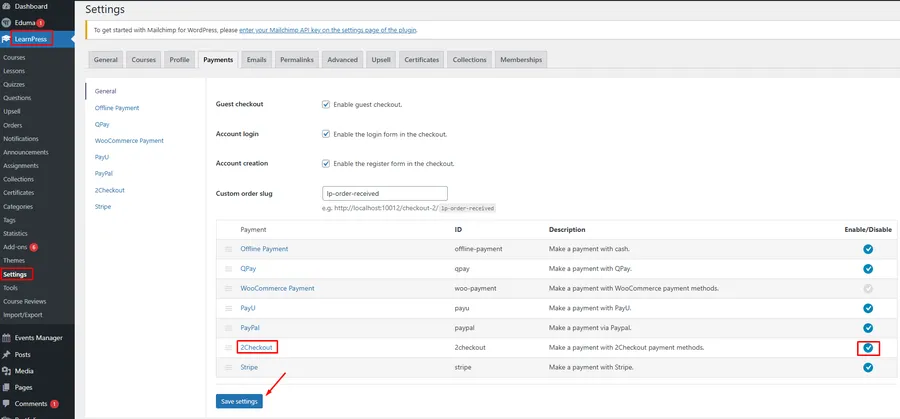
From your WordPress dashboard, navigate to LearnPress → Settings and click on the Payments tab. Here, you will see a list of available payment methods. Find 2Checkout in the list and check the box in the “Enable/Disable” column to turn it on.
Remember to click the “Save settings” button at the bottom of the page to apply this change.
Step 2: Enter Your Account Details
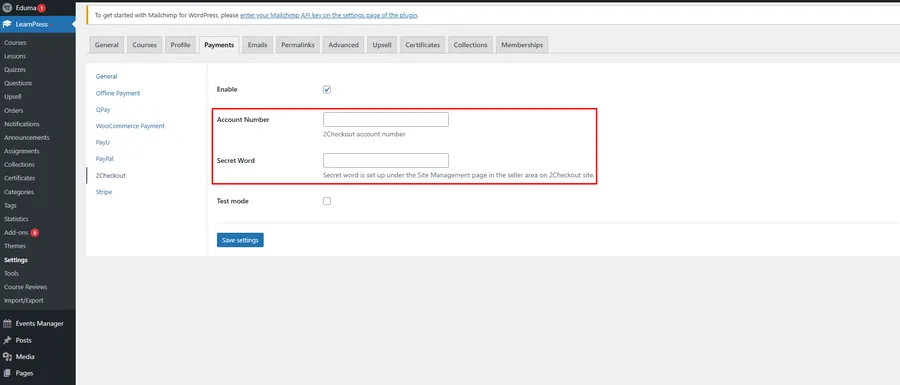
Now, click on the 2Checkout sub-tab to configure the specific settings for this gateway. You will be presented with the following fields:
- Enable: Ensure this box is checked to keep the payment method active.
- Account Number: Enter your 2Checkout Account Number here. You can find this information in your 2Checkout merchant cPanel.
- Secret Word: Input your Secret Word. This acts as a security key to validate transactions between your website and 2Checkout, ensuring payment notifications are authentic. This is also found within your 2Checkout account’s Site Management page.
After entering your details, click ‘Save settings’ to finalize the configuration.
Step 3: Use Test Mode (Optional)
If you want to test the payment process without making real transactions, you can use the Test Mode. Simply check the ‘Test mode’ box. This will connect your site to the 2Checkout sandbox environment, allowing you to simulate a purchase and ensure everything is working correctly before going live.
FAQs About 2Checkout in Eduma
Q1: Where do I find my 2Checkout Account Number and Secret Word?
You can obtain both your Account Number and Secret Word by logging into your 2Checkout merchant account. The Secret Word is typically located in the ‘Site Management’ or ‘Integrations’ section of your cPanel.
Q2: Is the 2Checkout Add-on for LearnPress free?
Yes, the 2Checkout add-on is included with the Eduma theme, so you do not need to purchase it separately. You can install it directly from the Eduma dashboard.
Q3: Can I use 2Checkout alongside other payment gateways like Stripe or PayPal?
Absolutely. LearnPress allows you to enable multiple payment gateways simultaneously. This gives your students more choices at checkout, which can help increase conversions. Simply enable each gateway you wish to use in the LearnPress → Settings → Payments tab.
Q4: What should I do if payments are not being processed?
If you are having issues, first double-check that your Account Number and Secret Word are entered correctly. Second, ensure there are no conflicts with other plugins by temporarily deactivating them. Finally, make sure Test Mode is disabled if you intend to accept live payments.
Conclusion
Integrating a secure and efficient payment system is essential for any online learning platform. By following this guide, you can successfully set up 2Checkout in Eduma, providing your students with a reliable way to purchase courses. The process is straightforward: activate the add-on, enable the gateway in LearnPress, and enter your account details. Taking a few moments to test the configuration will ensure a smooth and professional payment experience for your users.


