WordPress Change Domain has become inevitable for WordPress websites when you deliver new goods and services or even expand and widen your markets. Therefore, you will have to associate your brand name with your domain. A domain name will represent your brand’s intentions and goals as well as be easy to remember by the audience.
Luckily, the process of changing a WordPress domain name is quite easy for all users. Today, we will introduce you to how to do a WordPress Change Domain Name step-by-step.
WordPress Change Domain: Why You Should Do It?
Particularly, all brands will keep their starting domain and make business projects around it. However, in some cases, they have to alternate it with a related or even different domain name.
We have summed up the reasons for a brand to Change Domain WordPress name below.
- Re-labeling (Rebranding): Based on realistic needs, a brand will have to change its domain name. Usually, it comes from targeting a new audience or gaining new goals or management. Therefore, you should alternate your domain to fit the new brand.
- Domain extension change: This case is very advisable when you want to use a more general extension like .com or .net. You can change your domain to replace the country-code or field-specific extensions.
- More user-friendly and easy-to-recognize URL: If your domain is simple and not complicated, it will be very easy to remember. In addition, you can keep a good track of around 12 characters.
- Combining multiple domains: For instance, you have the old domain name’s authority and you need to merge it with the new one. With merging domains, the new site’s URL can still inherit SEO and link juice from the old site. Besides, you can do less SEO work to improve the new domain’s popularity.
As can be seen, alternating domain names will bring both advantages and disadvantages. For example, if changing the domain can bring pros, it can also bring cons. The reason is that search engines must take time to crawl your new URL address’s data.
To acquire it, you should get yourself some practice with this.
WordPress Change Domain: Step-by-Step Instruction
Usually, this process is very simple for WordPress users. However, some of them may require your knowledge of PHP coding. A wrong move will ruin your work entirely, so be careful!
Here, you must follow these necessities before any change happens.
Backing up Your Site’s Data
To make it, you should start by backing up your website. Of course, safety should get more of your attention! If things happen, you can restore your site without any harm or scratch. Otherwise, you may lose all data and start from zero.
To be more specific, every WordPress site will have two main parts: the site’s files and database. Therefore, make a total backup of your site’s files before making any changes or transferring the domain.
Usually, each web hosting service will have a restore and backup system for this case. However, you can also rely on some plugins Free WordPress Backup Plugins.
Get Access to an FTP Client/a Hosting Dashboard
To Change WordPress Domain, you must gain access to your hosting account dashboard. Then, you can add your new domain name. Normally, people will have their domain-setting system to log in and make the changes. Otherwise, you can back up your database with an FTP client. Afterward, you can edit and upload those files from a personal computer.
A Brand New Domain Address
You will have to make careful searches here. As usual, you have to find your site a proper registrar and select a suitable extension for the new URL. Wonder if there is a way to make it simple. Yes, you can. Create a list of potential domain addresses and check their availability with a domain checker.
After all the above necessities, you can get yourself into work. Now, we will solve the question “How to Change Domain Name in WordPress” in these ways.
Buy a Brand New Domain Name
First of all, navigate to the domain checker and search for your desired domain. After that, the domain’s availability will show up, and some related domains will show up if they’re available. Plus, you can also see the price of each one of them.
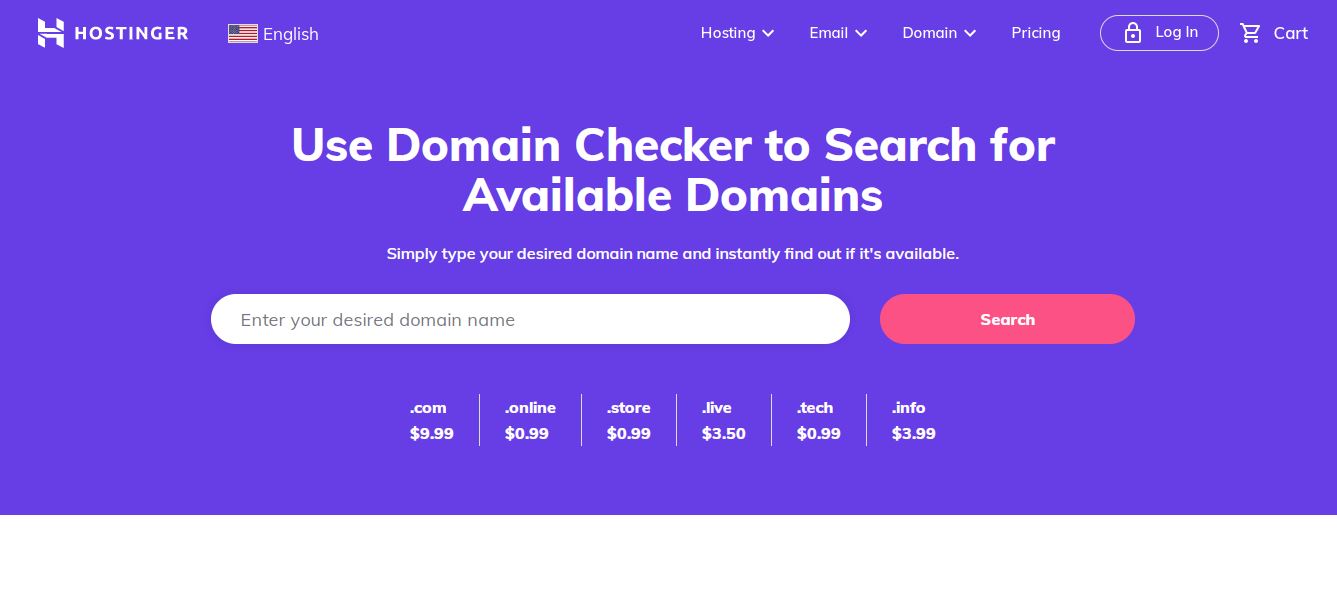
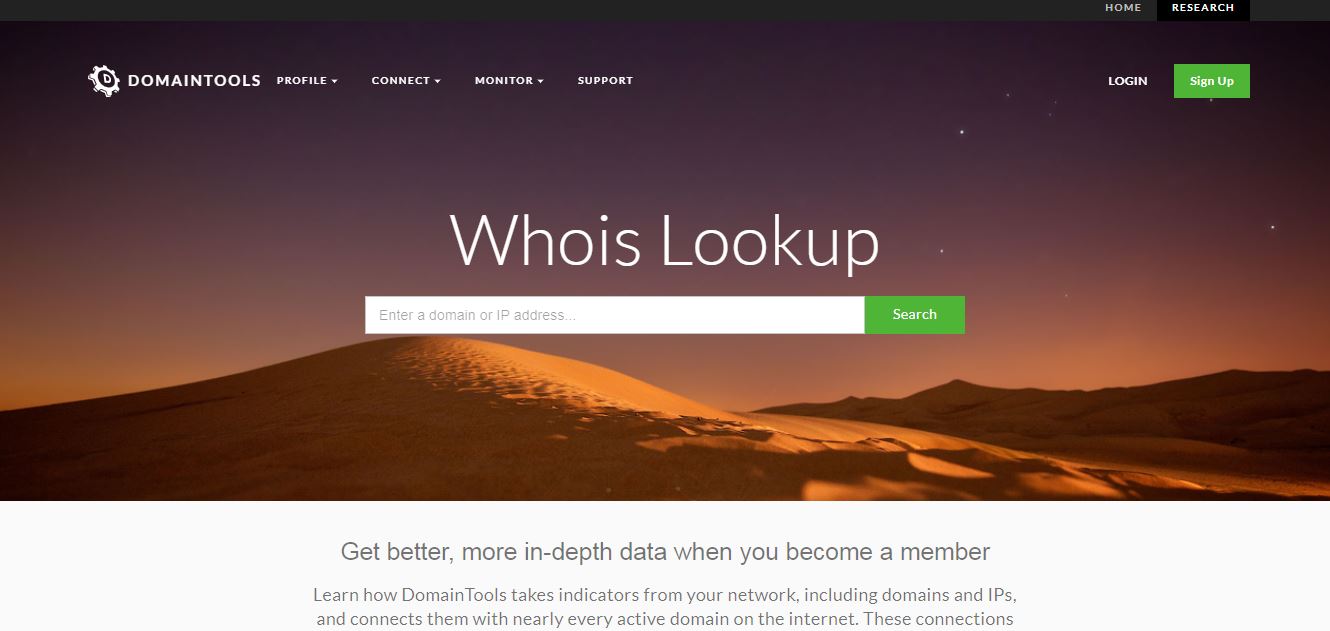
If the wanted domain is taken, you can go for the related domains. Otherwise, you may contact that domain’s owner and make a good deal. To find the owner’s information, users can use a WHOIS tool and look for the domain’s information: owner’s info, phone number, IP address, rankings, and more. On the other hand, if your desired domain is ready, you can simply add it to your cart and purchase it.
In the checkout step, you will have to determine the period for domain registration from 1 to 10 years. Particularly, most of them will require at least one year of registration.
At the end of this step, finish your purchase order. This is the first step to the question “How to Change Domain Name on WordPress”.
Add New Domain Address and Upload Your Site’s Backup Files
The next step for “How to Change WordPress URL” is to add the new domain to your hosting service. Today, we will work on cPanel and hPanel.
Using cPanel
First, log in to your cPanel account and go to “Domain” -> “Add-on Domains”. In there, you will type in your new domain name. Then, the system will automatically fill the subdomains and document root.
Using hPanel
To start, look for “Domains” and choose “Add Website”. Then, you will add the new domain and set a password for it. After that, you will choose “Add Website”.
Of course, it will take you some time to load the new URL on your current hosting service.
Make a Copy of Your Site’s Main Files from the Old Domain Name
In this step, you can easily transfer the data from the old domain name to the new one. Besides, it will be much better if you don’t need to switch to a new hosting service. You can do it in two ways: download your backup files from the hosting service or just copy your old domain’s files directly to the new one.
There are many different hosting services with different files. However, we will guide you on how to change domain name in WordPress | Hostinger in its file manager.
- In the hPanel dashboard, choose “Files” -> “File Manager”.
- Check for the existence of all domain files.
- Choose the wanted domain folder and open the directory public_html.
- Choose all files and select “Copy” or “Transfer” based on your need.
- Check all the information on the popup and click “Change” to finish.
On the other side, if you change the hosting service, you must download your site’s files from the current hosting domain and use an FTP client or the cPanel file manager. After that, you will upload the data via phpMyAdmin and update WordPress’s configuration file.
By doing this, you will keep your site online while working with the transfer.
Alternate Your URL Address
Next, you will update the current URL and site address. You can boost your site’s speed and improve visitors’ experiences. Also, this will help the search engines crawl and index yours faster.
You can choose a method from the list below. Here is a list of them.
WordPress Admin Dashboard
This method remains the most popular way to add a new site address to the WordPress general settings. First, navigate to “Dashboard” -> “Settings” -> “General.” Next, you will replace the old WordPress address and site address with the new ones.
You should make sure that both of them match, and then choose “Save Changes”.
The File wp-config.php
You can find it below the root directory of your website. You can simply get access to it in the hPanel file manager. Otherwise, you may open it via FTP, SSH, or WP-CLI.
Here are the steps to edit the WordPress change domain in wp-config in the hPanel dashboard.
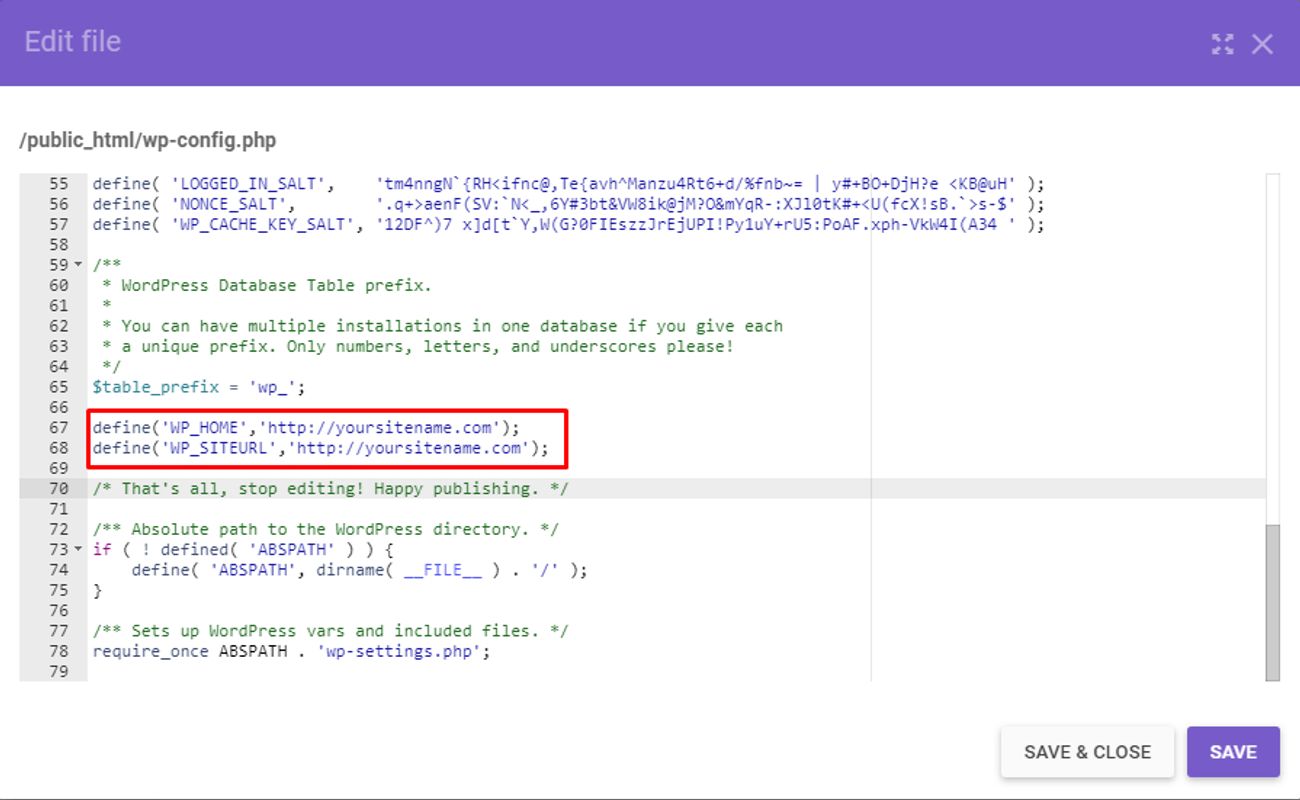
- Navigate to “hPanel” -> “Files” -> “File Manager”.
- Find the domain folder and choose “Go to File Manager”.
- In the folder public.html, search for the file wp-config.
- Right-click and then “Edit”.
- Replace http://domain.com with the new address.
<!-- wp:paragraph -->
<p>define('WP_HOME','http://domain.com');</p>
<!-- /wp:paragraph -->

<!-- wp:paragraph -->
<p>define('WP_SITEURL','http://domain.com');</p>
<!-- /wp:paragraph -->- Insert and choose “Save & Close”. This will be how you see the file wp-config.php.
If you use an FTP client, you will do pretty much the same as this. Besides, you will only need an FTP account warrant to access your site’s main files.
phpMyAdmin
Direct WordPress change domain in database editing in phpMyAdmin also stays as a part of the “How to Change WordPress Domain” solution. To do it, you must follow these steps:
- Go to “hPanel” -> “Database” -> “phpMyAdmin”.
- Select the database in which your site’s database is placed before choosing “Enter phpMyAdmin”.
- Look for the file “wp-option”.
- Click “Edit” on your website’s URL.
- Alter the old domain with the new domain.
Therefore, the system will save your changes automatically.
Reset URL Design
Next, you will update and manage the site’s URL complex. If you don’t make changes, all your posts will come up with errors 404 and 500 when visitors access your pages or posts. Therefore, your customers must receive accessible content, or you will face lots of troubles.
Here, you can make a reset in these ways:
Via the WordPress Dashboard
To start, you will navigate to your WordPress Dashboard -> Settings -> Permalinks. Usually, your site will automatically use a plain permalink structure. However, it does not show any idea of your content, which stays as the least recommended one:
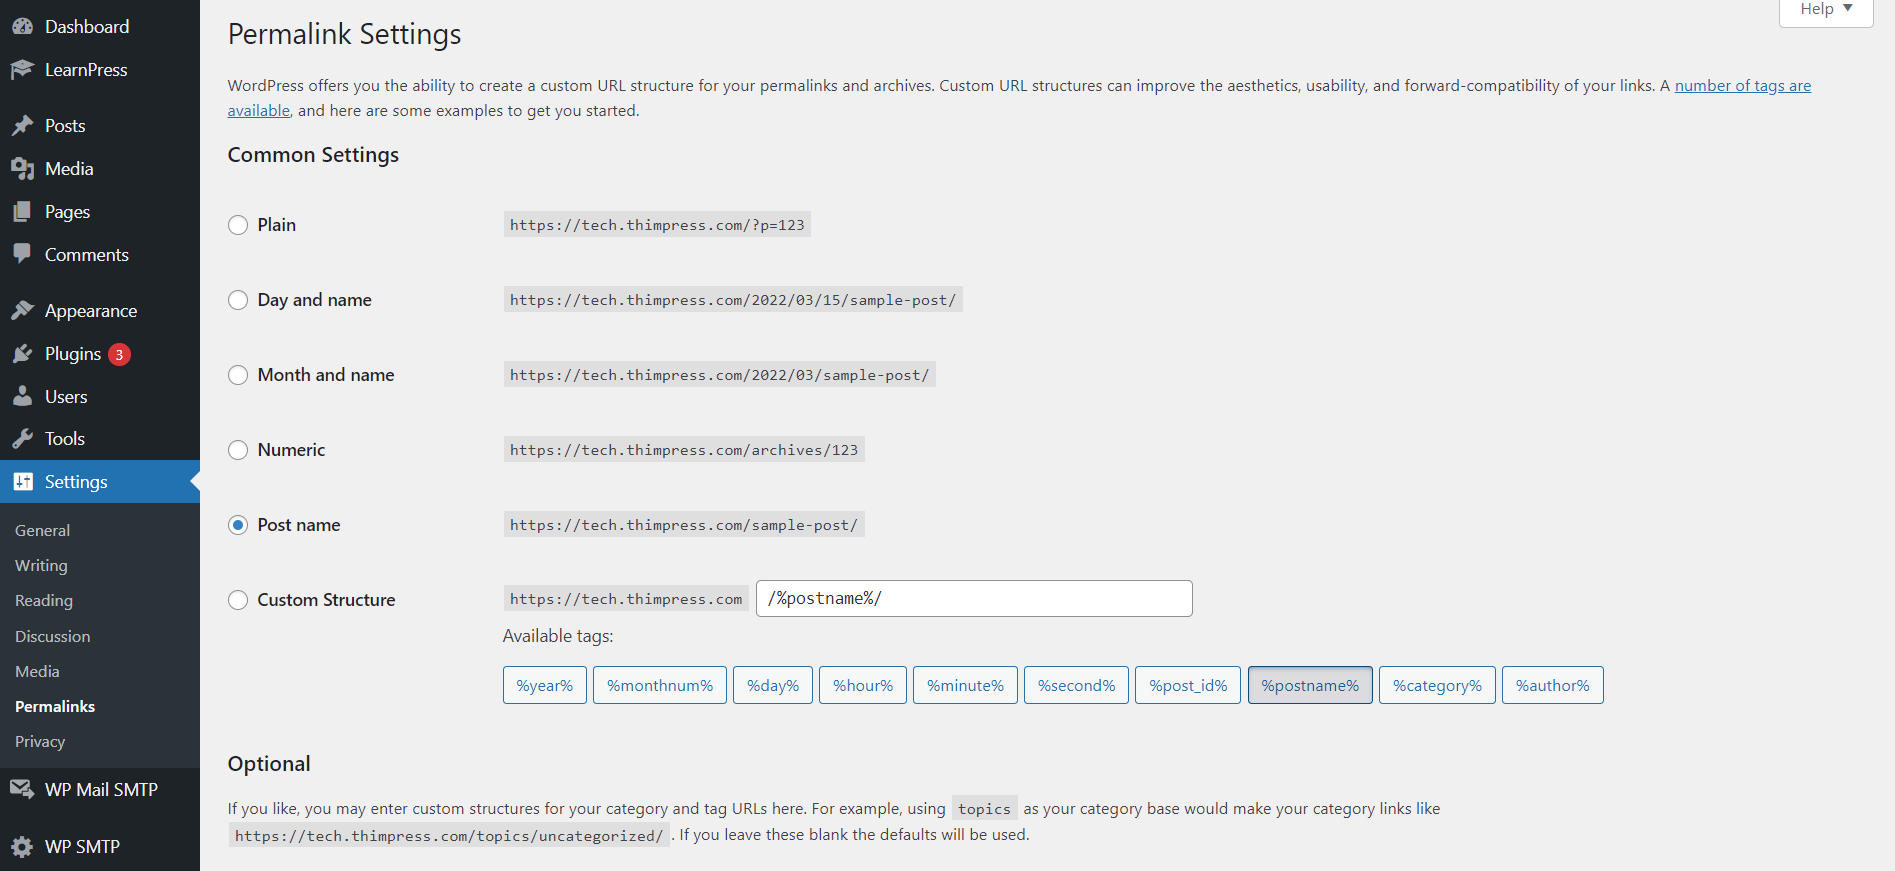
- Day and name – Have full publishing date and post name.
- Month and name – Have month and year alongside the post name.
- Numeric – Use the post ID written in numbers.
- Post name – shows the post slug in the URL.
- Custom structure – allows you to customize what goes into your site URL with available tags, such as author/category.
In this list, the Post name stands as the most recommended URL design. Otherwise, you can go for any option you want. Resetting your WordPress permalinks will lead your audience from the old site to the new URL address.
Search and Replace Command
On the other hand, you can use the search and replace command to Change WordPress Domain Name. To be more specific, the process is irreversible, so be careful when replacing the value. If you are not confident in coding, use a plugin to alternate. Install the WordPress change domain plugin and follow these steps:
- In the WordPress dashboard, you will go to Tools -> Better Search Place.
- Add the wanted text line and then the replacement.
- Choose the wanted database table.
- Preview changes by clicking “Run as dry run?”.
- Run Search/Replace.
Redirect the Old WordPress Domain Forever
The next step to Change WordPress Domain Name is to make a 301 redirect. 301 redirect is a command to redirect the audience from the old URL to the new URL. In addition, it will bring along all page ranking values and SEO efforts to the new one.
You should keep the old domain active for a short time. Therefore, your audience won’t realize the domain change and will announce to search engines about the URL change.
To redirect, you will first get to the file hPanel. Then, you will go to File Manager, choose the old URL, and choose “Go To File Manager”. Look for the file .htaccess in the directory public_html.
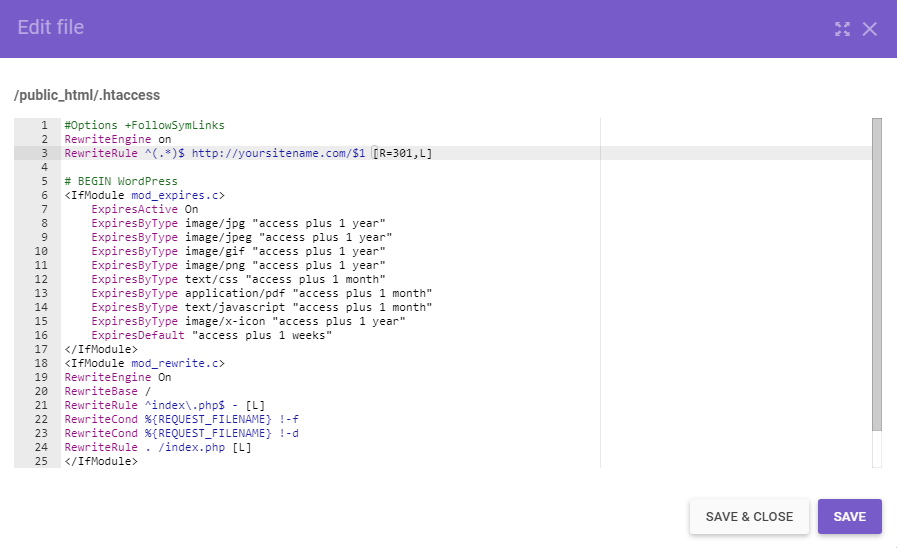
Next, you will right-click and select the ‘Edit” button. Lastly, it’s time to alternate the old domain name with the new URL address. Remember to add this code:
<!-- wp:paragraph -->
<p>#Options +FollowSymLinks</p>
<!-- /wp:paragraph -->
<!-- wp:paragraph -->
<p>RewriteEngine on</p>
<!-- /wp:paragraph -->
<!-- wp:paragraph -->
<p>RewriteRule ^(.*)$ http://yoursitename.com/$1 [R=301,L]</p>
<!-- /wp:paragraph -->
<!-- wp:paragraph -->
<p>Choose “Save & Close” to finish. Of course, you can do the same thing on an FTP client.</p>
<!-- /wp:paragraph -->WordPress Change Domain: Conclusion
Indeed, you may change your site’s domain name due to many causes. Fortunately, WordPress provides built-in domain-setting options. With those options, you can manually take up some PHP work or apply an FTP client to do the domain things.
To solve the question “How to Change URL in WordPress”, you must follow many steps to make it correctly. No matter which way you go, you should practice to get better SEO rankings.
Don’t forget to try Eduma, the WordPress theme that will transform your online learning experience. With its powerful features and intuitive design, Eduma is the perfect platform for creating an engaging and effective online learning environment.
Read more:
Uncover The 5 Best Online Course Themes for LearnPress
How to Create a Lesson with LearnPress Plugin.
Uncover The 5 Best Online Course Themes for LearnPress
Contact US | ThimPress:
Website: https://thimpress.com/
Fanpage: https://www.facebook.com/ThimPress
YouTube: https://www.youtube.com/c/ThimPressDesign
Twitter (X): https://x.com/thimpress_com


