You want to change something on your site. Maybe it’s the header color, maybe it’s the spacing under your logo, maybe it’s a font that just does not match your brand. Whatever it is, you have landed on the same question every WordPress user eventually asks: how to edit WordPress themes without turning a five-minute fix into a broken homepage.
The good news is that WordPress gives you several ways to make changes, and most of them do not require touching a single line of code. The bad news is that picking the wrong method, like editing your parent theme’s files directly, is the single most common reason people lose hours of custom work after an update.
This guide walks through every real option: the Customizer, the block-based Site Editor, child themes, and custom code, so you know exactly which one fits your situation.
Eduma – Education WordPress Theme
We provide an amazing WordPress theme with fast and responsive designs. Let’s find out!
What it means to edit a WordPress theme
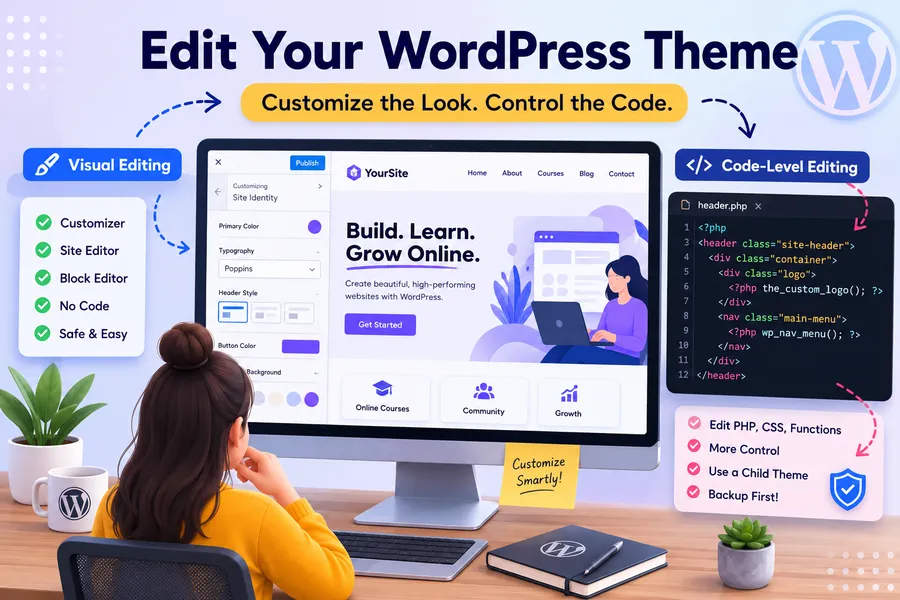
Editing a WordPress theme means changing how your site looks or behaves by adjusting the template files, styles, or settings that a theme controls. That can be as small as changing a button color in the Customizer or as involved as rewriting a template file in a child theme.
There are two very different categories of theme editing, and mixing them up is where most beginners get into trouble.
Visual editing through the dashboard
This covers anything you do inside the WordPress admin: the Customizer, the Site Editor, or the block editor’s style panel. No code, no file uploads, and WordPress handles the saving for you. This is where almost every site owner should start.
Code-level editing
This covers changes to PHP template files, CSS stylesheets, or functions.php. It gives you far more control, but it also means you are responsible for backups, syntax errors, and compatibility when the theme updates. Code-level editing belongs in a child theme, never in the original theme files, and I will explain exactly why in a few sections.
Editor for WordPress themes: which tool should you use
The right editor for WordPress themes depends on which type of theme you are running and how deep the change needs to go. WordPress currently supports two theme architectures, and they use different editing tools.
Classic themes use the Customizer
If your theme was built before full-site editing became standard (think Eduma or other classic WordPress themes), your main visual editing tool is the Customizer. You will find it under Appearance > Customize. It opens a live preview on the right and a settings panel on the left, so every change you make shows up instantly before you publish it.
Block themes use the Site Editor
If your theme is a block theme, such as Twenty Twenty-Four, you will edit it through Appearance > Editor. This is WordPress’s native visual builder, and it lets you edit templates, template parts (like the header and footer), and global styles directly on the canvas, without opening the Customizer at all.
Page builders as a third option
Some site owners install Elementor, Divi, or Beaver Builder on top of either theme type. These tools add their own front-end editor and largely bypass the theme’s built-in styling system. They are powerful for building custom page layouts, but they add extra JavaScript and CSS that can affect your page speed scores if you are not careful with how many modules and animations you stack on a single page.
Code editors, for advanced changes
For changes that go beyond styling, custom template logic or new functions, you will eventually work with a proper code editor like VS Code, plus either the Theme File Editor under Appearance > Theme File Editor or, better, SFTP access to your host. I will get into why SFTP is the safer route later in this guide.
How to use WordPress themes before you start editing
Before you touch anything, it helps to understand how to use WordPress themes the way they are meant to be used, because most editing mistakes come from skipping this step.
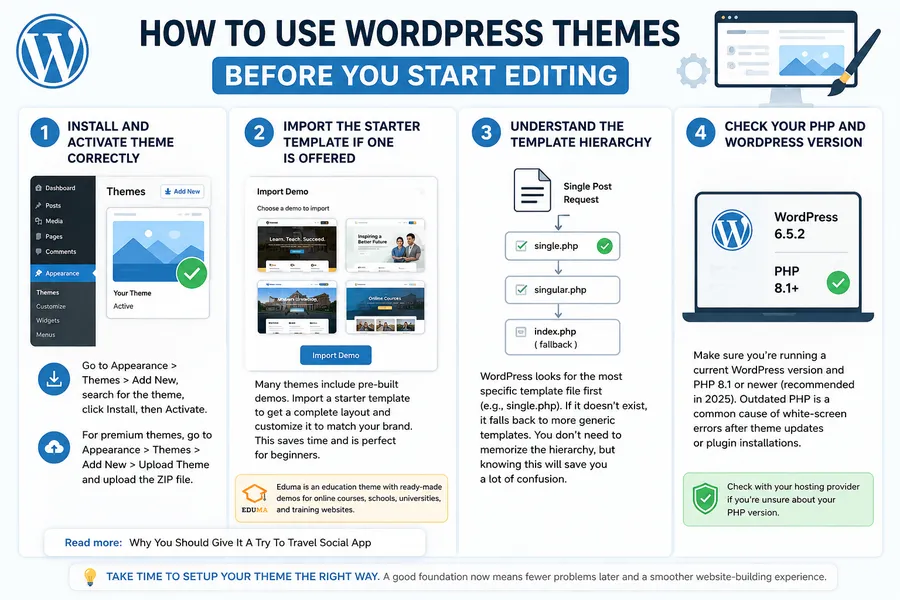
Install and activate the theme correctly
Go to Appearance > Themes > Add New, search for the theme, and click Install, then Activate. If you are using a premium theme, you will usually upload it as a ZIP file through Appearance > Themes > Add New > Upload Theme instead.
Import the starter template if one is offered
Many modern WordPress themes include starter websites or pre-built demos that give you a complete layout to customize instead of starting from a blank canvas. Importing one can save considerable time when building a website, especially if you are not comfortable designing every section yourself.
For example, Eduma is designed specifically for education websites and includes ready-made layouts that can give you a strong starting point for an online course, school, university, or training website. Instead of building the entire structure from scratch, you can import a suitable demo and then customize its colors, typography, pages, headers, and other elements to match your brand.
This approach is particularly useful for beginners because you can focus on editing existing content and layouts rather than figuring out how to build every section yourself.
Understand the template hierarchy
WordPress decides which template file to use for a given page based on a set of rules called the template hierarchy. A single blog post, for example, looks for single.php before falling back to a more generic template. You do not need to memorize the whole hierarchy to edit visually, but knowing that WordPress checks for specific, named templates before falling back to generic ones will save you a lot of confusion once you start working with the Site Editor or child theme files.
Check your PHP and WordPress version
Before editing anything, confirm you are running a current WordPress version and a PHP version your host recommends, usually PHP 8.1 or newer as of 2025. Older PHP versions are a common cause of white-screen errors when a theme update or a new plugin runs code that the server cannot interpret.
How to edit a theme in WordPress step by step
Here is the practical walkthrough for how to edit a theme in WordPress using the dashboard tools, starting with the safest options first.
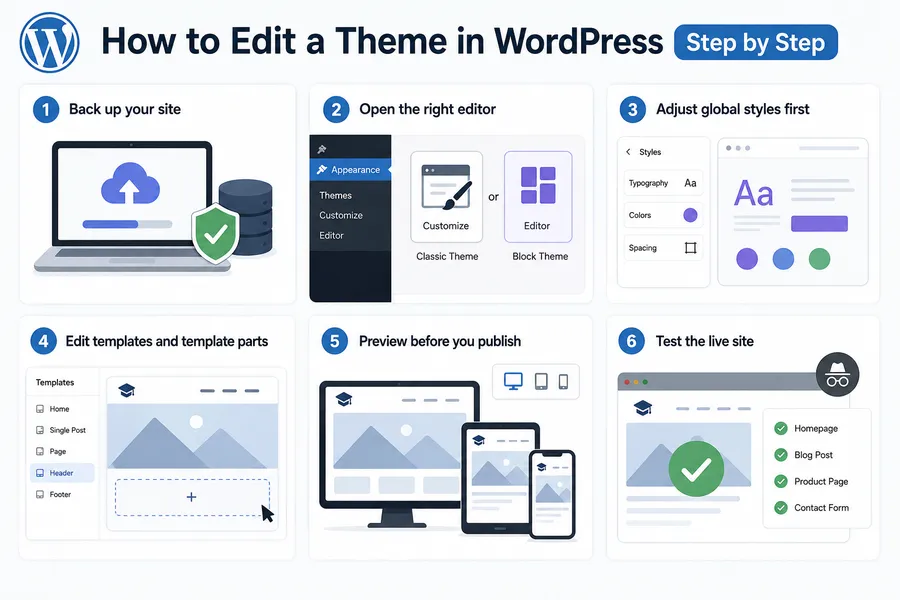
Step 1: Back up your site
Before any editing session, take a full backup, files and database, using a plugin like UpdraftPlus or your host’s built-in backup tool. This single habit is what separates a five-minute rollback from a support ticket that takes all afternoon.
Step 2: Open the right editor for your theme type
Go to Appearance and look at what options WordPress shows you. If you see “Customize,” you are working with a classic theme. If you see “Editor,” you are working with a block theme. Some hybrid themes show both, in which case start with the Editor since it controls the newer, more flexible parts of the design.
Step 3: Adjust global styles first
In the Site Editor, click Styles in the top toolbar. This panel controls your site-wide fonts, colors, and spacing. Changing values here updates every page that inherits the default style, which is usually more efficient than editing individual blocks one at a time. In the Customizer, the equivalent is usually found under a section labeled Colors, Typography, or Global Styles, depending on the theme.
Step 4: Edit individual templates and template parts
If you need to change something specific, like the layout of your header, go to Appearance > Editor > Templates (or Template Parts for just the header or footer). Click the template, and you will land on the visual canvas where you can add, remove, or rearrange blocks the same way you edit a normal page.
Step 5: Preview before you publish
Both the Customizer and the Site Editor include a live preview. Check your changes on desktop, tablet, and mobile breakpoints using the device icons in the toolbar before you click Publish or Save.
Step 6: Test the live site
After publishing, open your site in an incognito browser window (so cached files do not hide problems) and click through your main pages: homepage, a blog post, a product page if you run WooCommerce, and your contact form. This catches layout breaks that only show up outside the editor’s preview frame.
How to modify WordPress theme safely with a child theme
Once you need changes that go beyond what the Customizer or Site Editor offers, custom CSS, a modified template file, or new PHP functions, the answer for how to modify WordPress theme without losing your work is a child theme.
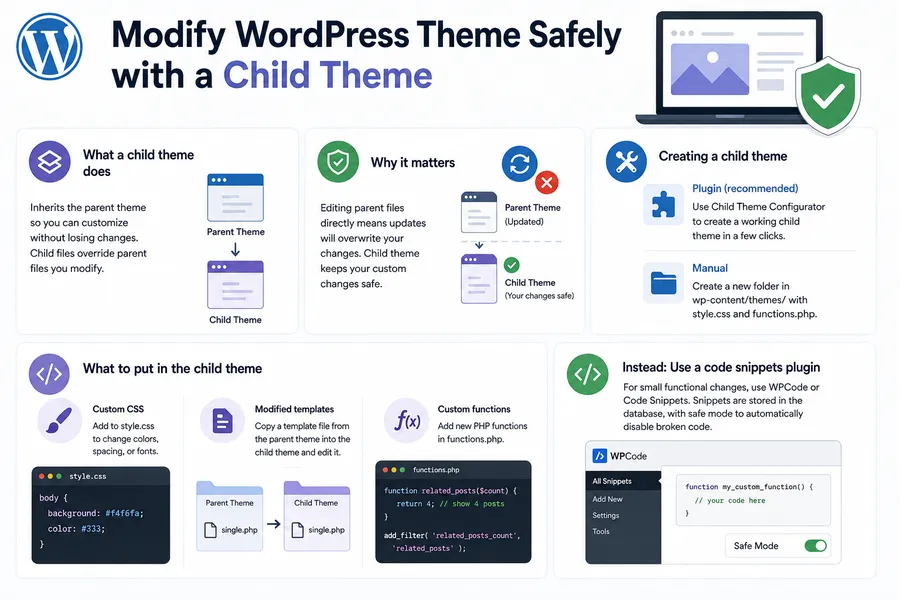
What a child theme actually does
A child theme is a theme that inherits the functionality and styling of its parent theme, letting you make customizations without losing them when the parent theme updates. Any file you place in the child theme overrides the matching file in the parent, while anything you do not touch continues to use the parent’s original code.
Why this matters more than most beginners realize
If you edit the parent theme’s files directly and the developer releases an update, WordPress overwrites those files during the update process, and every change you made disappears. A child theme sidesteps this completely because the parent theme’s files are never touched.
Creating a child theme
The fastest, safest route is a plugin like Child Theme Configurator, which generates a working child theme in a few clicks. If you would rather do it manually, you need two files in a new folder inside wp-content/themes/: a style.css file with a comment header pointing to the parent theme via the Template field, and a functions.php file that enqueues the parent’s stylesheet. Once both files exist, the child theme appears in Appearance > Themes ready to activate.
What to put in the child theme
Once your child theme is set up, you can use it to safely manage several types of WordPress theme customizations, including:
- Custom CSS: Add it to the child theme’s style.css to change colors, spacing, or fonts beyond what the Customizer exposes.
- Modified templates: Copy the specific file you want to change, for example single.php, from the parent theme into the same relative path in the child theme, then edit the copy.
- Custom functions: Add new PHP functions to the child theme’s functions.php, such as a snippet that changes the number of related posts shown at the bottom of an article.
A note on using a code snippets plugin instead
For small functional changes, a plugin like WPCode or Code Snippets lets you add PHP functions without creating a child theme at all. This is often the lower-risk option for a single tweak because the snippet is stored in the database rather than a file, and the plugin usually includes a safe mode that disables broken snippets automatically if one causes an error.
Editing theme files directly (and why you should think twice)
WordPress includes a built-in Theme File Editor under Appearance > Theme File Editor that lets you edit PHP and CSS files straight from the dashboard. It works, but there are real risks worth understanding before you use it.
The update problem
As covered above, direct edits to a parent theme vanish on the next update. If you are editing the parent theme through this screen, you are setting yourself up to redo the work later, possibly without remembering exactly what you changed.
The white-screen problem
A single missing semicolon or unclosed bracket in a PHP file can trigger a fatal error the moment you save, and on some hosting setups that error can lock you out of the dashboard entirely. Many hosts now disable the Theme File Editor by default for exactly this reason.
The safer alternative: SFTP
If you do need to edit theme files directly, connect to your server with an SFTP client like FileZilla instead of using the in-dashboard editor. Editing through SFTP means a broken file does not lock you out of wp-admin, since you can immediately reconnect and revert the file from your local backup. Always edit a copy in a child theme, never the parent theme’s original files, and always save a working copy of the file before you start.
When direct file editing makes sense
Direct editing is reasonable for very specific, well-understood changes: adjusting a single CSS value in a child theme’s stylesheet, adding a tracking snippet to functions.php, or fixing a translation string. It is not the right tool for large structural changes, which are safer to build visually inside the Site Editor where WordPress validates the markup for you.
Editing WordPress themes without hurting page speed
Every change you make to a theme has a cost somewhere, whether that is extra CSS, an additional font file, or a new plugin dependency. Keeping performance in mind while you edit saves you a separate cleanup project later.
Watch your font choices
Adding a new Google Font through the Customizer or a typography plugin pulls in an extra external request unless the theme loads it locally. After swapping a client site from a Google-hosted font to a locally hosted version using the OMGF plugin, the Time to First Byte on that page dropped noticeably because the browser no longer had to make a separate round trip to Google’s font servers before rendering text.
Be selective with page builder animations
Fade-ins, parallax sections, and scroll-triggered effects all look appealing in a demo, but each one usually loads its own JavaScript. On a shared hosting plan, stacking several of these on one landing page is a common reason Core Web Vitals scores drop after a redesign. If you are using Elementor or Divi, check the page’s PageSpeed Insights report after adding any animation-heavy section, not just at the end of the project.
Test after every meaningful change
Rather than making a dozen edits and testing once, check your Largest Contentful Paint (LCP) and Cumulative Layout Shift (CLS) scores in PageSpeed Insights after each significant change, especially anything touching images, fonts, or above-the-fold layout. Catching a regression right after you introduce it is far faster than tracing it back through a long editing session.
Keep an eye on plugin overlap
It is common to end up with two plugins doing the same job, for example a theme’s built-in lazy loading feature running alongside a caching plugin’s lazy loading module. This does not usually break anything visually, but it can add unnecessary processing overhead. Check your theme’s performance settings, usually under Appearance > Customize > Performance or a similar panel, before assuming you need a dedicated plugin for a feature the theme already handles.
Useful plugins for editing WordPress themes
While the Customizer and Site Editor cover most needs, a few plugins consistently make theme editing safer and faster.
- Child Theme Configurator: Generates a working child theme in a few clicks and can copy over existing Customizer settings, which saves the step of manually rebuilding a style.css header.
- WPCode: Lets you add PHP snippets, like a custom function or a tracking script, without touching functions.php directly, and includes an automatic safe mode that disables a snippet if it throws a fatal error.
- Advanced Editor Tools: Extends the block editor with additional formatting controls, useful when a theme’s default typography options feel limited inside the Customizer.
- Query Monitor: A developer-focused plugin that shows exactly which template file, hook, or query is responsible for a given part of the page, which speeds up debugging once you start editing template files directly.
Common mistakes to avoid when edit WordPress themes
Knowing how to edit WordPress themes safely also means understanding the common mistakes that can cause layout problems, lost customizations, or performance issues. Avoid these mistakes before making changes:
- Skipping the backup: Even a two-line CSS change can interact badly with a plugin you forgot was active. Back up first, every time.
- Editing the parent theme instead of a child theme: This is the single most common reason people lose custom work after an automatic update.
- Testing only in the editor preview: The Customizer and Site Editor previews do not always reflect caching, minification, or mobile menu behavior exactly as visitors experience them. Always check the live, cached version of the page.
- Ignoring version differences: WordPress menu labels and editing options can change between releases and themes. If your dashboard looks different from the steps in this guide, check your theme’s documentation and the current WordPress interface before making changes.
- Stacking too many page builder modules on one page: Each added module usually means more render-blocking JavaScript, which can push your Largest Contentful Paint (LCP) past the 2.5-second threshold Google treats as a good user experience.
Conclusion
Editing a WordPress theme does not have to mean digging through PHP files and hoping nothing breaks. Start with the Customizer or Site Editor for anything visual, since both tools save your changes without touching the underlying template files. Reach for a child theme the moment you need custom CSS, a modified template, or new PHP functionality, so your work survives the theme’s next update. And if you ever do need to edit files directly, do it through SFTP with a backup in hand rather than the in-dashboard file editor. Follow that order and you can make almost any change your site needs without the risk that usually comes with it.
FAQs about how to edit WordPress themes
Can I edit a WordPress theme without knowing how to code?
Yes. The Customizer and the block-based Site Editor let you change colors, fonts, spacing, and layout entirely through visual controls, no PHP or CSS required. Coding only becomes necessary for changes those tools do not expose, like custom template logic.
Will editing my theme break my site?
It can, especially if you edit the parent theme’s files directly or skip testing after a change. The risk drops significantly if you use a child theme for code changes and always back up before editing, since a broken change can then be reverted in minutes.
Do I need a child theme just to change colors and fonts?
No. Colors, fonts, and spacing set through the Customizer or the Site Editor’s Styles panel are saved separately from the theme’s core files and survive updates on their own. A child theme becomes necessary once you are editing CSS files directly or modifying template code.
What is the difference between the Customizer and the Site Editor?
The Customizer is the visual editing tool for classic, non-block WordPress themes, while the Site Editor is the tool for block themes and covers templates, template parts, and global styles on one canvas. Which one you see under the Appearance menu depends entirely on whether your active theme was built as a classic theme or a block theme.
Read more: How to Choose the Best Tutoring Website Template?
Contact US | ThimPress:
Website: https://thimpress.com/
Fanpage: https://www.facebook.com/ThimPress
YouTube: https://www.youtube.com/c/ThimPressDesign
Twitter (X): https://x.com/thimpress_com