The LearnPress WooCommerce integration is truly necessary and popular because it gives you a lot of chances and flexibility for selling your online courses. In addition, WooCommerce provides multiple payment options and it allows to immigrate your profile page between LearnPress and WooCommerce.
With WooCommerce, you can offer multiple payment gateways (credit cards, bank transfers, etc.), create dynamic coupons, and manage your courses as full-fledged products. This guide will walk you through exactly why and how to make the most of this essential integration.
Why Should You Use LearnPress WooCommerce Integration
While you can sell courses with LearnPress alone, the WooCommerce Integration for LearnPress is a must-have for anyone serious about growing their online course business. Here’s why:
- Expand Your Payment Options: Don’t limit your customers to just PayPal. WooCommerce lets you add countless payment gateways like Visa, MasterCard, Stripe, and even local bank transfers, dramatically increasing your conversion rates.
- Boost Sales with Coupons & Discounts: WooCommerce’s robust coupon system lets you create advanced discount codes, run sales campaigns, and offer targeted promotions to attract new students.
- Professional E-commerce Experience: Give your course website the look and feel of a professional online store. You get a dedicated shopping cart, a streamlined checkout page, and clear order management for a better user experience.
- Centralized Management: Manage all your courses, orders, and customer data from one central dashboard. This simplifies inventory tracking and financial reporting.
How to Take Advantage of This Add-on?
We provide our tutorial on How to Use WooCommerce addon and our text guide. If you want to check our text guide, keep reading!
Install and activate
- Open your WordPress Dashboard -> find Plugins -> select Add New
- Click the Upload Plugin button
- Navigate to Choose File button and search for the .zip file you have downloaded after purchasing WooCommerce addon
- Then click Install Now button
- After a few seconds, click Activate Plugin button
Finally, your WooCommerce addon is ready to use and it’s time to setup it.
Settings
When you successfully activate WooCommerce Addon for LearnPress in LearnPress Pro Bundle, you need to make WooCommerce account to enable the WooCommerce payment gateways.
- Hover to LearnPress -> choose Settings
- Find Payments tab and click on it -> select WooCommerce Payment -> tick the box Enable the payment
- Then click the Save settings button to save all changes you have made.

Next, you have to visit WooCommerce section on your sidebar to setup WooCommerce Checkout.
- Navigate to WooCommerce -> select Settings -> then click Checkout tab
- Find Checkout pages section-> select Cart for Cart page and Checkout for Checkout page.
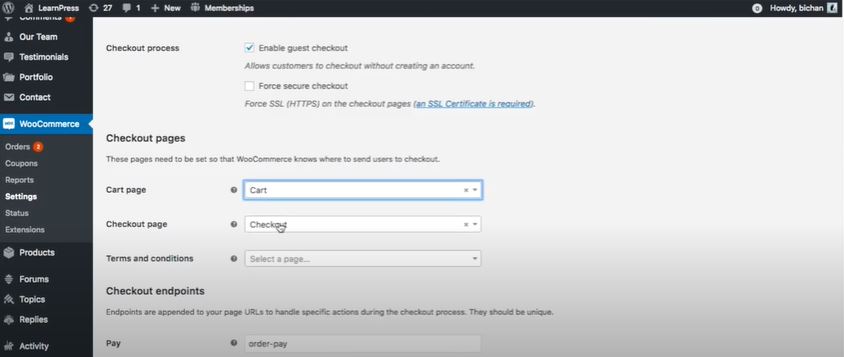
- Scroll down to the Gateway display order to see all gateways available. However, they have not been enabled yet. So simply click each gateway name right there or go up to the Checkout options below Checkout tab.
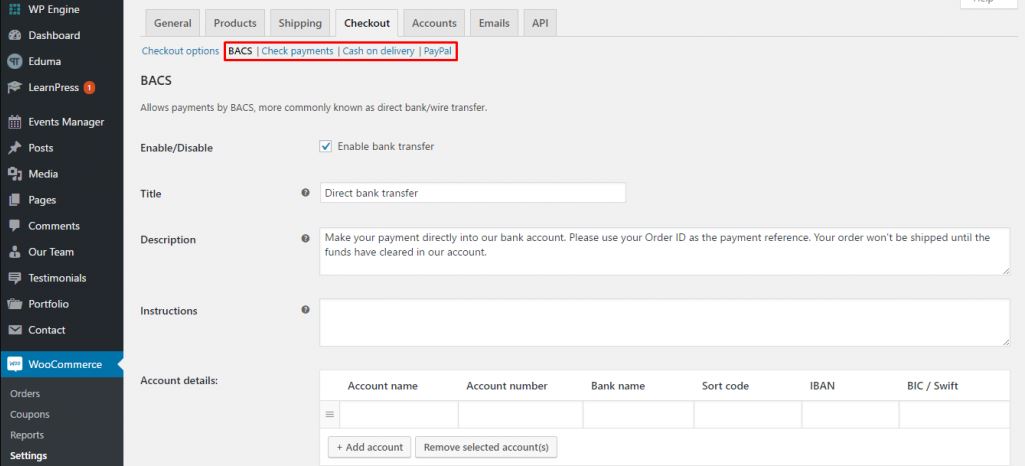
- For example: I’ll choose BACS for bank transfer method-> tick the Enable bank transfer box. If you want to edit the title, descriptiom, and instructions of bank transfer gateway, it’s all possible. Please remember to add your Account details and click Save changes button.
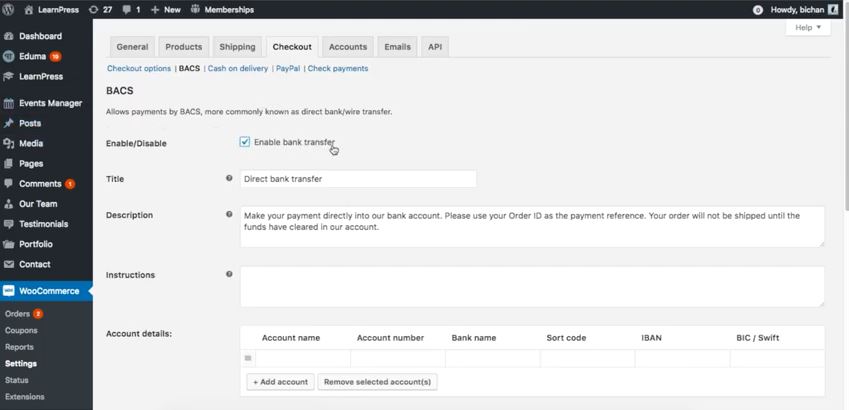
Similarly, you can follow the example to set up PayPal, Cash on delivery, and Check payments then back to the Gateway display order to see your gateway is enabled.
Set up WooCommerce LearnPress Payment the right way
Step 1: Setup Enable Register and Payment Page – Learnpress Woocommerce
Before setting up LearnPress WooCommerce payment gateway, you need to take care some of things below in a correct ways after installing successfully a theme like Eduma.
– LearnPress login and registration error
– LearnPress checkout page error
– Setup PayPal gateway
You can find these setups in The Correct Way to Set Up Payment for LearnPress After Installing a Theme.
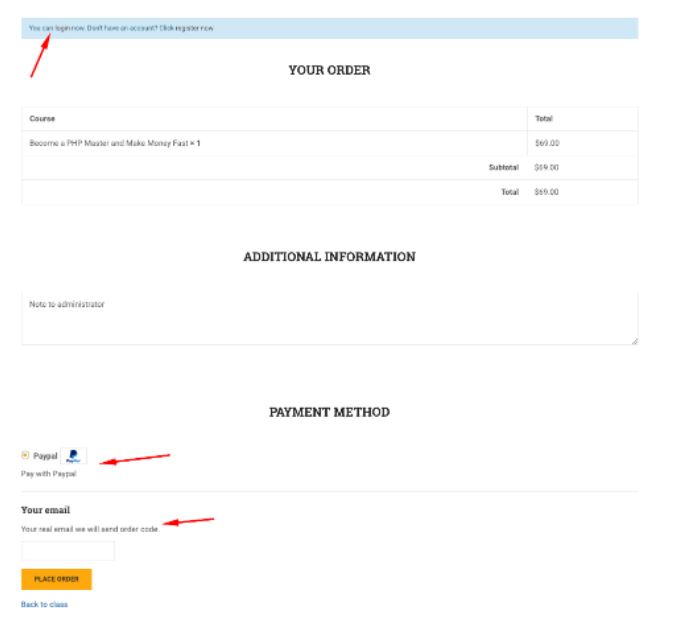
Step 2: Install and update each payment setting – Learnpress Woocommerce Integration
At step 1, you’ll know that PayPal is a default payment gateway of LearnPress and it’s possible to add other payment gateways using WooCommerce Integration. So that your students have multiple choices to choose the payment gateway with different currencies.
Please note that if you use Eduma or other Education WordPress Themes from ThimPress, you can find the LearnPress – WooCommerce Payments on your admin dashboard.
Simple open your WordPress Dashboard -> go to your theme like Eduma, IvyPrep, etc -> select Plugins -> find the Plugins tab and type WooCommerce to search for the plugin-> click the Install Now button and Activate it.
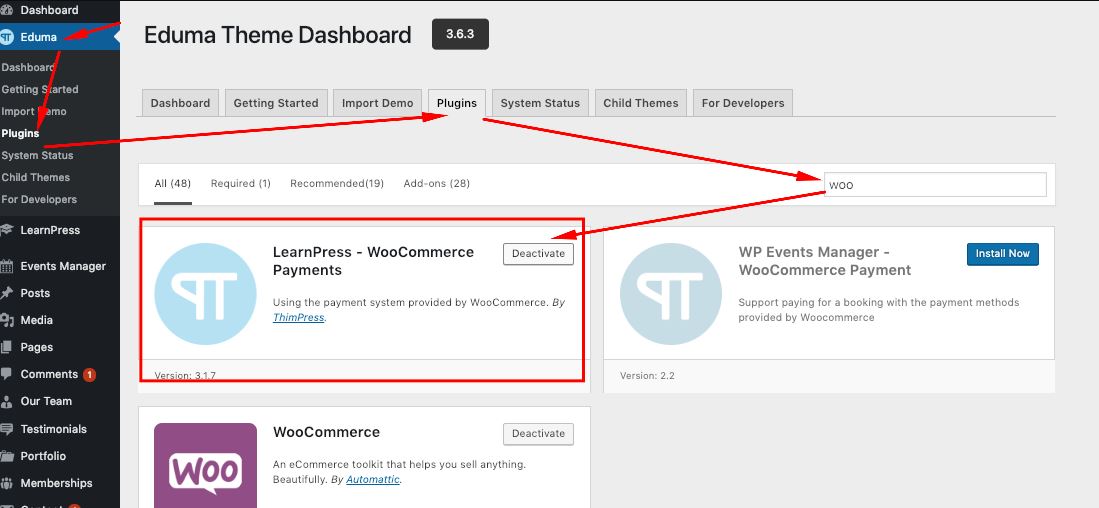
Is it easy if you are using our education theme, right? But if you’re not using our theme, you can still install and activate the WooCommerce addon for LearnPress by purchasing it here.
After having WooCommerce addon, go to LearnPress -> Settings -> Payments -> WooCommerce Payment. Similarly, you can follow How to Use LearnPress WooCommerce Integration guide above to set up the payment like the way you want.

Step 3: Enable Guest Checkout with WooCommerce – Learnpress Woocommerce
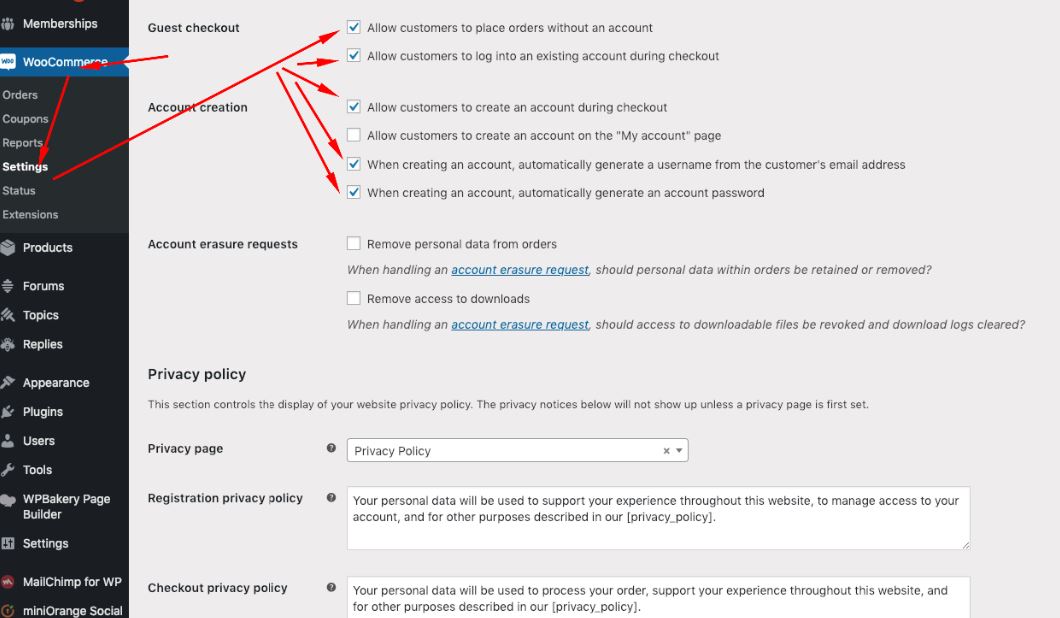
Do you know that you can let your students place orders even if they don’t have an account or log in to an existing account while checkout? All are available with WooCommerce in the Guest checkout section. If you feel this LearnPress WooCommerce functionality is not necessary, you can skip this step.
To turn guest checkout function, navigate to the WooCommerce -> select Settings -> tick on both boxes available there:
- Allow customers to place orders without an account
- Allow customers to log into an existing account during checkout
Below is the Account Creation, please tick 3 in 4 options there:
- Allow customers to create an account during checkout
- When creating an account, automatically generate a username from the customer’s email address
- When creating an account, automatically generate an account password
Extended: Installing other payment gateways with WooCommerce – Learnpress Woocommerce Payment
After installing LearnPress WooCommerce Payment, there are 4 payment gateways:
- Direct bank transfer
- Check payments
- Cash on delivery
- PayPal
So if you want to use a credit card or pay with another currency, you have to look for a payment gateway that works with WooCommerce then you can make LearnPress payments using that gateway.
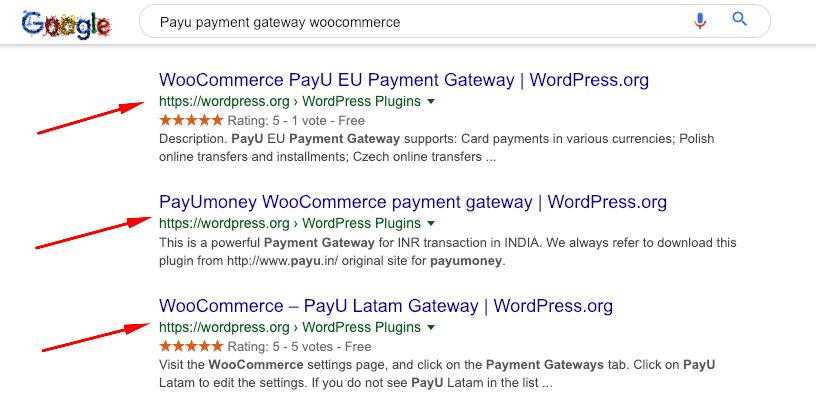
For example, you can type Payu payment gateway WooCommerce on Google and search for it. Then you’ll find many payment gateway plugins that run with WooCommerce. Pick the one you want and download it to have another payment gateway.
Another way to find payment gateway is to use WordPress.org. Simply click on Plugins tab and type payment gateway on the search bar. Then you will see many plugins that integrate with WooCommerce. They’re usually free to download.
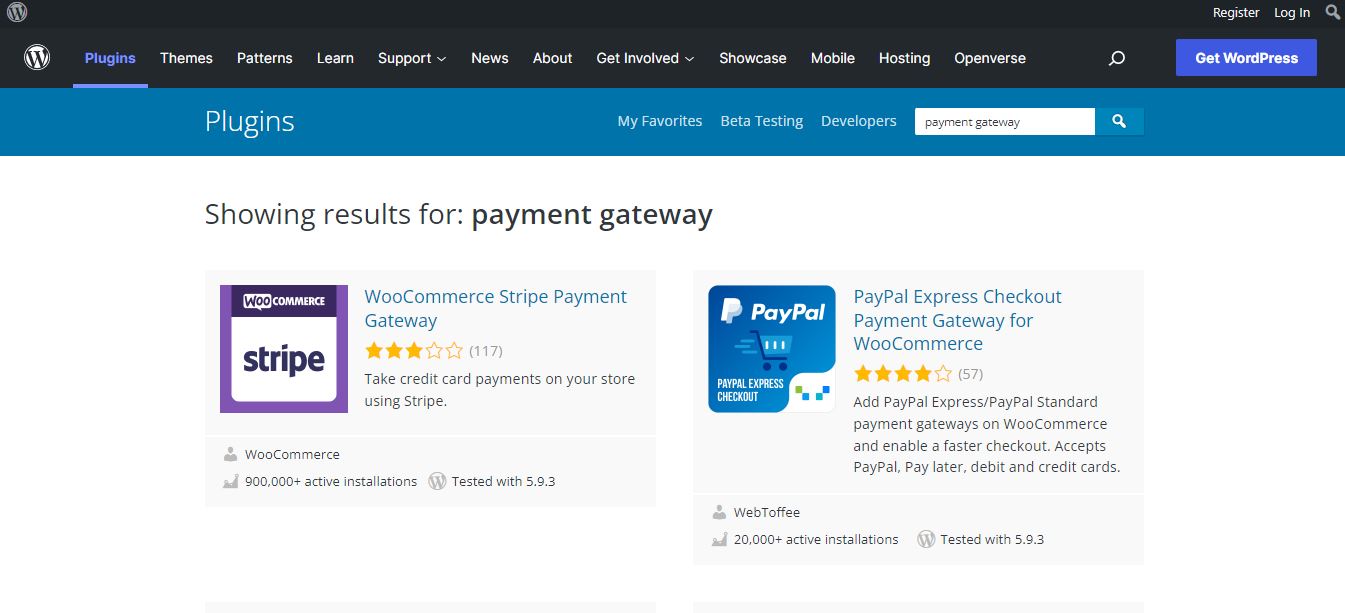
If you look at the screenshot bellow, you can see WooCommerce Stripe Payment Gateway, WooCommerce PayU EU Payment Gateway, Authorize.Net For WooCommerce, etc. Moreover, there are even Cryptocurrency for WooCommerce gateway or Cryptocurrency Checkout – Accept Bitcoin, Ethereum and Nimiq as well.
Extended: Payment without WooCommerce – Learnpress Woocommerce
If you don’t use the WooCommerce payment gateway for LearnPress, you can set other other payment channels like 2Checkout, Stripe, Authorize.net, and offline payment. Kindly go to Payment without WooCommerce to understand more details.
Extended: Using Other Payment Gateways
The core WooCommerce integration gives you four default gateways. To use credit cards or other online payment services, you’ll need to install an additional payment gateway plugin.
You can find these on WordPress.org or directly from the gateway provider’s website (e.g., Stripe, Authorize.Net, PayU). Simply install and activate the plugin, and it will appear in your WooCommerce Payments settings.
Final Thoughts
Integrating LearnPress and WooCommerce is more than just a technical step—it’s a strategic move to professionalize your online course business. By offering a wide range of payment options, you remove a key barrier to purchase and give your students the secure and flexible checkout experience they expect. Take advantage of this powerful combination to boost your sales and grow your educational platform.
FAQs about LearnPress WooCommerce Integration
Is the LearnPress WooCommerce integration a free add-on?
No, the WooCommerce add-on is a premium extension for LearnPress. It’s often included in premium LearnPress themes or bundles.
Do I need a separate hosting plan for this integration?
No, the integration works on any standard WordPress hosting. You just need to ensure your hosting meets the requirements for both LearnPress and WooCommerce.
Can I use WooCommerce for other products, not just courses?
Yes, once WooCommerce is installed, you can sell any type of product—physical, digital, or subscription-based—alongside your LearnPress courses.
Read More: Paid Memberships Pro: Membership Plugin for LearnPress
Contact US | ThimPress:
Website: https://thimpress.com/
Fanpage: https://www.facebook.com/ThimPress
YouTube: https://www.youtube.com/c/ThimPressDesign
Twitter (X): https://x.com/thimpress_com

