For any successful online education platform, a smooth and secure payment process is essential. If you are using the powerful Eduma education WordPress theme, you are already equipped with LearnPress, a robust Learning Management System (LMS).
To further enhance your students’ payment experience, integrating a reliable gateway like Stripe is a smart choice. The great news for Eduma users is that the Stripe Add-on for LearnPress is included for free with your theme purchase.
This guide will walk you through the simple process to use Stripe in Eduma, from installation to final configuration, ensuring you can start accepting payments securely and efficiently.
Eduma – Education WordPress Theme
We provide an amazing WordPress theme with fast and responsive designs. Let’s find out!
Prerequisites
Before you begin, please ensure you have the following:
- Your website is running on the Eduma WordPress theme.
- You have an active Stripe account. If you don’t have one, you can create it on the official Stripe website.
How to Use Stripe in Eduma: A Step-by-Step Guide
Step 1: Install and Activate the Stripe Add-on
Unlike typical plugins that require a separate file download, Eduma simplifies the process. The Stripe add-on is already included with the theme, waiting to be installed.
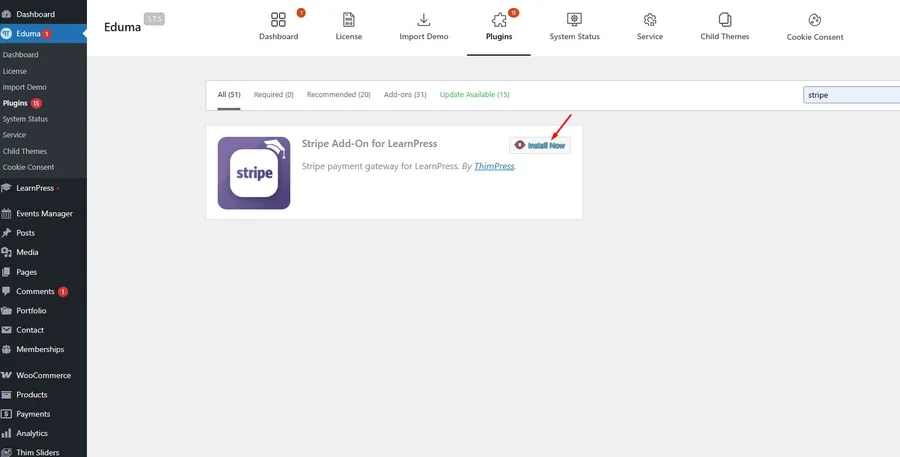
- From your WordPress dashboard, navigate to Eduma > Plugins.
- In the plugin search bar, type “Stripe”.
- The Stripe Add-on for LearnPress will appear. Click the Install Now button.
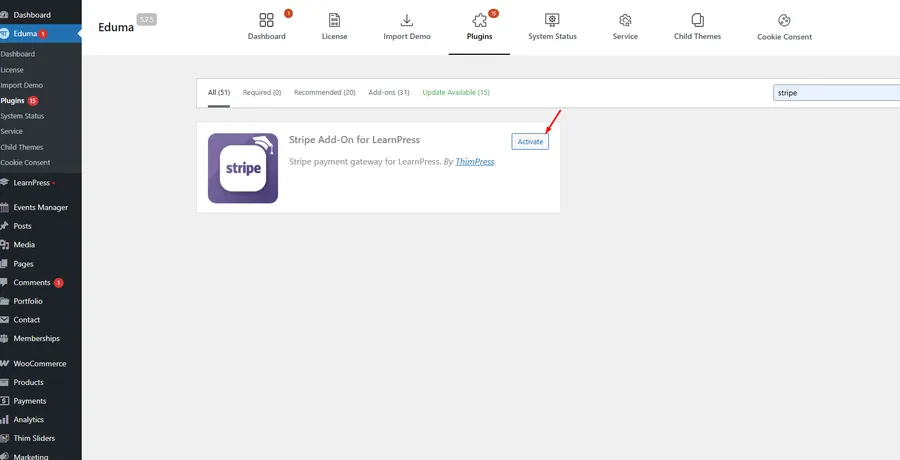
- After the installation is complete, the button will change to Activate. Click it.
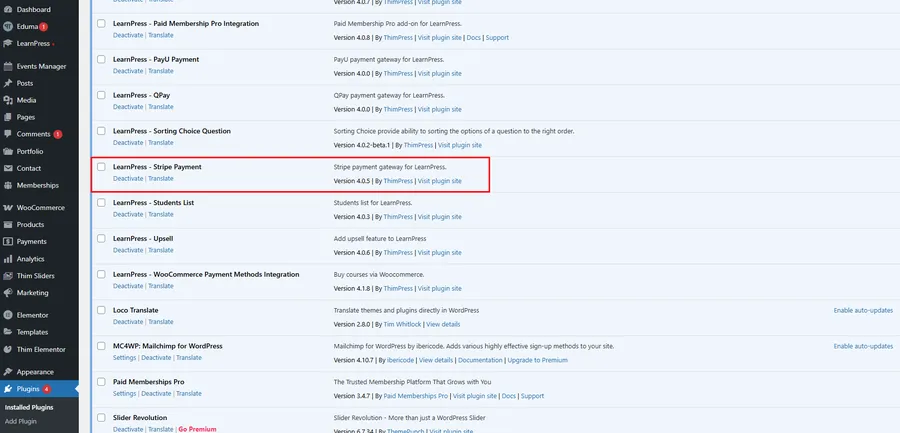
Once activated, the “LearnPress – Stripe Payment” plugin will appear in your main Plugins list, confirming that it is ready for configuration.
Step 2: Enable the Stripe Payment Gateway
Now that the add-on is active, you need to enable it as a payment option within LearnPress.
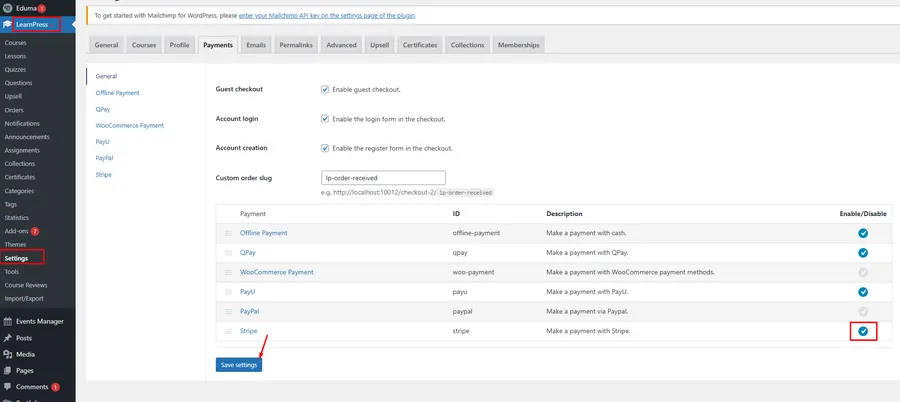
- In your WordPress dashboard, go to LearnPress > Settings.
- Click on the Payments tab.
- You will see a list of available payment methods. Find Stripe and tick the checkbox in the Enable/Disable column to enable it.
- Click Save settings.
Step 3: Configure Your Stripe Account Details
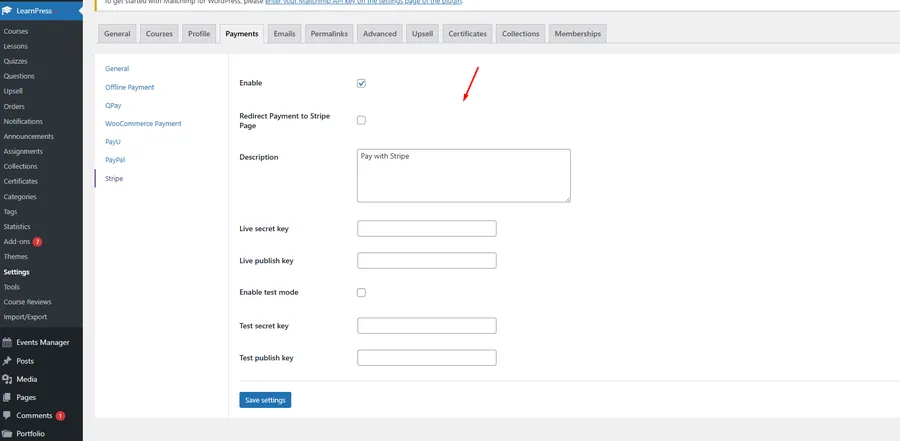
The final step is to connect your Stripe account with your website by adding your unique API keys.
- While still in the LearnPress > Settings > Payments menu, click on the Stripe sub-tab at the top.
- Here, you will find the fields to configure the gateway:
- Enable: Ensure this box is checked.
- Live secret key: Your secret API key for live transactions.
- Live publish key: Your publishable API key for live transactions.
- Enable test mode: Check this box if you want to test the payment process without using real credit cards.
- Test secret key: Your secret API key for testing.
- Test publish key: Your publishable API key for testing.
- To get your API keys, you must log in to your Stripe account. For detailed instructions, you can follow the official guide here: Stripe Docs: Manage API Keys.
- After pasting your keys into the respective fields, click the Save settings button.
The Result: A Seamless Checkout Experience
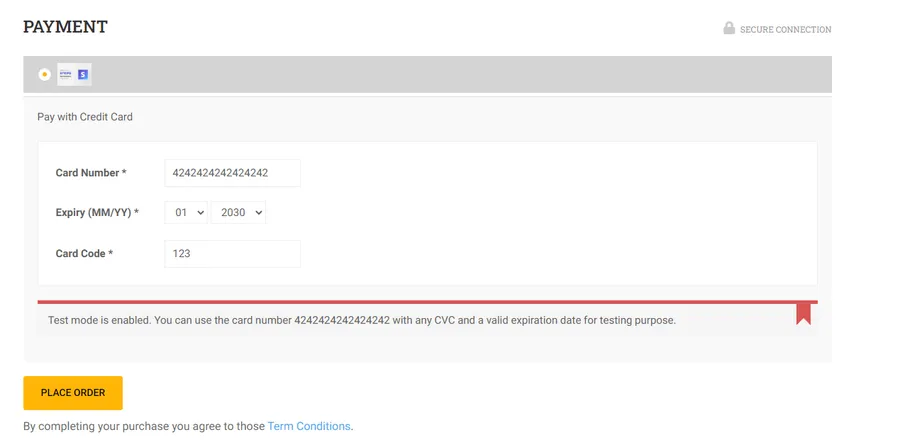
After completing these steps, the Stripe payment option will now be available on your course checkout page. When “Test mode” is enabled, Stripe provides a notice and a test card number for you to use. Students can easily enter their credit card information directly on your site for a fast and secure transaction.
Frequently Asked Questions (FAQs)
Q1: Do I need to purchase the Stripe for LearnPress add-on separately?
No. If you are using the Eduma theme, the Stripe Add-on for LearnPress is included for free and can be installed directly from the Eduma dashboard.
Q2: What is "Test Mode" used for?
Test Mode allows you to run test transactions using special test card numbers provided by Stripe. This ensures your payment process is working correctly before you start accepting real money from customers.
Q3: Where do I find my Stripe API keys?
You can find your API keys by logging into your Stripe account and navigating to the Developers > API keys section of your dashboard.
Q4: Can I use other payment gateways with Eduma and LearnPress?
Yes. LearnPress supports several payment gateways, including PayPal, WooCommerce Payment, and Offline Payment, which can be enabled alongside Stripe in the LearnPress > Settings > Payments menu.
Conclusion
Integrating a trusted payment gateway is fundamental to the success of your online education platform. By following this guide, you can easily use Stripe in Eduma to offer a secure and professional checkout experience. The seamless integration provided by Eduma and LearnPress removes technical barriers, allowing you to focus on creating and selling high-quality courses. Once tested and configured, the Stripe gateway will reliably handle your transactions, helping you grow your eLearning business.
Read more: How To Use Elementor For Eduma: A Step-by-Step Guide
Contact US | ThimPress:
Website: https://thimpress.com/
Fanpage: https://www.facebook.com/ThimPress
YouTube: https://www.youtube.com/c/ThimPressDesign
Twitter (X): https://x.com/thimpress_com


