Starting an online business usually comes down to one decision that shapes everything else: how you approach ecom web development. Pick the wrong path and you end up stuck with a slow, clunky store that scares off buyers. Pick the right one and you get a shop that loads fast, ranks in search, and actually sells.
This guide walks through the whole process, from choosing a platform to launching your first product page, using the same steps a working WordPress developer follows when building a store for a client.
Eduma – Education WordPress Theme
We provide an amazing WordPress theme with fast and responsive designs. Let’s find out!
What is ecom web development?
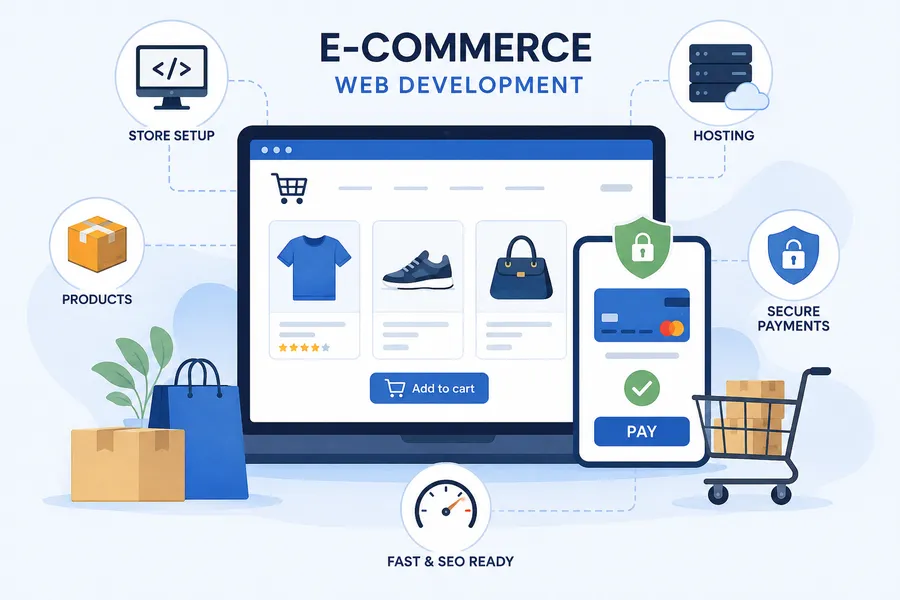
Ecom web development is the process of designing, building, and configuring the technical foundation of an online store: the platform, the hosting, the product catalog, the payment system, and the front-end pages a shopper interacts with. It covers everything between “I want to sell online” and a live, working checkout page.
It’s not just design work. A developer building an eCommerce online shop has to think about database structure for products and variations, payment gateway security (PCI compliance), page speed under real traffic, and how search engines crawl category and product pages. Get any one of those wrong and the store either breaks under load or never shows up in search results in the first place.
Two platforms dominate this space right now. According to HTTP Archive’s Tech Report data from the May 2026 crawl, WooCommerce is detected on 6.64% of all measurable web origins, with Shopify close behind at 4.76%, making them the two largest eCommerce platforms by a wide margin. Both are covered below, along with a few smaller alternatives worth knowing about.
Most people who search for ecom web development already have a rough idea of what they’re selling. What trips them up is everything underneath that: which files live on which server, how product data connects to the checkout page, and why a site that looks fine on a laptop suddenly breaks on a phone. None of that is complicated once you’ve done it once, but the first time through, it helps to have the whole sequence laid out instead of piecing it together from scattered tutorials.
Physical products versus digital products
The setup differs depending on what you’re selling. A store shipping physical goods needs shipping zones, package weights, and stock tracking configured before the first order comes in. A store selling digital downloads (ebooks, templates, software licenses) skips shipping entirely but needs secure file delivery, so buyers get a download link only after payment clears, not before. WooCommerce handles both natively, and a lot of stores end up running a mix of the two, physical products alongside a downloadable warranty guide or a digital add-on.
Choosing a web builder for eCommerce
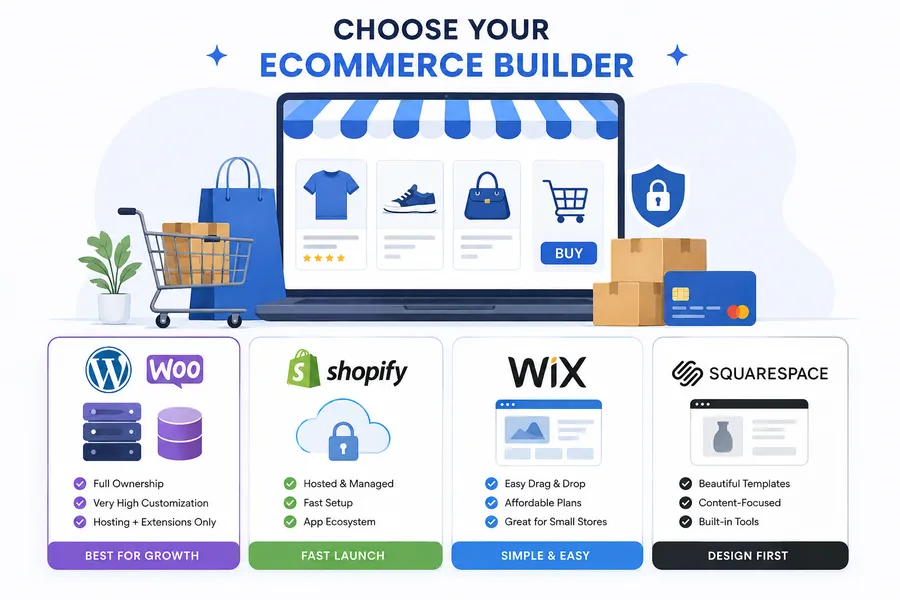
Before touching any code or settings, decide which web builder for eCommerce actually fits your business. This choice determines your monthly costs, how much control you have over design, and how much you’ll rely on developers down the line.
WordPress and WooCommerce
WordPress paired with the WooCommerce plugin is the most common route for store owners who want full ownership of their site. You install WordPress on your own hosting, add WooCommerce, and you own the database, the code, and the content outright. There’s no monthly platform fee for the core software itself, though you’ll still pay for hosting, a domain, and any premium themes or extensions.
The tradeoff is setup time. WooCommerce gives you more decisions to make: which host, which theme, which payment gateway, which caching plugin. After activating WooCommerce on a fresh WordPress install, the setup wizard walks you through store location, currency, shipping zones, and payment methods in about 15 minutes, but the real configuration work (tax rules, product attributes, shipping classes) happens afterward in the WooCommerce settings tabs.
WordPress runs a large share of the web to begin with. WordPress powers approximately 43% of all websites globally, which gives WooCommerce a natural advantage: existing WordPress sites can add eCommerce functionality without a full platform migration. If you already run a WordPress blog or business site, adding WooCommerce is usually less disruptive than starting over on a closed platform.
The other advantage worth naming is the plugin ecosystem. Once WooCommerce is running, you can add a review plugin, a subscription add-on, a wholesale pricing tier, or a booking system without touching a line of code, because someone else has already built and maintained that plugin. That’s the tradeoff store owners make: a bit more setup work upfront in exchange for not being locked into whatever features the platform vendor decides to ship.
Shopify
Shopify is a hosted, closed-platform builder. You pay a monthly subscription and Shopify handles hosting, security patches, and uptime. It’s a faster path to a working e commerce shop if you don’t want to manage a server or plugin updates yourself, but you’re renting your storefront rather than owning it, and switching platforms later means rebuilding product data and theme customizations from scratch.
Shopify’s app store fills the same role WooCommerce’s plugin directory does, but almost every meaningful app comes with its own monthly fee stacked on top of your base subscription. A store running five or six paid apps can end up paying more per month in app fees than in the base plan itself, which is worth budgeting for before you commit.
Wix, Squarespace, and other closed builders
Wix and Squarespace target smaller catalogs and simpler stores. Drag-and-drop editing makes them approachable for a first-time store owner, but customization options are limited compared to WordPress, and neither scales well past a few hundred products without hitting friction.
Comparison table
| Platform | Ownership | Monthly cost | Best for | Customization |
|---|---|---|---|---|
| WordPress + WooCommerce | Full (self-hosted) | Hosting + extensions only | Store owners who want long-term control | Very high |
| Shopify | Hosted, rented | $39–$399+ | Fast launch, no server management | Moderate |
| Wix eCommerce | Hosted, rented | $17–$35 | Small catalogs, first-time sellers | Low to moderate |
| Squarespace Commerce | Hosted, rented | $23–$65 | Design-first, content-heavy shops | Moderate |
For the rest of this guide, we’ll focus on WordPress and WooCommerce, since it’s the platform most store owners choose when they want a shop they actually own and can extend as the business grows.
How to create an online shopping website step by step
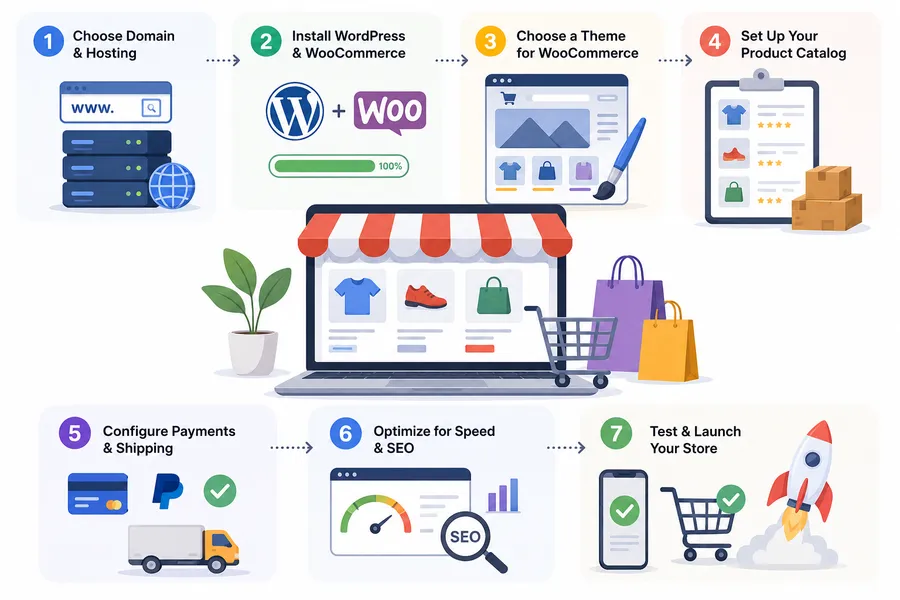
This is the part most people actually search for: how to make an online shopping website from a blank domain to a live store taking orders. Here’s the process in order.
Step 1: Choose a domain and hosting plan
Pick a domain name that’s short, easy to say out loud, and free of hyphens or numbers if possible. For hosting, avoid the cheapest shared plans if you’re serious about eCommerce website building. WooCommerce stores need more server resources than a basic blog because every product page, cart update, and checkout action queries the database. Managed WooCommerce hosting (SiteGround, Hostinger, WP Engine) handles server-level caching and security patching for you, which matters once you start getting real traffic.
Step 2: Install WordPress and WooCommerce
Most hosts offer one-click WordPress installs. Once WordPress is running, go to Plugins > Add New, search for WooCommerce, and activate it. The setup wizard that appears next asks for your store’s address, industry, and whether you’re selling physical products, digital products, or both. Answer honestly here, since it changes which shipping and tax options WooCommerce surfaces later.
Step 3: Choose a theme built for WooCommerce
Not every WordPress theme handles product grids, variation swatches, and cart pages correctly out of the box. A theme built specifically for WooCommerce will already have templates for shop pages, single product pages, and cart/checkout flows, which saves you from custom-coding those views yourself. Always confirm the theme’s changelog shows recent updates and lists which WooCommerce version it was tested against, since WooCommerce ships frequent updates and an outdated theme is a common source of broken checkout pages.
If your business plans to sell online courses alongside physical or digital products, it’s worth looking at ThimPress’s Eduma theme. It’s built for WordPress sites that combine an online school with WooCommerce, so you can sell course access and physical merchandise from the same install without stitching together two separate platforms.
Whichever theme you land on, check it in the Customizer before committing to it. Swap the header color, upload a placeholder logo, and change the font, and watch how quickly the preview updates. A theme that reloads the whole page for every small change usually means a heavier, slower codebase underneath, which shows up later as sluggish product pages once the store is live.
Step 4: Set up your product catalog
Go to Products > Add New for each item, and set up product categories and attributes before you add dozens of listings, not after. Attributes (size, color, material) let WooCommerce generate variations automatically instead of you creating a separate product for every combination. Write actual product descriptions instead of copying manufacturer text word for word; duplicate content across the web hurts both your SEO and your credibility with shoppers comparing multiple stores.
For a catalog larger than fifty or so products, build the category structure on paper first. Decide how many levels deep your categories go (a “Shirts” category nested under “Men’s Clothing” nested under “Clothing” is usually as deep as a shopper wants to click), then create the categories in WooCommerce before importing or adding products, so every item lands in the right place from the start instead of getting reorganized later. If you’re migrating from an existing spreadsheet or another platform, WooCommerce’s built-in CSV importer under Products > Import can bring in hundreds of listings at once, including images, prices, and stock levels, as long as the column headers match WooCommerce’s expected format.
Step 5: Configure payments and shipping
Under WooCommerce > Settings > Payments, enable at least one gateway (Stripe and PayPal cover most markets). Under the Shipping tab, set up shipping zones based on where you actually ship, and decide whether you’re charging flat rates, weight-based rates, or offering free shipping above a threshold. Test every payment method with a real card in test mode before launch; a broken checkout is the single fastest way to lose a sale you already won.
Tax setup deserves its own pass. WooCommerce can calculate tax automatically through an extension like WooCommerce Tax or a third-party service, but the base rates and rules still need to match your local requirements, especially if you sell across state or country lines with different thresholds for when tax collection kicks in. Get this wrong and you either undercharge and eat the difference, or overcharge and lose trust at the exact moment someone’s about to pay.
Step 6: Optimize for speed and SEO
Install a caching plugin, compress your product images before uploading them (large, uncompressed photos are the most common cause of slow product pages), and set up an SEO plugin like Rank Math or Yoast to handle your meta titles, sitemaps, and schema markup. Google’s Core Web Vitals directly affect ranking, and Largest Contentful Paint (LCP) under 2.5 seconds is the benchmark to aim for on your product and category pages.
Product schema markup matters more for an eCommerce online shop than it does for a blog. When a search engine can read your price, stock status, and star rating directly from your page’s structured data, that information can show up right in the search results as rich snippets, before a shopper even clicks through. Most SEO plugins add basic product schema automatically once WooCommerce is active, but it’s worth checking Google’s Rich Results Test on a live product page to confirm the markup is actually valid, not just present.
Step 7: Test and launch
Place a real test order, check that confirmation emails send correctly, verify your tax calculations against your local rules, and check the mobile checkout flow specifically, since most shopping traffic now arrives from phones. Run the same test order using at least two different browsers and a real phone, not just a resized desktop browser window, since mobile Safari and Chrome handle checkout forms differently in ways a simulator won’t catch. Once everything checks out, switch WooCommerce out of test mode and you’re live.
E commerce website building best practices
Getting a store live is one thing. Building it so it holds up under real traffic and actually earns trust is another.
Mobile-first layout
Design and test every page on a phone screen first, not last. Product images, the add-to-cart button, and the checkout form all need to work with a thumb, not just a mouse.
Page speed as a sales feature, not a technical detail
Every second of load time costs conversions. Compress images to WebP format, limit the number of active plugins to what you actually use, and choose a host with server-level caching built in rather than relying only on a caching plugin.
Security and trust signals
Use an SSL certificate (most hosts include this free now), display your return policy and contact information clearly, and keep WooCommerce, WordPress core, and all plugins updated. Outdated plugins are one of the most common ways store sites get compromised.
Clear, honest product pages
Real product photos from multiple angles, straightforward sizing or spec information, and visible shipping timelines build more trust than polished stock photography. Shoppers comparing your e commerce online shop against a competitor’s tab open in another window will pick the site that answers their questions fastest.
How to make an online shopping website that converts
A technically solid store can still fail to sell if the path from homepage to checkout is confusing. A few adjustments make a measurable difference:
- Put your search bar somewhere visible on every page, not buried in a menu.
- Show shipping cost and estimated delivery date before checkout, not after, since surprise costs at the last step are the top reason shoppers abandon carts.
- Offer guest checkout. Forcing account creation before a first purchase is friction most new shoppers won’t push through.
- Add customer reviews on product pages. Social proof next to the buy button consistently outperforms reviews buried on a separate tab.
- Keep your checkout to as few steps as your payment gateway allows. Each additional form field is a chance for someone to give up.
- Show trust badges (secure checkout icons, payment provider logos) near the buy button, not just in the footer. Shoppers glance for reassurance right before they commit to entering card details.
- Use real customer photos where possible instead of only studio shots. A product photographed in someone’s actual kitchen or worn on a real body reads as more trustworthy than a perfectly lit catalog image alone.
Common mistakes in e commerce website building to avoid
A few mistakes show up over and over in new stores, and most of them are avoidable with a bit of planning before launch.
- Skipping mobile testing until the end. Building the desktop version first and checking mobile last is backwards, since most shoppers arrive on a phone. Design and test mobile as you go, not as a final checklist item.
- Too many plugins. Every extra plugin is more code loading on every page, more potential for conflicts, and one more thing to keep updated. Install only what the store actually needs, and remove anything you tested and decided not to use.
- No backup before major changes. Updating a theme, switching plugins, or changing hosting without a fresh backup first is how stores lose weeks of product data in a single bad update. A backup plugin running on a daily schedule, stored off-server, costs almost nothing and saves everything when something breaks.
- Ignoring abandoned carts. Most shoppers who add something to a cart don’t finish the purchase in that session. Without an abandoned cart email or a simple retargeting setup, that traffic is gone for good instead of coming back to finish the order.
- Launching without a returns policy visible. Shoppers who can’t find a clear returns and refund policy before checkout are more likely to abandon the purchase entirely, especially for anything above a low price point. Put it somewhere easy to find, not buried in the footer under six other links.
Growing your e commerce shop after launch
Launch is the starting line, not the finish. Once the store is live, track which product pages get traffic but low conversions (a sign of pricing or trust issues, not traffic issues), watch your cart abandonment rate in WooCommerce’s built-in analytics, and set up abandoned cart emails if your theme or an extension supports them. Revisit page speed every few months as you add products and plugins, since both tend to creep up over time and quietly slow the site back down.
If you’re expanding into education or training content alongside your product catalog, that’s another place a theme like Eduma pays off: it’s built to run WooCommerce and LearnPress side by side, so course sales and product sales share the same WordPress install, the same customer accounts, and the same reporting dashboard instead of living on two disconnected systems.
FAQs
How much does it cost to build an eCommerce website?
A WordPress and WooCommerce store typically costs between $200 and $2,000 to set up, depending on hosting, theme, and whether you hire a developer, plus ongoing hosting costs of roughly $10 to $50 a month. Shopify stores run $39 to $399 a month depending on plan, with no separate hosting cost since it’s bundled in.
Can I build an online store without coding knowledge?
Yes. WooCommerce, Shopify, and Wix are all designed for store owners without a development background, using visual setup wizards, drag-and-drop page builders, and pre-built themes. Coding only becomes necessary for custom features beyond what a theme or plugin already offers.
Is WooCommerce or Shopify better for a new store?
WooCommerce suits store owners who want full ownership of their site and lower long-term platform costs, while Shopify suits owners who want hosting and security handled for them in exchange for a monthly fee. Neither is universally better; the right choice depends on how much server management you’re willing to take on yourself.
How long does it take to build an online shopping website?
A basic WooCommerce store with a pre-built theme and a modest product catalog can go live in one to two weeks. A custom-designed store with unique features, a large catalog, or third-party integrations typically takes four to eight weeks from start to launch.
Conclusion
Ecom web development isn’t a single decision, it’s a sequence of smaller ones: the platform you build on, the theme you choose, how you set up products and payments, and how carefully you test before launch. WordPress and WooCommerce give you the most control over that whole process, and with a theme built for the job, most of the heavy technical setup is already handled for you. Get the foundation right and everything you build on top of it, from your first product page to your hundredth, gets easier.
Read more: How to Choose a Nonprofit Website Builder
Contact US | ThimPress:
Website: https://thimpress.com/
Fanpage: https://www.facebook.com/ThimPress
YouTube: https://www.youtube.com/c/ThimPressDesign
Twitter (X): https://x.com/thimpress_com