Online marketplaces like Amazon, AliExpress, Etsy, and eBay are well-known and widely used websites where buyers and sellers can do business. You likely have experience with one or more of them. And if you wish to create an online marketplace using WordPress, you are on the right track. WordPress is a fantastic option for building a platform where buyers and sellers can communicate and trade.
A multi-vendor site, also known as an online marketplace website, enables users to purchase and sell products by setting up their own small shops on your eCommerce platform. Multi-vendor websites have grown in popularity due to their low overhead costs.
In this article today, let’s learn how to create a WordPress online marketplace without breaking the bank.
Create an Online Marketplace using WordPress: What Do We Need?
WordPress is available on two platforms: WordPress.com and WordPress.org. WordPress.com is known as a restricted blog hosting service, while WordPress.org – the most famous platform – is a self-hosted WordPress.
And of course, you should try WordPress.org since it gives you complete control and access to all WordPress features right away.
So what do you need to build an online marketplace using WordPress?
- Domain name ($14.99/year) (for example, thimpress.com)
- Web hosting account ($7.99/month) (where you store the content and files of your websites)
- WordPress.org (Free) (use to create any kind of website)
- SSL certificate ($69.99/year) (to process an online transaction)
- WooCommerce plugin (free) (to turn your website into an eCommerce site)
- Online marketplace add-on
After taking a look at all the tools you need, it’s time to create an online marketplace using WordPress.
How to Create an Online Marketplace Using WordPress
Now, we will go step by step together to create an online marketplace using WordPress
Step 1: Create Your Online Store Platform
Firstly, you need to purchase a domain name and a web hosting service. You will require more than just web hosting because we will be using WooCommerce hosting as our online store.
As you can see, buying a domain name, web hosting, and SSL separately can be expensive.
That’s why you should go for Bluehost which gives you a domain at no cost for one year, a free SSL certificate, and a free CDN for only $2.95 per month
Once you have bought your hosting plan, you can start to build a WordPress site with WooCommerce installed on it.
However, unlike Etsy and eBay, WooCommerce does not allow other users to automatically add their own products and services to your website.
Let’s fix this.
Step 2: Switch Your WooCommerce Site to an Online Marketplace Using WC Vendors Plugin
The WC Vendors plugin is required and must be activated in this step. If you are a beginner in WordPress, you can refer to our comprehensive guide on how to install a WordPress plugin.
WC Vendors is a marketplace plugin for WooCommerce. It makes building a marketplace website easier by converting WooCommerce into a multi-vendor website.
You can use a free version of WC Vendors, but we use the pro version in this guide to show the complete features you need for an online marketplace.
As the marketplace owner, each vendor can sell their online products while you retain complete control of the website. You have complete control over your business model, payment gateways, different products, and other aspects.
After you activated WC Vendors, go to your WordPress Dashboard -> WC Vendors -> Settings -> General and tick on the Vendor Rergistration checkbox so users can sign up as vender on your eCommerce site.
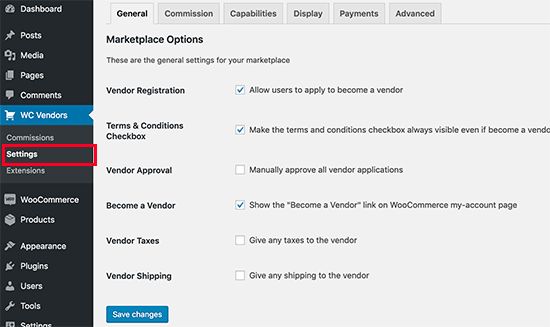
There are some other marketplace options, such as Become a Vendor, Terms & Conditions Checkbox, and more. You can enable them if it’s needed, and don’t forget to save your changes.
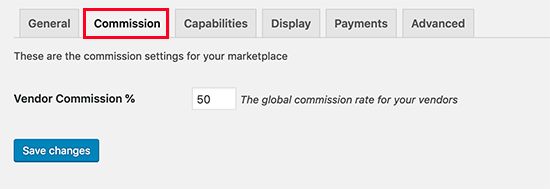
Now, go to the Commission tab to set your vendor commission on your website. This is the amount you’ll pay to the vendor for each sale.
Keep in mind that: The global commission rate can be changed for specific vendors and products.
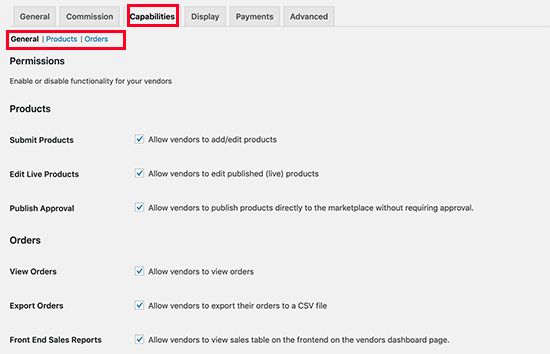
Next, click on the Capabilities tab, where you can establish global rules for vendors. It has three sections to set up.
In the General section, you can enable your vendors to add products, edit published (live) products, and publish products without requiring approval.
Plus, it’s possible to allow your vendors to view orders, export orders, and view sales table on the frontend on the vendors dashboard page.
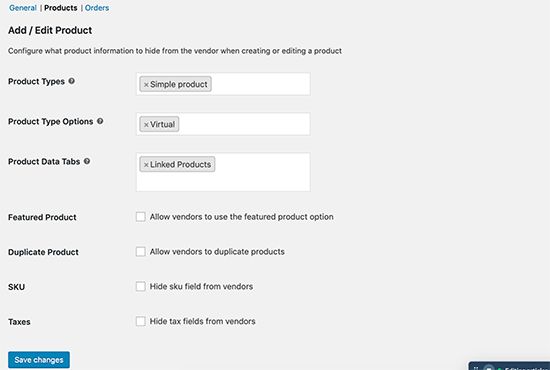
In the Products section, you can select product types, product type options, and product data tabs that vendors can create and view. You can enable vendors to use the featured product or a copy of it. You can conceal SKU or taxes from vendors.
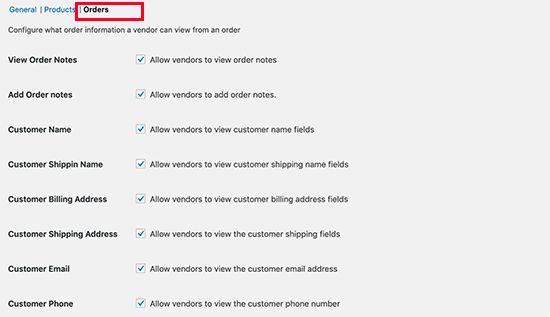
The Order section is about order information. A vendor can view or add order notes, see the customer’s shipping name, know the customer’s billing/shipping address, the customer’s email, or the customer’s phone number. It all depends on your settings.
Once the capabilities are configured, move to the Display tab to set up pages. Simply navigate to Pages -> Add New to build a new page for each item, and paste the shortcode given under each dropdown into the page’s content area.
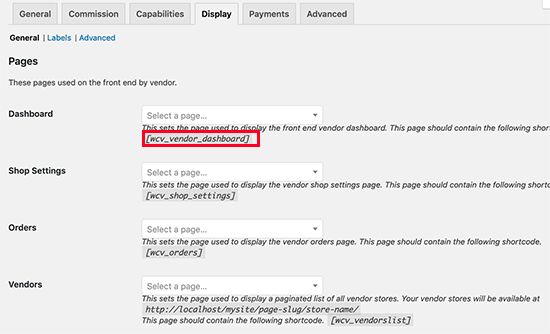
Simply return to the Display tab after creating pages with these shortcodes.
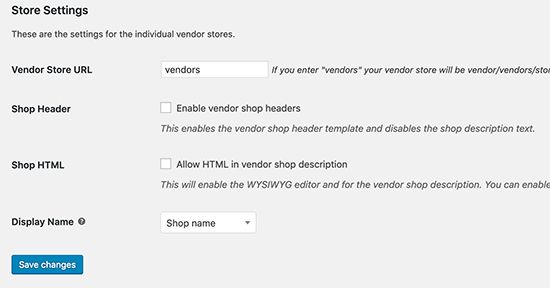
Now, you need to scroll down to find the Store Settings part on the same page. Here you can set for the individual vendor stores such things as vendor store URL, shop header, shop HTML, and display name.
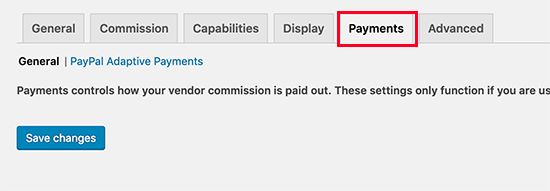
Then, you need to set up payments for your vendors by going to the Payment tabs. A minimum amount is required for vendors to get paid on most marketplace websites, and they receive payments every month or week.
We suggest paying vendors manually because it gives customers more time to give feedback or request refunds for the products.
You can get paid add-ons for a payment withdrawal system for vendors, though. WC Vendors provides add-ons for Stripe, MangoPay, Escrow, and Manual Payouts.
Enter your API keys to configure a payment gateway that matches your choice. Don’t miss clicking on the Save Changes button to keep your settings.
After setting up WC Vendors successfully, let’s configure WooCommerce to work with multiple vendors.
Step 3: Enable Account Management in WooCommerce
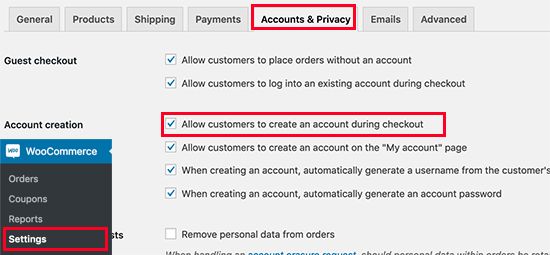
Back to your Dashboard -> WooCommerce -> Settings and find the Accounts & Privacy tab. To create an account, you must select all options and save your changes.
Step 4: Set Up Navigation Menus
After completing the setup of your multi-vendor marketplace, let’s set up navigation menus.
That requires you to go to your admin dashboard and find the Appearance -> Menus page. Select My Account and Checkout pages to add to the menu and click Save Menu.
If you don’t find a My Account page, you can easily create one in WordPress and add the shortcode in the post editor.
[woocommerce_my_account]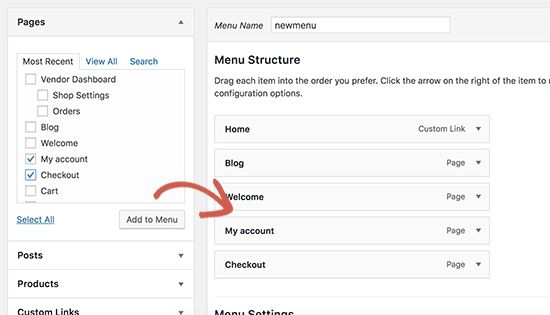
Step 5: Run a Test on Your Marketplace Website
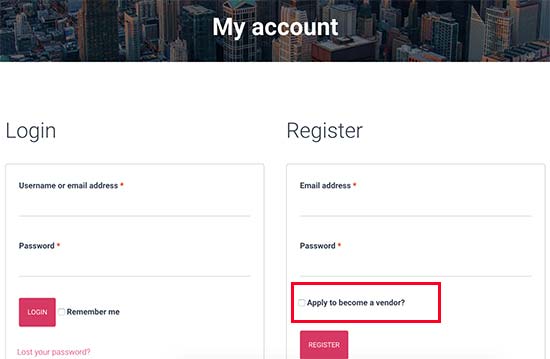
Simply visit your online marketplace site and go to My Account to create a new account.

The vendors have the option to create an account and enter their accounts from your website.
You will be notified via email when a user creates a new account.
If you want to see new vendor applications, you can go to Users -> All Users to check it. You can approve or deny that Pending Vendor too.
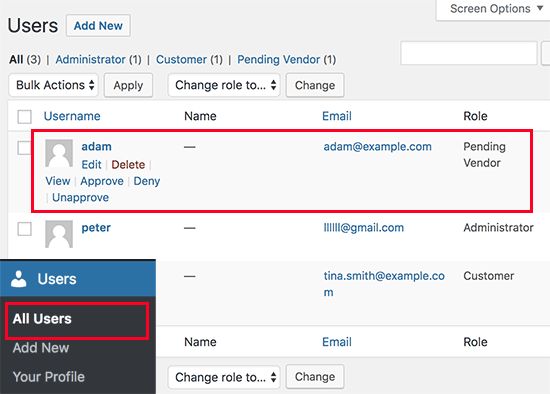
If you approve it, that vendor can log in, and then add new products, and see their orders and sale reports.
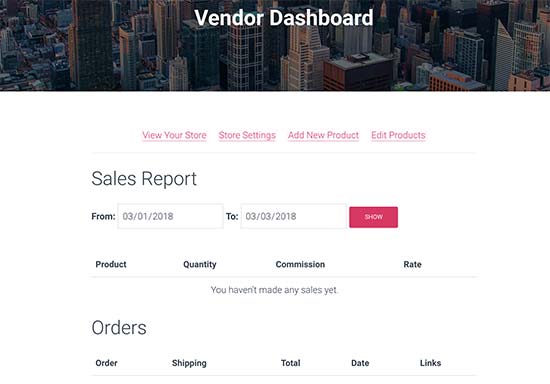
Your vendors need to set up their store settings by clicking on the Store Settings link first.
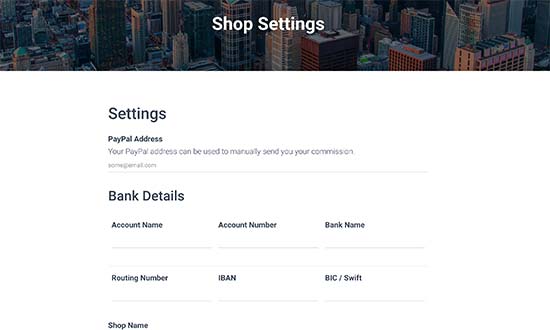
They must enter their PayPal or Stripe email address to transact, depending on which payment method you set up. In addition, they should provide bank account information for direct manual payments.
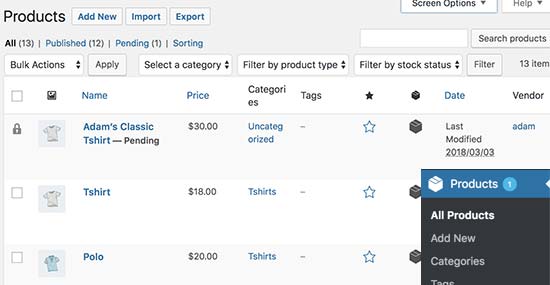
A notification email and an icon next to the products menu will appear once a vendor adds a new product. You can then edit, approve, or delete a product.
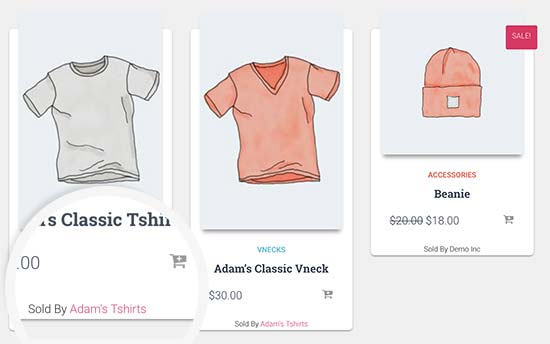
On your shop page, you will see the products sold by the vendor’s shop name.
Step 6: Take your Online Marketplace to the Next Level
To grow your online marketplace, you might need a beautiful design that is eCommerce-ready. Don’t worry! You can pick the best WooCommerce themes and install one of them quickly.
Following that, you should consider adding new features to your website, such as a membership community.
You’d want to keep track of which products are getting the most attention and which vendors are bringing in the most customers. Enabling customer tracking in WooCommerce on your site is needed.
The most difficult challenge in growing any eCommerce website is increasing profits through abandoned cart sales.
Conclusion
That’s all. We hope that by reading this article, you have gained some valuable insights on how to create an online marketplace using WordPress, the most popular and versatile website platform in the world.
Read More: Beginners Guide: How to Install WordPress Theme (Step-by-Step)
Contact US | ThimPress:
Website: https://thimpress.com/
Fanpage: https://www.facebook.com/ThimPress
YouTube: https://www.youtube.com/c/ThimPressDesign
Twitter (X): https://x.com/thimpress_com


