Are you setting up your LearnPress LMS website and facing issues with payments? Many beginners get stuck when configuring LearnPress Payment Gateway settings. Without a proper setup, your students cannot buy courses, subscriptions, or memberships.
This guide will walk you step by step through the correct way to configure PayPal, WooCommerce, Stripe, and other LearnPress payment gateways. We tested these settings on the Eduma theme—the best-selling Education WordPress Theme on ThemeForest—but you can apply the same process to any LearnPress-compatible theme such as IvyPrep, Coaching, or StarKid.
By the end of this article, you will:
- Understand how LearnPress handles payments.
- Know how to fix common errors (login/registration, checkout page not set up).
- Learn how to enable PayPal Standard.
- Add WooCommerce payment gateways like Stripe, Authorize.net, or bank transfer.
- Explore separate LearnPress add-ons for more options.
- Set up subscriptions and memberships using Paid Memberships Pro.
Let’s dive in.
Eduma – Education WordPress Theme
We provide an amazing WordPress theme with fast and responsive designs. Let’s find out!
Why Payment Setup Matters in LearnPress
When you create an online learning website, setting up your LMS is only half of the job. The real goal is to sell your courses online. Payment issues can stop students from completing purchases and hurt your business.
LearnPress is flexible. You can:
- Use built-in gateways like PayPal.
- Extend functionality with WooCommerce add-ons.
- Enable third-party gateways such as Stripe or Authorize.net.
- Offer subscriptions and memberships for recurring income.
The correct payment setup ensures a smooth student experience, higher conversions, and fewer support requests.
The Correct Way to Set Up Payment for LearnPress
After you install a WordPress Theme – Eduma, with a 1-click demo import feature, you can open your dashboard admin to start setting up payment methods now.
Step 1: Fix Login and Registration Issues
But before doing it, try to view your theme first. There will be a “Buy this course” button for students to buy your courses. However, your education website should have the “Register” button so that students can register, sign up, and then log in to your site. If not, you will only see the login box with no registration option.
It’s simple by opening your dashboard admin -> find Settings on the left sidebar -> choose General -> Membership and tick on the Anyone can register box.
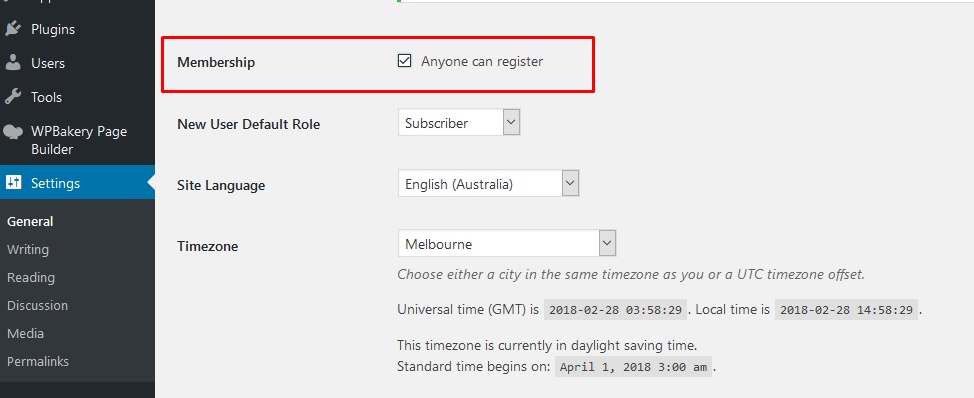
So now you can click on the Buy this course button and our system will ask you to sign up or log in before continuing the next steps.
Step 2: Fix the Checkout Page Error
However, your user will meet another error after they log in. It said, “Checkout page hasn’t been set up or the page does not exist”. In another case, you can see “The following required page(s) are currently missing: Checkout Page. To ensure all functions work properly, please click here to create and set it up automatically” in your dashboard.
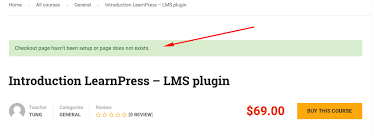
The reason you have this error is that you have not set up the checkout page yet.
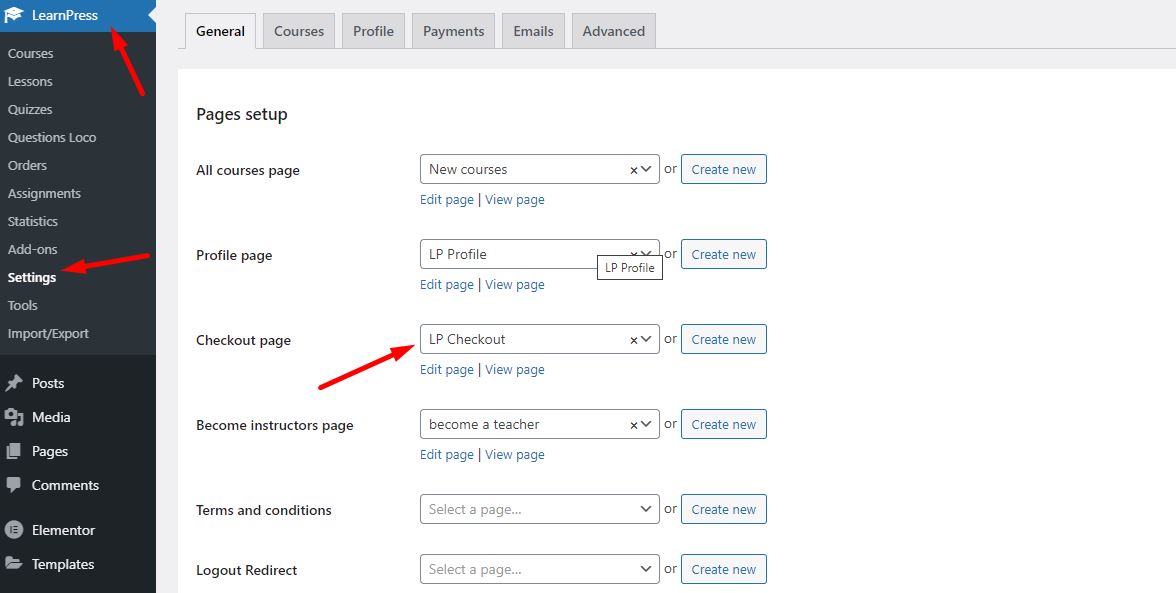
You can fix this issue easily by opening your dashboard -> LearnPress -> Settings -> and clicking the General tab. In the Page Setup, find the Checkout page -> and choose the “LP Checkout” option. After that, those errors will disappear automatically.
Step 3: Set Up PayPal Payment Gateway
PayPal is a LearnPress Payment Gateway integration in the theme package. You can set it up quickly by choosing the Payments tab in LearnPress settings and selecting PayPal.
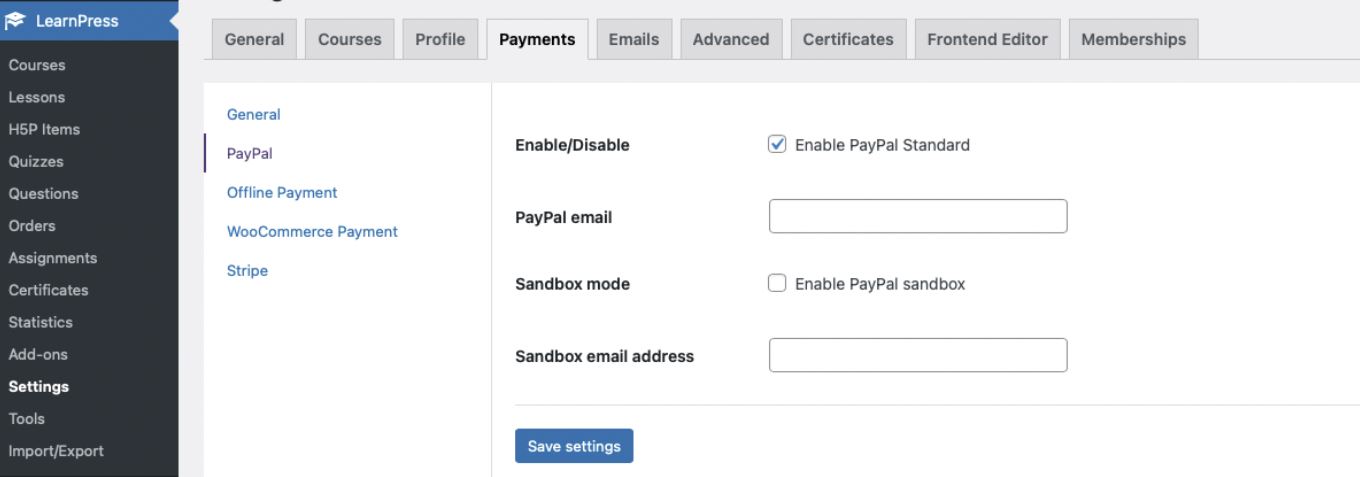
It allows you to enable or disable PayPal Standard. Plus, you should add your PayPal email to receive your course payment directly using the PayPal gateway. There is the Sandbox Mode. You can enable this feature by adding a Sandbox email address to test the payment system.
After that, remember to Save Settings so all changes are saved.
In addition, PayPal is the main built-in payment gateway for LearnPress. So if your students have no PayPal account, it’s not a problem. They can purchase your courses with a credit card using PayPal.
Once you set up the PayPal gateway in the correct way, you can tick the “Enable Guest Checkout” box. Hence, students can click on the “Buy this course” button, and they will be led to the basic PayPal payment to pay for their online course.
Step 4: Use WooCommerce for More Payment Options
Apart from PayPal, you can add another LearnPress Payment Gateway like a WooCommerce addon to give more payment options for students. They can purchase your courses with Stripe, Authorize.net, offline payment, bank transfer, etc.
So how to install the WooCommerce add-on?
As shown above, we use Eduma here so you can find WooCommerce Payment right in the WordPress dashboard.
Simply open your Dashboard -> Eduma -> Plugins -> WooCommerce LearnPress Payment Add-on. Just install & activate it.
However, if you use other themes that are not from us, you can install our WooCommerce add-on too. It’s one of the add-ons of LearnPress.
After all, you can find the Payments tab in LearnPress settings. Then click on WooCommerce Payment to set up according to your requirements. You can enable/ disable WooCommerce payment or configure payment gateways for your website such as direct bank transfer, cash on delivery, check payment, or PayPal standard.
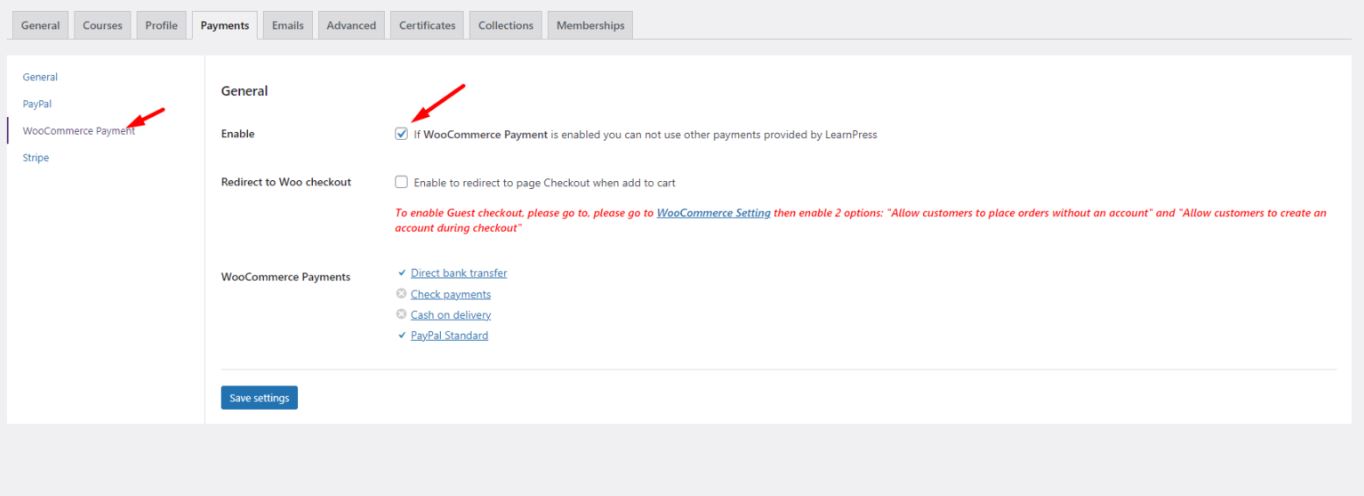
You can test your WooCommerce payment with a few clicks as well. You’ll find the Add to Cart button, choose one of four payments, and see instructions to complete your payment process.
Note: You need to enable Guest Checkout for WooCommerce so your guest can purchase your courses with ease.
Open your Dashboard -> WooCommerce -> Setting -> Enable both options:
– Allow customers to place orders without an account
– Allow customers to create an account during checkout
Step 5: Add Stripe and Other Payment Gateways
By the WooCommerce default, you can find only 4 WooCommerce payments. However, it’s possible to add other payment methods, for example, LearnPress Stripe Payment Gateway, Voguepay, Eurobank, PayU, or even cryptocurrency payment.
To add these payments, you can go to WordPress.org -> plugins -> search for the payment you want which integrates with WooCommerce.
Most of them are free to download and install with a click.

Set up Payment without WooCommerce – LearnPress Payment Gateway
WooCommerce is the most famous option to create payment gateways. However, not all of us like to use it. There are some reasons that people want to use separate payment gateways so we provided additional methods for LearnPress Payment Gateway addons without adding WooCommerce:
In addition, you can find our LearnPress add-ons right on the WordPress dashboard if you use our education themes. You can go to Dashboard -> Theme -> Plugins to see all add-ons, just like the WooCommerce Payment add-on we have tried above. If not, you need to click on each add-on link to purchase and install it.
Step 6: Set Up Memberships and Subscriptions
Along with the Customised Code for Payment Gateway Integration in LearnPress, you can use the Paid Memberships Pro add-on to create membership plans, set up monthly payments, manage subscriptions, and so on.
If you just need a membership or subscription service, you can use the free Paid Memberships Pro version on WordPress.org. You also can refer to our article for LearnPress and Paid Memberships Pro integration to add membership plans in LearnPress for your education website.
Step 7: Troubleshooting Common Payment Issues
Even after setup, you may face some problems. Here are solutions to the most common:
- Students cannot register: Check Membership → Anyone can register in General Settings.
- Checkout page missing: Assign “LP Checkout” in LearnPress → Settings → General.
- PayPal not working: Make sure your PayPal account is Business, not Personal.
- WooCommerce errors: Check that your WooCommerce add-ons are up to date.
- Stripe test fails: Verify API keys are copied correctly (live vs test keys).
Comparison: PayPal vs WooCommerce vs Stripe in LearnPress
| Feature | PayPal (Built-in) | WooCommerce Integration | Stripe Add-on |
|---|---|---|---|
| Setup | Very easy | Moderate | Easy |
| Global Coverage | High | Depends on plugins | High |
| Payment Methods | PayPal + Credit Card | Bank, COD, Check, PayPal, More | Credit/Debit, Apple Pay, Google Pay |
| Recurring Payments | Limited | Yes (with extensions) | Yes |
| Fees | Standard PayPal fees | Varies per gateway | Stripe fees (2.9% + 30¢ per transaction) |
FAQs
1. Can I use LearnPress without WooCommerce?
Yes, you can. PayPal works without WooCommerce, and you can install standalone add-ons like Stripe or Authorize.net.
2. Does LearnPress support subscription payments?
Yes, with the Paid Memberships Pro add-on, you can create recurring plans.
3. How do I fix the “Checkout page missing” error?
Go to LearnPress → Settings → General → Page Setup and assign “LP Checkout”.
4. Can students pay without creating an account?
Yes. Enable Guest Checkout in both LearnPress (PayPal) and WooCommerce.
5. Which payment method is best for beginners?
PayPal is the easiest to start with. Stripe is best for credit card flexibility. WooCommerce is best for multiple gateways.
6. Is Stripe safe for LearnPress payments?
Yes, Stripe is PCI-compliant and widely trusted for online payments.
7. Can I use cryptocurrency with LearnPress?
Yes, via WooCommerce extensions, but it is recommended only for advanced setups.
Final Thoughts
Hopefully, you can connect LearnPress Payment Gateway with your theme and set up the payment you want to your website. LearnPress is a great choice for an LMS or education website that everyone should use. It’s flexible and powerful with different add-ons to upgrade your site to the next level.
Read More:
Paid Memberships Pro: Membership Plugin for Learnpress
10 Best LearnPress Compatible Themes
Uncover The 5 Best Online Course Themes for LearnPress
Contact US | ThimPress:
Website: https://thimpress.com/
Fanpage: https://www.facebook.com/ThimPress
YouTube: https://www.youtube.com/c/ThimPressDesign
Twitter (X): https://x.com/thimpress_com

